Butter Crumb Coffee Cupcake

so how do you like your coffee? Strong or light? Decaf? Well this cake would please all! (: Unless you are the kind that only drinks espresso. haha Then well, you can add more coffee to this recipe and you will also be happy!

Thanks to Eat and Be Happy, I got to come across this recipe and being a big fan of both coffee and streusel. I tweaked the recipe a little but the texture of the cake with the combination of the crumble – it’s SOO GOOD! (:

Have this with a cup of tea or coffee, make a perfect tea snack. (:

so here’s the recipe.

Continue reading

Melting Moments with Lemon Buttercream

ever wanted to make something that takes really little time and yet tastes so good that you would squeeze in time just to make them?

Having more time on my hands now, all I want to do is bake. haha so cupcake one day, today cookies!

to be honest, I was never a cookie person (baby is!) normally my cookies don’t come out good. but this one is simple enough to taste yumms!

so give it a try! (: Then you won’t have to pay $2 (or more) for one at a cafe! haha

Continue reading

A Cupcake That Brings Back Memories

What is your favourite snack when you were little?

I had many : sweets, chocolates, cookies, ice cream, jellies, chocolate, sweets, cookies. haha

but one of my favourites and also one that I still love now (but keeping it in control) is the oreo cookie! (:

so how do you eat your oreo?

Do you…

1) Twist it gently, lick off the cream and enjoy the chocolate cookie after

2) Dip into cold milk and allow it to soften 9doesnt take long!) and put it in your mouth, allowing it to dissolve slowly.

3) Just throw it in whole!

Well. I’m a number two! haha my favourite is dipping it in cold milk. Absolutely divine. hehe

the only way I will have my oreo whole. haha (: love it!

but I decided to do something else with the oreo cookie today

Decided to use it to make cupcakes!

I searched and searched and chance upon this blog that had the most yummy looking cupcake so I decided to use her recipe. Thanks Lucy!

just so happen I broke it and left the whole word there! (: love it!

I had alot of fun crushing the oreos. it was kinda therapeutic! hehe and I used more than what the recipe asked for. Just cause. (:

so here’s the recipe!

Continue reading

Roasted Black Sesame Macarons

my second try
and it’s still not successful.
i dunno what’s wrong anymore. haha. (:
but i will give it another shot another time!
my shells just not rise like they should!

oh wells. hehe
if u got tips on this please feel free to let me know!
cause I really wanna get it right. hehe

got this recipe from a blog i regularly read (:
Muffins are Ugly Cupcakes
how cute is the name of the blog? hehe

so before trying it for the second time
i read around to see if people could help me not fail. haha
so I microwaved my egg whites for 10sec in a medium heat microwave to get all the water out.
I also toasted the almond meal and the grounded black sesame in the oven at 140 C° for 10mins (:

besides that.
i followed Felicia all the way.
(Thanks for the recipe btw!)

Recipe :

1 cup confectioners’ sugar
3/4 cup ground almonds
1/4 cup finely ground black sesame
6 tablespoons egg whites (I just used 3 egg whites)
Pinch of salt
1/4 cup granulated sugar

i processed the icing sugar to make sure there were no lumps.

then I added the toasted almond meal and black sesame and processed it as well.

I whipped the egg whites and slowly adding the sugar
until you get soft peaks.
Add the dry ingredients to the egg whites and start folding.
I put my dry ingredients half at a time. Makes things easier.

mine seems too thick now (the first attempt. it was too thin haha)
i should have a flow-like-magma consistency.

Pipe the macaron batter onto baking paper.
Top off with some sesame seeds to make it prettier

Bake at 320F (160C) for 12 mins.
and let it cool (:

cause it was a fail attempt
i didn’t make any buttercream to sandwich it with.
I will hold that till I get the perfect shells. hehe

help anyone?

chocolate salted-caramel mini cupcakes

I promised myself that once all the school madness is over.
I will bake something to unwind (:
and I did! hehe
been wanted to try this recipe for ages.
and i did.
mine didn’t turn out as yummy as I thought it would be.
though it looks pretty haha.

i think the icing just taste of butter, sadly.
and my salted caramel didn’t stay in the middle of the cupcake.
it got absorbed by the cupcake for some reason
maybe it was too thin haha.

ah wells. (:
it’s still quite good.
baby said he likes it.
hopefully it taste better when it’s been put in the fridge!

so here’s the recipe!
(adapted from Bake or Break)

Cupcake

1 1/2 cups of plain flour
3/4 cups dutch cocoa
1 1/2 cups of caster sugar
1 1/2 tsp baking soda
3/4 tsp baking powder
3/4 tsp salt
2 large eggs
3/4 cup buttermilk
3 tbs vegetable oil
1 tsp vanilla extract
3/4 cup warm water

Steps :

1. Preheat oven to 350° (175 C°).
Line mini muffin pans with paper liners.

2. Whisk together flour, cocoa, sugar, baking soda, baking powder, and salt.
Add eggs, buttermilk, oil, vanilla, and water. Using an electric mixer on low speed, mix until smooth.

3. Fill muffin pans about 2/3 full.
Bake about 15 minutes, or until a toothpick inserted in the center comes out clean.
Cool in pans on wire racks about 10 minutes. Remove cupcakes to wire racks to let cool completely.

4. Cupcakes can be stored overnight at room temperature or frozen in an airtight container for up to a month.

Salted-Caramel Filling

2 1/2 cups sugar
2/3 cup water
1tbs light corn syrup
3/4 cup heavy cream
2 1/2 tsp sea salt

Steps :

1. Heat sugar, water, and corn syrup in a heavy saucepan over high heat.
Stir occasionally until syrup is clear. Attach a candy thermometer to side of pan.
Stop stirring, and cook until syrup comes to a boil, washing down sides of pan with a wet pastry brush as needed.

2. Boil, gently swirling pan occasionally, until mixture is caramelized and temperature just reaches 360°.

3. Remove from heat. Slowly pour in cream and stir with a wooden spoon until smooth.
Stir in sea salt. Use immediately. If caramel begins to harden, reheat gently until pourable.

4. Use a paring knife, cut a cone-shaped piece, about 1/2-inch deep, from the center of each cupcake.
Spoon 1-2 teaspoons of warm filling into each cupcake. Sprinkle a pinch of sea salt over filling.


Dark Chocolate Frosting

1/2 cup plus 1 tablespoon unsweetened Dutch-process cocoa powder
1/2 cup plus 1 tablespoon boiling water
2 & 1/4 cups unsalted butter, room temperature
3/4 cup confectioners’ sugar, sifted
1/4 teaspoon salt
1 & 1/2 pounds semi-sweet chocolate, melted and cooled

Steps :

1. Combine cocoa and boiling water. Stir until cocoa has dissolved.

2. Using an electric mixer on medium-high speed, beat butter, confectioners’ sugar,
and salt until pale and fluffy. Reduce speed to low and add melted and cooled chocolate.
Beat until combined. Beat in cocoa mixture.

3. Frosting can be refrigerated up to 5 days or frozen up to 1 month.
Bring to room temperature and beat on low speed until smooth before using.

4. Fit a pastry bag with a medium open-star tip (Wilton #18).
Fill pastry bag with frosting. Pipe onto cupcakes, swirling tip and releasing as you pull up to form a peak.
Garnish with a pinch of sea salt.

5. Cupcakes are best eaten the day they are filled and frosted.
Store at room temperature in an air-tight container until ready to serve.

i think it’s the prettiest I’ve made.
just wish it was yummier and made me go WOW. haha
but it was still good! (:

Pavlova : First Attempt !

Instead on working on my thesis
(which i really should haha just so tired of it)
I decided t try making a pavlova
which baby has been craving for.
so it’s a win-win. kinda. hehe.

found a recipe on Joy of Baking and it looks really good! hehe
so I decided to give it a shot.
well. it didn’t turn out as well as I hoped for.
it was flat. haha
and not high and thick like how it looked on the website.
but it still tasted pretty good i must say
baby had 2 servings! haha
so it must not be that bad. hehe

the center was chewy and it was crispy on the outside.
just like how a pavlova is suppose to be.
now I just need to try and get it to be thick and not spread out after being placed on the parchment paper.
any hints or suggestions?
would love to hear from your past experiences!

so here’s the recipe.
hopefully, the next time I try it
would be better! hehe

ingredients :

Meringue Cake
120g egg whites (from 4 eggs)
100 grams of caster sugar
1 teaspoon of white vinegar
1/2 tablespoon of corn starch

Topping
240ml thickened cream
1 1/2 tablespoon of caster sugar
1/2 teaspoon of vanilla

Fresh fruit of our choice (I used mango and passionfruit)

Steps :

1. Preheat oven to 250 degrees F (130 degrees C) and place rack in center of oven.
Line a baking sheet with parchment paper and draw a 7 inch (18 cm) circle on the paper.

2. In the bowl of your electric mixer, with the whisk attachment,
beat the egg whites on medium-high speed until they hold soft peaks.
Start adding the sugar, a tablespoon at a time, and continue to beat until the meringue holds very stiff peaks.
(Test to see if the sugar is fully dissolved by rubbing a little of the meringue between your thumb and index finger.
The meringue should feel smooth, not gritty.
If it feels gritty the sugar has not fully dissolved so keep beating until it feels smooth between your fingers).
Sprinkle the vinegar and cornstarch over the top of the meringue and, with a rubber spatula, fold in.

3. Gently spread the meringue inside the circle drawn on the parchment paper,
smoothing the edges, making sure the edges of the meringue are slightly higher than the center.
(You want a slight well in the center of the meringue to place the whipped cream and fruit.)

4. Bake for 1 hour 15 minutes or until the outside is dry and takes on a very pale cream color.
Turn the oven off, leave the door slightly ajar, and let the meringue cool completely in the oven.
(The outside of the meringue will feel firm to the touch, if gently pressed,
but as it cools you will get a little cracking and you will see that the inside is soft and marshmallowy.)

5. Just before serving gently place the meringue onto a serving plate.
Whip the cream in your electric mixer, with the whisk attachment, until soft peaks form.
Sweeten with the sugar and vanilla and then mound the softly whipped cream into the center of the meringue.

6. Arrange the fruit randomly, or in a decorative pattern, on top of the cream.
Serve immediately as this dessert does not hold for more than a few hours.

ENJOY!

Triple Banana Double Caramel Mini Cupcakes

I chanced upon this recipe when I was blog surfing
Thanks to Baking Obsession for sharing this recipe! (:
it’s awesome.
I think it’s the first time my cupcake turned out quite pretty! haha
However, my size of a mini cupcake was way smaller than the one that is on her recipe.
and i forgot to adjust the time to leave it in the oven.
should have taken it out after 10mins. haha
but it’s not that bad.
still pretty yum!
and baby says it’s not too sweet surprisingly! hehe
so im glad.
and if Cheok who isn’t a big fan of sweet stuff popped like 3 or 4 before dinner
(maybe he’s just hungry! haha)
it must be quite good. i hope! heh

so here’s the recipe and step by step photos!
ENJOY!


For the cupcakes:

2 cups all-purpose flour
¾ tsp baking soda
¼ tsp baking powder
½ tsp salt
1 ½ cups banana puree (about 3 large bananas)
½ cup sour cream
2 tbsp dark rum (I used 2 tbsp of apple juice)
1 ½ tsp pure vanilla extract (I used 1 tsp vanilla bean paste)
1 stick (4 oz; 113g) unsalted butter, at room temperature
½ cup granulated sugar
½ cup packed light brown sugar
2 large eggs

For the banana-caramel filling:

1 cup sugar
¼ cup water
½ whipping cream, hot
2 tbsp sour cream
1 medium ripe banana, mashed
1 tsp lemon juice

For the caramel frosting:
1 ½ cups granulated sugar
½ cup water
1 ½ sticks (6 oz; 170g) unsalted butter at room temperature
¼ cup sour cream
1 tbsp dark rum (I used 1 tbsp apple juice)
2 tsp pure vanilla extract (I used 2 tsp vanilla bean paste)
¼ tsp kosher salt
1 lb cream cheese (454g) at room temperature
Banana chips for garnish

Make the cupcakes:

1. Center an oven rack and preheat the oven to 350F.
Fit parchment mini-cupcake liners into mini-cupcake molds.
Spray the liners lightly with oil spray.


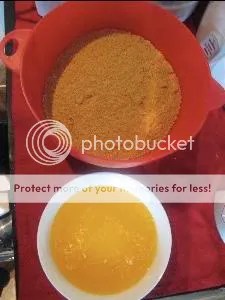
2. Sift the dry ingredients onto a sheet of parchment paper or into a bowl.
In another bowl, combine the banana puree, sour cream, apple juice, and vanilla extract.

3. In a large bowl, beat the butter with an electric mixer for a few seconds, until creamy.
Gradually add the sugars and beat until light and fluffy, 6 to 7 minutes.
With the mixer on medium, add the eggs, one at a time, beating well after each.
Reduce the speed to low and add the dry ingredients in three additions alternating with the banana mixture,
starting and ending with the dry ingredients.
Scrape the bowl as necessary, and beat only enough to incorporate the ingredients after each addition.


after the first addition of flour


after the second addition.
getting thicker


ready to be baked! (:

4. Transfer the cake batter into a large pastry bag fitted with a large plain tip
and pipe the batter into the prepared molds filling them about ¾-full.
This is the easiest way to equally divide the batter between so many mini-muffin molds.
Although you can also use a spoon.


ready for the oven

5. Bake the cupcakes for about 18 to 20 minutes, until puffed and a cake tester comes out clean.
Cool the cupcakes for 5 minutes on a cooling rack, then unmold and completely on the rack before filling and frosting.
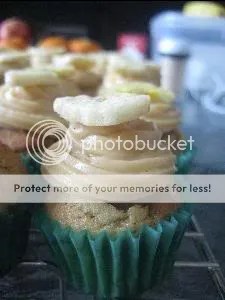

all done!


my cupcakes were really small!


I could make 69 cupcakes instead of the 3 dozen that was suggested by Baking Obsession!
haha cos mine were that small!

Make the banana-caramel filling:

6. Stir together the sugar and water in a high-sided medium saucepan.
Cook, stirring occasionally, until the sugar dissolves,
then raise the heat to moderately high and boil without stirring,
occasionally brushing down the sides of the pan with a wet pastry brush,
until the syrup turns deep amber in color.


turning amber soon!

7. Immediately remove the pan from the heat and slowly pour in the cream,
stirring gently but carefully with a wooden spoon.
Wait until the bubbles subside, then whisk in the sour cream, banana puree, lemon juice, and salt.
Cool and refrigerate. Any leftovers can be warmed and used as a caramel sauce whenever you need it.


Make the caramel frosting:

8. Stir together the sugar and water in a high-sided medium saucepan.
Cook, stirring occasionally, until the sugar dissolves,
then raise the heat to moderately high and boil without stirring,
occasionally brushing down the sides of the pan with a wet pastry brush,
until the syrup turns deep amber in color.

9. Immediately remove the pan from the heat, stir in the butter, sour cream, apple juice, and salt.
Transfer to a bowl and let cool, stirring occasionally with a wooden spoon, until just slightly warm.

10. With the paddle attachment of a stand mixer or with the hand-held electric beaters,
beat the cream cheese and vanilla until lump-free and smooth.

11. Gradually, in a thin stream, beat in the caramel.
Mix until well combined, scraping the sides of the bowl as needed.
The consistency should be somewhat of softly whipped cream.
Cover with plastic wrap, pressing it directly over the surface.
Refrigerate until firm enough to pipe, at least for a couple of hours, or better – overnight.


ready to be refrigerated for at least for a couple of hours

12. To fill the cupcakes, cut out a small, round, fennel-like hole with a sharp paring knife in the top of each cupcake.
Enjoy the scraps right away.
Transfer the banana caramel into a small sealable plastic bag,
snip a corner, and pipe about a half-teaspoon of the caramel into each cavity.
Don’t overfill the cupcakes, or the caramel will leak and cause the frosting to slide off.

13. To frost the cupcakes, transfer the frosting into a piping bag fitted with a large star tip
and pipe a rosette over the top of each cupcake.
Refrigerate to firm up the frosting.
Remove the cupcakes from the fridge 30 minutes prior the serving time.
The cupcakes can be made a day in advance and kept in the refrigerator in an air-tight container.
Garnish with the banana chips close to the serving time, so the chips wouldn’t lose their crispness.

It does take a bit of time.
But these little things are quite yummy
and having one wouldn’t be THAT sinful! haha (:
hope you guys enjoy this!

Broccoli and Cheese Cupcake with Avocado Cream

This has been a big hit in my family
and I bake it for my grandma and my cousins.
I think it’s a great way to make kids eat their veggies! haha
cause my youngest cousins love them to bits!

I made this during the bake sale at House last year.
and this won me the first prize badge. haha (:
I was shocked at the final result
but I was really happy that everyone liked it!

(the theme was green, my fav : Broccoli and Cheese cupcake with avocado cream,
Molten mud Chocolate cupcake with mint meringue and Green tea tiramisu)

it was 1 out of the three cupcakes I made.
and the judges were very amused with a savoury cupcake
and what more with veg and cheese in it! haha
it would have been better if it’s hot.
but yes. It’s easy and simple
and you guys can give it a try!

Ingredients :
15 broccoli florets, steamed and cooled
4 cups  all-purpose flour
1/4 cup  sugar
4 teaspoons  baking powder
1 teaspoon  salt
2 cups  milk
2 eggs (extra large)
1/2 cup  oil
3/4 pound  shredded cheddar cheese

Avocado Cream :

1 very ripe avocado
1 tablespoon cream cheese
1 tsp lemon juice

Steps :

1. Preheat oven to 425 degrees (220C°).

2. Mash the avocado or blend it in a food processor, add the cream cheese and lemon juice and mix till smooth.
Put it in the fridge for 30mins or until it is needed.
(Remember to put it in the fridge as it might turn brown upon exposure to the environment.)

3.In the bowl of an electric mixer, combine flour, sugar, baking powder, and salt.
Add milk, eggs, and oil and beat (starting at low speed and changing to high after flour is dampened)
just enough to moisten the dry ingredients.

4. Put the chopped broccoli pieces and cheese into the batter and mix gently by hand.
Batter will be somewhat lumpy and sticky. Spoon batter into pans about 2/3 full.
Bake in 400 degree (200C°) oven for approximately 20 minutes or until toothpick inserted in center comes out clean and dry.

5. You can either pipe it on top of the cupcake or you can cut a cone shape out and pipe it in the cupcake.

Enjoy it while it’s hot! (:

Japanese Cheesecake

Saw this on Maria’s blog a while ago
and I have been wanting to make this for the longest time (:
and since I wanted to take a break from the typing of essays. haha.
(rather. just wanted to slack off a little)
I decided to bake it!
and I’m so glad I did. it turned out pretty good besides the cake sinking in a little.
but it still remained fluffy and light!

My mum use to get these on weekends when i was young
cause it was a family favourite! haha
I guess now we don’t have to buy it anymore.
I can bake for them to enjoy! (:
SUPER awesome!

so if you’re craving for cheesecake
but want to have it kinda guilt free (without the buttery base)
give this a try! I think it’s something everyone would like!


Ingredients :

7 ounces (200g) cream cheese, at room temperature
1/4 cup whole milk
1/2 cup caster sugar
3 eggs, seperated
1/4 cup cornstarch
2 tablespoons lemon juice
1/2 teaspoon cream of tartar
Boiling water

Steps :

1. Preheat oven to 170 degrees celcius and spray a 9-inch cake tin with cooking oil spray.

2. Beat cream cheese with milk to soften.
Add half of the sugar, egg yolks, cornstarch and lemon juice.
Beat till smooth.

3. Beat egg whites in a seperate bowl until foamy.
Gradually add remaining sugar and cream of tartar,
beating on high speed until soft peaks form.
(About 8-10mins)

4.Gradually fold beaten egg whites into the cream cheese mixture, stirring gently.

5. Pour into the cake pan and smooth the surface.
Place the cake pan into a larger roasting pan and place in lower rack of oven.
Pour enough water into the roasting pan to come halfway up the side of the cake pan.

6. Bake for 35-40mins, until a pick inserted in the middle of the center comes out clean.

can you see the wrinkles? haha
the cake sunk in a little. oopsie.

but still nice and fluffy and light on the inside! (:

i couldn’t stop at one slice. haha i needed to have 2!

YUMMY! (:

jelly hearts ♥


♥  on a plate. made with love.

I’ve made these a few times now.
but Baby never had a chance to try them
cos I made them last year when we were a million km away from each other. hehe
so i decided to make some for him to try!
and since I bought strawberries from our visit to Costco that day.
it was the perfect timing to make it! (:

see the HUGE box of Philly cream cheese and the HUGE block of unsalted butter?
I got them at Costco! hehe
I LOVE THE PLACE!
cos it’s buying in bulk and buying them at a cheaper price!
and the strawberries were cheap and super sweet.
just awesome (:


(pic stolen from Peggy’s album haha sorry babe!)

see the block of butter in comparison to Peggy’s face?
haha. SUPER huge right?
yes. I wasn’t overemphasizing the HUGE at all. haha

the cream cheese and the butter were bigger than the box of digestives for the first time!

now that I got the “logistics” explained. haha
here is the recipe so you all can enjoy!

Ingredients :

Base
320g digestive biscuits
160g melted butter

Filling
250g cream cheese
2 1/4 tsp gelatine powder
70g sugar
150ml hot water
1/2 tsp vanilla essence
20 medium sized strawberries

Topping (Jelly)
1 packet (170g) strawberry flavoured Jell’o
1 1/2 cups hot watr
1 1/2 cold water

Steps :

Base

1. Crush biscuits and stir in melted butter
2. Divide and press onto the base of the try. Chill for 15mins or until needed.

3. Prick base with the back of a skewer (I used a fork) before pouring in the filling.

Filling

1. Using a small heart shaped cutter (1″) and cut hearts out of the strawberry halves.
Place on a plate lined with paper towel.


(and don’t worry. the left over strawberries are not wasted! you can use it in your smoothies!)

2. Place gelatine and sugar in a bowl.
Pour boiling water over and stir until gelatine has dissolved.
If it doesn’t dissolve completely, place this bowl over a bigger bowl filled with boiling hot water.

3. Cream the cream cheese and vanilla essence together.
Add the gelatine syrup gradually and cream until smooth.
Pour into tray(s).

4. Place 20 hearts on each try, partially submerged in the cheese.
(I refrigerate the cream cheese for 15 mins before submerging the strawberries.
Just so they don’t sink in all the way).

Refrigerate until firm about 2 hours.

Topping

1. Dissolve Jell’O in boiling water. Add cold water and stir well.

2. Cool completely before pouring over the cheese filling.
(Try and pour really slowly and over the strawberries instead of the cheese so that the jelly stays clear)

3. Refrigerate for at least 4 hours before serving.

a row of ♥s. (:

we have a bit to last us for the week!

Baby’s verdict : it’s damn good la! haha. WHEEEE!