Shrooms Delish

Shrooms Delish

Happy Mid Week dearest readers! (: I hope your week has been going well and we’re not too far from the weekend (and a long one for those in Melbourne & Tassy! Woohoo!) I’ve got some exciting news to share with all of you! I was recently contacted by Keep Left and was asked to be part of this fun recipe campaign with Bakers Delight! Without much hesitation, I agreed to it! Fortunately the time line wasn’t too rush, so I had the weekend to try out what I wanted to create.

Ingredients

We were allowed to create a recipe for lunch with our choice of any Bakers Delight bread and I decided to head to their website to see what they had to offer and the choices were endless! There were SO MANY different kinds of bread and I haven’t really said this before, but my weakness is definitely freshly baked bread! Mmmmm (:

Pipe loaf (wholemeal)

After much consideration, I decided to go with the pipe loaf! It totally got my attention cause it was my first time seeing a loaf in a shape of a cylinder! How cute is that??? I tried to think of what I could do with it, but couldn’t really visualise until the bread loaves were delivered! The moment I saw it, I knew exactly what I wanted to make!

top view : shrooms delish

Many of you would know that brunch is no doubt my favourite meal of all time so of course, I decided to make something that could be enjoyed for both brunch or lunch. I walked along the aisles of the supermarket (and thankfully I was given a $20 Coles voucher to get ingredients! hehe) and I decided on something a little different from my usual choices, I decided to go meatless! Don’t get me wrong, I still love my smoked salmon and crispy bacon, but I decided to try something a little different, plus I was craving for some mushrooms!

top - fried egg and crispy enoki

Instead of just the usual white button mushrooms, I decided to buy a whole variety of them! I didn’t stop at just shiitake mushrooms, I wanted to have some asian influence in the dish as well. It’s amazing how many varieties there are in the mushroom area at all the supermarkets now, and even the asian ones! I couldn’t be happier! (:

middle - mushroom ragout and avocado salsa

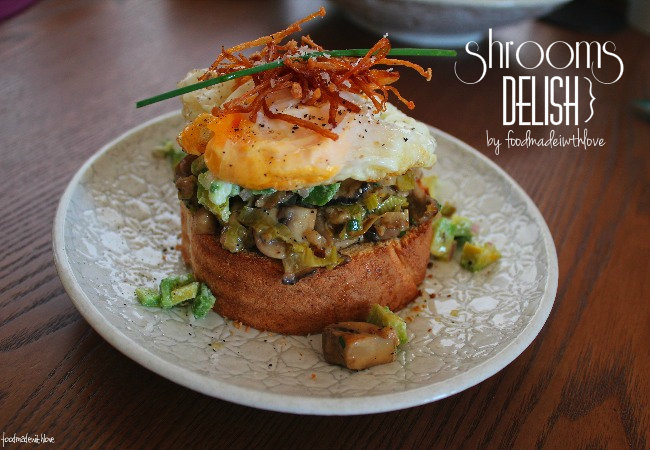
To add a little freshness to the dish, I decided to top with some avocado salsa as well!

bottom - wholemeal pipe loaf

To top it all off, I added a fried egg (with a runny yolk) and some crispy enoki mushrooms for some crunch! I am one who loves dishes with different textures, so the crunchy enokis were a must! hehe And of course, all these sat on a nice thick slice of the wholemeal pipe loaf which was so soft in the middle, and had a good crust after being toasted for 5 minutes in the oven! Of course, you could easily do this on any other thick toast, but I thought the round dimensions made the presentation a little prettier. hehe and yes, the plate from Made In Japan helps too! I’m really lucky that the Mr bought me some during the recent sale.

So here’s my recipe for my creation : Shrooms Delish ! Hope you all will enjoy it as much as the family did! (:

Shrooms Delish (a Food Made With Love original creation, serves 4)

For the mushroom ragout :

6 fresh shiitake mushrooms, thinly sliced

150g pearl mushrooms

8 white button mushrooms, quartered

1/2 leek, halved lengthwise and thinly sliced

2 cloves of garlic, chopped

50g butter

2 tbs water

5 sprigs of fresh chives, finely chopped

2 tbs creme fraiche

salt & pepper, for seasoning

For the crispy enoki mushrooms :

100g enoki mushrooms

vegetable oil, for deep frying

For the avocado salsa :

1 ripe avocado, roughly chopped or mash

1/4 red onion

4 pieces of sundried tomatoes, finely chopped

1 tbs olive oil

4 eggs, fried sunny side up

Pipe loaf, sliced into 1-inch slices

1 clove of garlic, peeled and left whole

Truffle oil, for garnish (optional)

Steps :

1) For the mushroom ragout : In a heavy-based pan, melt half of the butter over medium heat. Add the garlic and leeks, and allow them to sweat and soften, stirring continuously. Do be careful not to burn it, as it will turn bitter. Add the mushrooms and fry till they get soft and tender. Add the rest of the butter and water, allow the mixture to simmer for 10 minutes and until the flavours have developed, and the sauce has thickened. Season with salt and pepper, then turn the heat off. Add in the chives and creme friache and stir it till well combined. Set it a side while preparing the other components.

2) For the crispy enoki : In small pot, add the vegetable oil and heat it over medium-high heat. Add the enoki mushrooms (in batches) and fry till they are golden and crispy. Remove from the oil, and place them on some paper towel to absorb the excess oil.

3) For the avocado salsa : In a large bowl, add the avocado, chopped red onions and sundried tomatoes with the olive oil and give it a good stir. Season with salt and pepper and set a side.

4) For the toast : In a preheated oven, toast the bread for 5 minutes, or until the bread is nice and crispy on the outside with a little golden brown on top. When you take it out of the oven, rub the clove of garlic on the bread, so that you have an instant garlic bread base!

5) To plate : Place the thick toast on a plate, then add the mushroom ragout, followed by the avocado salsa. Slowly place the fried egg on top of the stack, and top it off with some crispy fried enoki mushrooms. I garnished with a sprig of chive and season with salt & pepper. Just to be a little more indulgent, I drizzled a bit of truffle oil on top, but it’s totally optional.

Shrooms Delight

Hope you enjoy my creation! (: Have a great week and weekend ahead!

Remember to always cook and bake with love! 

PS : I want to thank Bakers Delight & Keep Left PR for this amazing opportunity! 

Cheesy Bubble & Squeak

Cheesy Bubble & Squeak

Have you ever made dinner for a party and have left over mash and vegetables that you are not too sure what to do with? Making bubble & squeak with the leftovers make a delicious meal the day after. And I assure you, you would always want to have leftovers for every party after you’ve tried making this! (: Always good to not waste food yes?

The Mr is a huge fan of bubble & squeak and the first time he had it was at Galleon Cafe at St Kilda and would order it when he sees it on a menu ever since! I’ve been meaning to make it for him for the longest time but whenever the weekend comes, I always decide to cook something else! haha

Bubble & Squeak from Mr Hive's

Recently at a good friend’s wedding lunch, I tried the yummiest bubble & squeak that made me crave for more even after a few days so I had to try to make it! This one from Mr Hive’s Kitchen & Bar was slightly different, and had cheesy bites to it, so I decided to make a cheesy bubble & squeak too! hehe and to add some protein, I fried a sunny-side up to go with (:

Cheesy bubble and squeak with sunny side up

Cheesy Bubble & Squeak (Adapted from Gino D’Acampo on Let’s Do Lunch with Gino and Mel)

4 potatoes (400g), small cubes and boiled

300g mixed vegetables (any kind you fancy or have leftover)

2 streaks of bacon, diced

1/2 onion, finely chopped

1 clove of garlic, finely chopped

50g butter

1 tbs thickened cream

1 tsp worcestershire sauce

1 tsp tabasco

1/2 tsp garlic salt

2 tbs grated parmesan

1/4 cup of mozzarella cheese, shredded

freshly ground black pepper, to season

2 eggs

Truffle oil and chopped parsley, for garnish (optional)

Steps : 

1) Drain the potatoes after their boiled, and add the butter, thickened cream and garlic salt and lightly mash them with a hand masher. I like to leave some chunkier pieces so that it gives the dish more texture, but if you prefer it smooth, then just mash the potatoes till a mash potato texture. Transfer the potatoes into a large metal bowl and set aside.

2) In a frying pan, fry the bacon till brown and crispy, then add the chopped onion and garlic till fragrant. Add the mixed vegetables and fry till tender. Pour mixture over the potatoes.

3) To the potato and vegetable mixture, add the worcestershire sauce, tabasco, parmesan cheese and black pepper. Mix it till well combined and place the mixture into 2 terracotta pots and top with mozzarella cheese. Put it under the grill till the cheese melts and turns golden brown (about 5-10 mins).

4) As the bubble & squeak is grilling, fry 2 sunny side ups and place on top of each terracotta. Garnish with some chopped parsley and drizzle some truffle oil if you have some in the pantry.

Half eaten bubble & squeak

Dig in and enjoy! (:

Remember to always cook and bake with love! 

Wantons in Chilli Oil & Vinegar (红油抄手)

Wantons in Chilli Oil & Vinegar

Wantons. Don’t you just love them? I can’t get enough of them! I love them in soups, with noodles and even on it’s own. Steamed, boiled and fried, gimme gimme! I love it when it is really stuffed to the max, and all you need is a few to fill your tummies. Recently, I went back to Food Republik with my dearest Peach Water, and decided to try their wantons in chilli oil and vinegar.

Wantons in Chilli oil and vinegar from Taiwan - Shilin Night Market

Wantons in chilli oil and vinegar in Taiwan - Shilin Night Market

(Photo from my Taiwan trip in 2009, please excuse the blurry picture of the food, I think I was too excited and hungry haha)

The first time I had these were at the Shilin Night Market in Taiwan itself. Let me tell you, it’s a small bowl of yummy-ness! Silky smooth wantons, with flavoursome stuffing, chopped lettuce and a sauce that I still can’t replicate. It had chilli oil, sesame oil, vinegar and a nutty paste (might either be sesame paste or peanut). Just so so good! And because it’s so small, I could easily slurp down 2 bowls! haha

Wantons in chilli oil & vinegar from Food Republik

These from Food Republik were quite yummy too! Although they didn’t have the same sauce, but a really good balance of chilli oil and vinegar! They also garnished with crushed peanuts and coriander. All I needed was a bowl of these wantons and the popcorn chicken. My belly was very happy! (:

Rows of handmade wantons

So a few days after having them. I was somehow craving for more. So instead of going down all the way to Boxhill, I decided to make my own version of it. I have to say, mine wasn’t anywhere close to the ones from Taiwan, but it was pretty similar to the one from Food Republik. Hooray! (:

I think the next time I will try to add a bit of sesame paste just to get the nutty flavour through the sauce. Lucky thing I made heaps of wantons, and because I only eat 4 each time (cos they are ginormous haha) so I could slowly try different versions! But if you’re a fan of the combination of spicy with a sour kick, do give these a try! I’m pretty sure you’ll be hooked! Even though the wantons take a while to make, but it’s actually a pretty fun process and you’ll realise there are many ways to fold your wantons! Mine is just one of which (:

Cross section of the wanton

Wantons in Chilli Oil & Vinegar (An Original Recipe of FoodMadeWithLove)

Wantons 

250g mince pork

100g fish paste

8 prawns, finely chopped

4 shitake mushrooms, soaked and diced finely

20g dried shrimp, soaked and finely chopped

3 cloves of garlic, finely chopped

2 tbs fish sauce

1 tbs soy sauce

1 tbs sesame oil

1 tbs oyster sauce

1 tsp ground white pepper

1 heap tsp corn starch

1 stalk of spring onion, finely chopped

Wanton wrappers

Sauce (for 4 wantons)

1 tbs chilli oil* (I used 老干妈)

1 tbs black vinegar*

1 tsp sesame oil

1 tsp oyster sauce

toasted sesame seeds, chopped peanuts & fried shallots (for garnish)

Steps :

1) For the wantons : In a frying pan, fry the dried shrimp and garlic till fragrant. Set aside. In a large metal bowl, add all the ingredients as well as the fried dried shrimp and garlic and mix till well combined.

2) Place a portion on a wonton wrapper, wet the two sides with water and fold it into half. Press all the air out and stick the two ends together.

Steps to making wantons

3) In a pot of boiling water, drop the wantons in and cook for 8-10 minutes or until the wantons start floating at the top. Drain and set a side.

4) In a small bowl, combine the sauces together until well combined. Place the wantons on top of the sauce and garnish with toasted sesame seeds, peanuts and fried shallots.

Wantons in chilli oil & vinegar

5) Give it a good mix to make sure the wantons are coated with the sauce and soaking in all the good stuff! ENJOY!

* Note : I do love spicy food and I love my black vinegar too, so do give it a taste after mixing the sauces and adjust accordingly to what you fancy!

Remember to always cook and bake with love ! (:

Oven-fried Chicken

Fried chicken. How could you not like fried chicken? I would happily chow down two without much thought! haha But what could be better than fried chicken? Oven-fried chicken of course! Anything to make it feel a little less sinful than the oil-fried version. Just so you could enjoy it guilt-free. Definitely a win-win, if you ask me! (:

I chanced upon this recipe on Everyday Maven, and was coincidentally craving for something fried. It’s really quick and easy as well! Even though it’s baked, the chicken is so crunchy with every bite! The mr and I are addicted to it! We had it twice in a week. Definitely gonna make this for my family at the end of the year.

The chicken pieces were coated with crushed melba toast. I have to admit, I’ve heard of melba toast a number of times, but never really tried it or used it to cook. These were mini toasts that were baked and they were really amazing! Unlike normal bread crumbs, these ensures that the coating remains crunchy and not get soggy even after being baked. Would definitely not hesitate to use melba toast in the future! hehe

And what goes well with fried chicken? A side of kipfler and broccolini salad of course! Of course if you want to keep to the healthy-theme, you could always have it with a side of salad. Your tummies will still be satisfied. (: So I urge you to give this a try, you will never need to feel bad about have fried chicken ever again! hehe

Oven-fried Chicken (adapted from Everyday Maven)

800g chicken pieces (skin removed)

1 box of Melba toast (5-ounce/142g), crushed

1/2 tsp garlic salt

3/4 tsp ground black pepper

1/2 tsp cayenne pepper

3/4 tsp hot paprika

1/2 tsp dried oregano

1/4 cup kewpie mayonnaise

1 tbs Dijon mustard

Steps :

1) Place the melba toasts in a zip lock bag. Using a rolling pin, crush them till they are relatively fine, leaving some little pebbles for texture and maximum crunchiness. You could also place them in a food processor, but be careful not too completely pulverize them.

2) Add the garlic salt, black pepper, cayenne pepper, paprika and dried oregano into the zip lock bag and give it a good shake. Pour the seasoned crumbs into a plate.

3) In a separate bowl, mix the kewpie with the dijon mustard and mix till well combined.

4) Preheat the oven to 200 degrees celcius. Coat each piece of chicken with the mayo mixture (just enough to lightly coat) and roll it in the melba toast crumbs. Make sure the chicken pieces are covered well and evenly.

5) Place the chicken pieces on a cooking rack and place in the oven to bake for 40 minutes.

Enjoy it with a side of your choice! (: Don’t worry, I didn’t only have one piece. hehe I couldn’t resist another (or two)! Have a great weekend everyone!

Remember to always cook and bake with love!

Kong Ba (Twice-Cooked Pork Belly)

I have a weakness. Pork belly is my weakness. There’s just something about tender meat that melt-in-your-mouth the moment it touches your tongue. I never really use to like eating the fatty bits of the pork belly. I remember when I did marketing, I used to look for the piece that had less fat and more meat. But now, I look for equal proportions haha. The mr has changed me for the better. I didn’t know what I have been missing! And now when we are back in Singapore, we would meet Stephie for a meal of fatty pork! Can’t wait till the end of the year! (:

After the mr’s family went back, we had heaps of food left in the freezer and I needed to clear it or I won’t be able to buy other things! I opened the freezer and saw a container of sliced pork belly. Immediately, I knew what I wanted to cook – kong ba (twice-cooked pork belly). Nothing beats slow braised pork belly that is caramelised till the meat is soft and easily breaks apart. YUMS!

Traditionally, you would eat it with a soft steamed bun. But I was too lazy to head out to Springvale to get it and found some man tou in the fridge so I steamed that instead. Though it’s not as soft as the traditional buns, they worked well too! Plus, to off-set the unhealthy fatty bits, we had it with lettuce! This is the epitome of a balanced diet haha (:

Do note that usually, you would use a whole slab of pork belly and slice it up after, but mine was already sliced up. To me, there wasn’t much difference, in fact I think it works better and you don’t have to risk burning your fingers to slice them up later. But either way, you’ll have yummies in your tummies!

Kong Ba (adapted from  To Food With Love)

1kg pork belly (either whole or sliced)

1/2 tsp thick caramel black soy + 4 tbs extra

2 shallots, thinly sliced

5 cloves of garlic, finely chopped

1/2 tsp five-spice powder

2 tbs light soy

1 tbs honey

2 tbs sugar

1/2 star anise

1 tsp sesame oil

2 cups water

bunch of coriander, roughly chopped and separate into 2 portions

ground white pepper

Vegetable oil, for deep frying

Steps :

1) Boil a large pot of water and boil the pork belly for 15-20 minutes. Remove and rinse the pork under cold water before patting them dry. Allow it to cool slightly and rub the skin with 1/2 tbs of thick caramel dark soy.

2) In a frying pan, heat enough vegetable oil on medium heat. Be careful not to heat it too high. Carefully lower the pork belly into the oil and fry till the skin is crisp (about 5 minutes). Do be very careful as there will be a very big splatter, use a splatter screen to avoid being burnt. Take the pork belly out carefully and drain off the excess oil using paper towel. (If you use a whole slab of pork belly, slice the pork belly to 1/2 inches thick after it has cooled down.)

3) In a large metal bowl, add the rest of the caramel thick dark soy, light soy, honey, sugar, star anise, five-spice powder, garlic, shallots and sesame oil and mix till well combined. Add the fried pork belly and marinade for at least 30 minutes.

4) In a medium sized pot, add 1 tbs vegetable oil and fry the pork belly until they are seared well. Add the rest of the marinade and top it with 2 cups of water. Cover the pot and bring it to a boil, then lower the heat to low and simmer for 1 1/2 hours. Add half of the coriander (including the stems) and continue to simmer for 1/2 hour. Check occasionally and turn the pork to make sure it is evenly covered in the sauce. The pork should be tender and the liquid should be reduced to a thicker consistency. Season with ground white pepper. Garnish with the rest of the coriander before serving with hot steamed buns and lettuce!

Enjoy! (:

Remember to always cook with love!

Baked Eggs With Homemade Baked Beans

Really sorry for the inactivity for the past two weeks! We had my mr’s family over for a holiday and I took the chance to have a break and just spend quality time with the family. (: But I’m back and this time with a brunch recipe as a form of my apology to share with everyone!

So it’s the weekend! One thing we love to do is have brunch. Be it having it out or home. A dish that I love to order when I head out for brunch with the mr is no doubt baked eggs. The best thing about it is when the yolk is still runny and combines with the tomatoey baked beans to become the perfect sauce for me to dip my bread into it and enjoy every single bite. mmmm! So I decided to try and make it for the mr (and more recently, his family) for brunch at home.

And to be a little over indulgent (as I always like to go all out with my meals haha) I love topping the baked eggs with some sauteed chanterelles, with a side of buttery croissant and some crispy bacon! PERFECT! (: I couldn’t be happier with how it turned out. Although I have to say, I always tend to get the eggs a bit overdone and only got it done perfectly once! So I have alot of respect for the cafes that always get it spot on! *bows*

I also got a bit adventurous and decided to make my own baked beans from scratch and it turned out easier than I thought! And trust me, once you try making them from scratch, you won’t really buy the tin ones anymore. Definitely worth the extra 20 mins! Also, you can layer your baked eggs with your favourite ingredients. The first time I made it, I added capsicum. The second time I made it, I added corn and spinach!

I found these beautiful baking dish that was perfect for making individual portions of baked eggs! But of course, you could always just bake them in any suitable baking dish. I used a 10″ quiche baking dish for the family and it looked really pretty too! (: So regardless of the size, I’m sure it will still satisfy your tummy! hehe

So here’s the basic recipe of the baked beans as well as the baked eggs. I will be sharing the recipe that will fill a 10″ quiche baking dish. For big eaters like the mr and I, we could polish that off quite quickly, but it could comfortable feed 3-4 people as well! Do remember that the recipe is really versatile, so you could add your favourite ingredients and it will be super yums!

Baked Eggs with Homemade Baked Beans (a FoodMadeWithLove original recipe)

For the baked beans :

50g speck, diced into cubes (or bacon)

1/2 large onion, finely diced

1 tin diced tomatoes

1 tbs tomato paste

1 tin cannellini beans, drained

1 tsp dried chilli flakes (optional)

1 ts olive oil

1/2 tsp sugar

salt & pepper, season

For baked eggs :

4 eggs

1/2 cup mozzarella cheese, shredded

3 tbs shaved parmesan

1 tsp dried parsley, for garnish

For the chanterelles : 

5g dried chanterelles*

10g salted butter

50ml hot water

1 tsp thickened cream

Garlic salt  & pepper, to season

Steps :

1) Place the chanterelles in a small bowl, and pour the hot water over it allowing it to re-hydrate while cooking the baked beans.

2) For the baked beans : In a small saucepan, heat the olive oil on medium heat and fry the speck till all sides are golden brown. Add the onions and fry till fragrant, continuously stirring it. Add the tomato paste and stir till combined with the onions. Add the tin diced tomatoes and allow it to come to a boil. Lower the heat to low and allow it to simmer for 10 mins. Add the cannellini beans, sugar and chilli flakes. Stir and allow it to simmer for another 5 mins. Pour the beans into the baking dish and set aside.

3) For the chanterelles (garnish) : Drain the chanterelles, reserving the water. Squeeze the chanterelles to make sure it’s dry. In another small saucepan, melt the butter and add the chanterelles. Fry till fragrant, then add the reserved water and thickened cream and allow it to simmer for 10 minutes, or until all the water has evaporated. Season with a pinch of salt (or garlic salt) and pepper.

4) For the baked eggs : Preheat the oven to 180 degrees celcius. Create 4 holes in the baked beans using a wooden spoon, and crack an egg into each of them. Top the eggs with shredded mozzarella and parmesan cheese and bake for 10 mins, or until the egg white is cooked, remembering you would want the egg yolk to be runny!

5) Garnish with dried parsley and the chanterelles. Served with toast.

ENJOY! Have a great weekend!

*Note : Chanterelles could be purchased at Woolsworth in the fresh mushroom section! Of course, you could use other dried mushrooms, or the mixed forest mushrooms that you can purchase from specialty stores. 

Remember  to always cook with love (:

{Quick & Easy} Salmon, Shiitake and Edamame Soba Noodles

Part two of our jap themed dinner features a bowl of salmon, shiitake & edamame soba noodles! Remember my post on okonomiyaki? This goes really well with it! I don’t know about you, but I’ve always been a soba person, not so much udon. Maybe cause it makes me feel like I’m eating something healthier. hehe I do usually like the cold version, especially cause I get to dip it in the cold soba sauce and slurp it!

But I decided to try a hot version of it. And I was really glad with how it turned out! I could seriously have a bowl of it every night! hehe The addition of the edamame not only added freshness, but also added a vibrant colour to the dish!

And what’s more? I topped the soba noodles with supper yummy korean rice seasoning! If you haven’t had this before, I urge you to head to an asian supermarket to get one ASAP!! You could even top the okonomiyaki with it! So so good (: So here’s the recipe which I used for this delicious and healthy (in my opinion) soba noodles! And you can definitely get it cooked in less than 30 minutes! That’s a win-win in my books!

Salmon, Shiitake & Edamame Soba Noodles (adapted from Flying Fourchette)

300g skinless salmon fillet, cut into cubes

1 clove of garlic, finely chopped

6 fresh shiitake mushrooms, thinly sliced

1/2 cup edamame, shelled

180g soba (buckwheat noodles)

2 tbs vegetable oil

 For sauce :

1 /3 cup water

1/3 cup light soy sauce

3 tsp korean hot pepper paste (gochujang)

1 tbs brown sugar

Steps :

1) For the sauce : Stir all the ingredients together until the sugar has completely dissolved. Set aside.

2) In a non-stick frying pan, add 1 tbs of vegetable oil and fry the cubes of salmon until all sides of the salmon is slightly brown. Set it aside. Add the rest of the vegetable oil, and fry the garlic till fragrant then add the shiitake. Fry for about 5 minutes, or until the shiitake is tender.

3) Add the salmon cubes back into the pan, and add half of the sauce and allow it to simmer for 10 minutes on low heat. Meanwhile, heat a pot of water and cook the soba noodles till just tender (about 7 minutes, depending on the instructions on the packet). Drain the noodles and run under cold water, to stop it from cooking further. Drain well and place in a large bowl.

4) Transfer the cooked salmon with the sauce into the large bowl and toss it lightly until the noodles are well coated. Add the edamame and give it another toss, careful not to mash the salmon. Put a few more teaspoons of sauce if desired.

5) Sprinkle with rice seasoning before serving. ENJOY!

Definitely something quick and satisfying after you’ve had a long day at work or school. So hopefully this would be something you’d like to give a try! (: Happy midweek!

Okonomiyaki

I love Fridays! It’s not just a short day at work, but I also get to try something new for dinner which ushers in the weekend! So I decided that we shall have a Japanese-themed dinner! (: After searching Tastespotting for some inspiration, I decided on two dishes for the night : Okonomiyaki & salmon, shiitake and edamame  soba noodles!

So what is okonomiyaki? It is actually a savoury pancake that is mainly made up with cabbage and anything you wanna put in it! I’ve had it a couple of times, and really love it with the combination of mayonnaise and bbq sauce. Since it was Friday, we had ours with prawns! (:  I realised that I have been having heaps of Korean, and was really craving for some Japanese. I have to say though, I’m really lucky that the mr eats everything, so I am able to cook what I wanted. And he would happily eat it! hehe PHEW!

I think it turned out really well for a first-timer! (: But a pity I didn’t shred my cabbage thin enough so it was a little chunkier than I wished, and a little difficult to shape it into nice circles when pan-frying it. But besides that, it was really simple and yummy! And one thing I really enjoyed was alternating the sauces and using the toothpick to make the marbling effect on top of the pancake! hehe

Okonomiyaki (adapted from Las Vegas Food Adventures)

2 cups green cabbage, finely shredded

6 fresh shiitake mushrooms, thinly sliced

1 clove garlic, finely chopped

330g prawn, deveined and cut into half

1 cup plain flour

1 tbs corn flour

1/2 tsp baking powder

2/3 cup stock (I used fish stock, but you can always use chicken or dashi)

1 egg

salt, to season

Steps :

1) Combine the flour, corn flour and baking powder and mix it well. Mix the fish stock and egg together, and combine with the flour mixture. Mix until you get a thick pancake batter.

2) Add the cabbage, shiitake mushrooms, prawns and garlic to the batter. Season with salt. Heat a non-stick frying pan on medium fire, and add some vegetable oil. Add half of the pancake mix and flatten it to the depth of the prawns with a spatula.

3) Cook the pancake for about 10-15 minutes, flipping several times, until both sides are golden brown.

4) Serve it hot, drizzle the top with japanese mayonnaise and homemade bbq suace (recipe below).

~~~~~~~~~~~~~~~~~~~~~~~~~~~~~~~~

Bbq Sauce

1/2 cup ketchup

1/4 cup Worcestershire sauce

1/4 cup Soju/ Sake

1/2 tsp brown sugar

1) Mix everything together and whisk until the sugar is completely dissolved. Place in a squeeze bottle, so you could easily drizzle on the pancake.

~~~~~~~~~~~~~~~~~~~~~~~~~~~~~

ENJOY!

PS : Stay tuned for the recipe of the salmon soba noodles ! 

Prawn Mac N Cheese

It’s Friday people! And to welcome the weekend, I decided to go all out and make an indulgent (and sinful) dish – Prawn Mac N Cheese! (: Ever since we had mac n cheese at the Sharing house a few weeks back (a post that will come soon, I promise!), I have been wanting to make some. Especially after seeing Neil Perry’s version of truffle mac n cheese. That was definitely a push factor!  So there was no better day to make it but on a Friday!

And what better way to enjoy a Friday night in with a comforting bowl of cheesy pasta, with a glass of wine and the plan of having a Batman movie marathon with the mr? Absolutely, nothing! (:

This was a really simple recipe and you definitely could start cooking and end up indulging on your couch in less than 1 hour! Sounds good? Here’s the ultimate winter warmer!

Prawn Mac N Cheese (an original recipe)

250g dried macaroni

60g butter

1 whole onion, finely chopped

2 carrots, finely chopped

4 cloves garlic, finely chopped

320g prawns, diced into chunks

1 cup shredded gouda

1 cup shredded cheddar

1/4 cup grated parmesan

1/2 tbs dijon mustard

450 ml cream

100 ml milk

1 cup sliced mushrooms

1/4 cup bread crumbs

salt and pepper, to season

Steps :

1) Cook the macaroni in a pot of boiling salted water for 7-8 mins, or until al dente.  Drain and refresh in cold water before draining again and set it to one side.

2) In a large pot, melt the butter then add the onion, carrots and garlic. Fry till they get fragrant and soft. Do keep an eye on the garlic and be careful not to burn them.

2) Add the cream and allow it to boil and reduce by 1/4. Add the mushrooms, dijon mustard and milk and boil it for another 10 minutes. Add the prawns and cook the mixture on a low simmer until liquid thickens.

3) Take the cream mixture off the heat, and slowly add the gouda and cheddar. Stir it gently, till the cheeses have all melted and combined with the cream. Put the pot back on a low heat, then add the macaroni and stir it till it’s well combined.

4) Season with salt and pepper, then add the grated parmesan. Place the macaroni and cheese in a baking tray, then top it with bread crumbs and more parmesan if you want. Under a hot grill, grill until the top is golden and crispy.

Serve and enjoy on a couch with your favourite movie! (:

So what is your ultimate comfort food? Do share! hehe

Seafood Paella

I really wanna go to Europe. It has been a ultimate dream to head there for a holiday with the mr. We are in the midst of planning and saving. But not sure when that dream would officially take off! Of course there are a few must go places besides the obviouse France and Italy. But there are others that I would love to visit too! One of which, is Spain. Shopping in Madrid and of course trying the food the country has to offer!

But since it’s going to be at least a while before we get there, I thought I’d bring one of the famous dish you can find in Spain : Paella.

I remember walking at South Melbourne market one of the Saturdays, and seeing huge paella pans cooking these yummy rice with stock bubbling away. Every grain of rice would absorb the delicious and flavourful stock, plump up and become this amazing dish with lots of ingredients, which reminds me of claypot rice. haha I’m not sure what the traditional ones have, but because it was Friday, I used a variety of seafood when I cooked mine! (: Plus, I crank the heat up the last 5-10 mins when cooking to get a crispy base! hehe Just how the mr likes it!

I have to say, I was quite surprised at how easy it was to cook it. You don’t have to stand next to the pan and keep stirring like a risotto. Just let the rice do it’s own magic, and just keep an eye on it every 10-15 minutes as it is cooking. Place the seafood and before you know it, dinner will be served! So give it a shot, just simply delicious! hehe (:

Seafood Paella (adapted from Carlos Lopez on SBS Food, serves 2-3)

2 cloves of garlic, finely chopped

1 onion, finely chopped

1 large red chilli, finely chopped

1 tomato, chopped

2 tbs olive oil

1/4  red capsicum, roasted and thinly sliced lengthwise

1/4 green capsicum, roasted and thinly sliced lengthwise

 375ml fish stock

160g arborio rice

pinch of saffron

1 tsp hot paprika

1 calamari (about 200g), diced

8 king prawns

12 mussels

200g basa fillet, sliced

12 pippies/clams

salt and pepper, to season

3 tbs chopped parsley

Steps :

1) In a non-stick shallow frying pan (I used the IKEA 365+ series) / paella pan, heat the olive oil over medium heat and fry the garlic, onion, chilli until soft and fragrant. Do be careful not to burn it, as it will turn bitter.

2) Add the rice and give it a stir to make sure each grain of rice is well coated with the oil.

3) Add the chopped squid and fry for 2-3 minutes and stir in the fish stock, saffron, salt, pepper and paprika. Allow the stock to come to a boil and the rice will start absorbing the stock.

4) Keeping the heat at medium, add the fish and prawns and allow it to cook for 10 minutes. At this point, the stock would have reduced and the rice would have swelled and you could see it resurfacing. Add the mussels, pippies, and chopped tomatoes and cook until all the shells are open.

5) Turn the heat to high for the last 10 minutes to get the crispy base that would add a really nice texture to the dish. (Optional but highly recommended). Place the slices of roasted capsicum and and garnish with chopped parsley before serving.

Note : Try to resist from stirring the dish while it’s cooking or else it won’t have the nice crust! (:

ENJOY!