Food For Families Campaign

Wesley_FoodforFamiles_CMYK__WesleyLockup_Stacked_Colour.jpg

The Wesley Mission Victoria is holding it’s 24th annual flagship appeal to help Melbourne families that are in crisis. They help by providing nutritional food and household essentials during Christmas and throughout the year!

I’m happy to be part of this meaningful campaign and we should all try to do a little bit for those in need. Pay It Forward if you will! So what can you do? There are a few ways which you can go about helping out in this campaign!

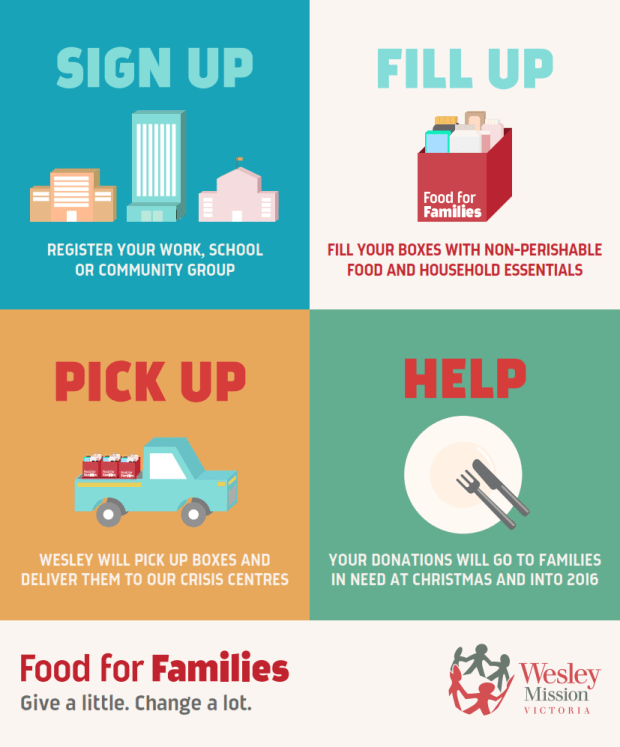
  • You can register to receive a donation box for your workplace, school or community group. Your participant pack, including box/es is delivered and collected by a Wesley volunteer before Christmas. 
  •  Items that are most popular with families that visit the Wesley pantry include ready to eat meals, pasta/noodles and sauces, cereal, baby food and UHT milk. A full list of items is available on our website.
  •  If you are unable to contribute to a collection, you can also help by making a donation. Visit wesley.org.au.
  • Monetary donations are used to purchase fresh and frozen foods, including fruit and vegetables, to supplement the donated non-perishable food supplies.

If you want to know more please don’t hesitate to jump onto wesley.org.au for more information about the appeal and the different ways you can get involved!

Food for Families - Donation Journey + Branding_001

As a new mum, it is always a joy to see the little man enjoy his food, and I wish that every mum/parent could do the same!

Campaign image 1

With your donations (be it food or money), you will ensure that families experiencing tough times can put food on the table this Christmas and throughout 2016!

The Wesley Mission Victoria is aiming to collect 30 tonnes of non-perishable goods to distribute to the crisis centres nation-wide! And you will be surprised to know that you can cook nourishing meals from non-perishable food items alone!

I was lucky to receive the recipe from the ambassador of Wesley Mission Australia and ex-Masterchef 2015 contestant, Sara Oteri! Of course, I’m going to share with you one of them that I am going to try it for myself! Sounds too yummy to give it a miss, plus it’s always been something I want to try and make for breakfast!

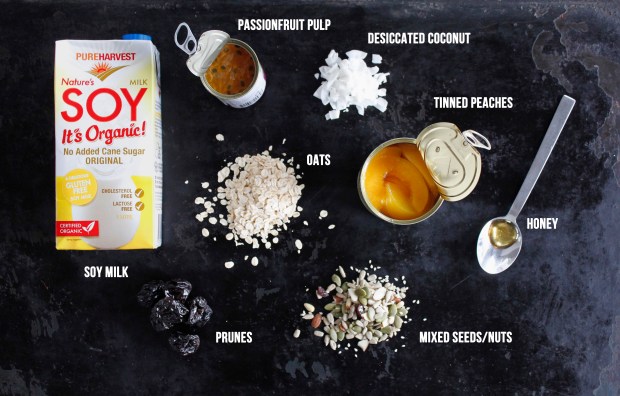
Overnight Oats (Soaked Muesli) (Recipe by Sara Oteri)

Ingredients:

OATS

2 cups Oats

2 cups Soy milk or long life milk

2-4 tbsp honey

¼ cup passionfruit pulp

5- 10 prunes roughly chopped

Mixed seeds

TOPPING

Desiccated coconut

Tinned peaches (or any tinned fruit of your choice)

MuesliING

Steps :

  1. Put all the ingredients to make the muesli into a bowl, mix well, then leave covered in the fridge overnight.
  2. In the morning you should wake to a beautiful soaked muesli with just the right amount of moisture. If for whatever reason it’s too dry for your liking, simply incorporate a touch more milk.
  3. Finish with coconut flakes and some tinned peaches or any fresh fruit/frozen berries you have lying around.

Muesli2

Easy, simple and nutritional! Best way to start your morning. So hop onto the website and help in any way you can! This would ensure that everyone can start their morning right and bright!

P.S. Thank you for this opportunity Wesley Mission Victoria, to help those people in need. This is something, indeed, really close to my heart and a campaign I really believe in.

Photo credits – Wesley Mission Victoria 

{Spencer Cooks} Gula Melaka Kaya

unnamed-12-1-1

For those who follow me on Instagram (@lianneelow) you would know I have a new baby. A machine baby haha My dearest mr has got me the dream machine of my life – A thermomix! I was so so excited when I placed my order and couldn’t wait for it to arrive! I have to admit, I’ve always wanted one. But gave it a pass cos of two main reasons – 1) the cost and 2) I already have a whole range of machines in my small kitchen. But having it for the past 2 weeks, I think I can now sell my other machines (besides my kitchenaid hehe)!

Spencer

So everyone, meet Spencer! (: Don’t ask me how I came up with the name. It just came to me when I got it. So Spencer it is! I’ve not stopped using it since it arrived! And don’t you worry, I will be sharing the recipes I’ve tried (and some original recipes, hooray!) with all of you! hehe

The very first thing I’ve made is  recipe I’ve been wanting to make for ages. I kept it in my “in case I get a thermomix folder” haha Gula Melaka Kaya (Coconut jam)! YUM! Living in Singapore, our breakfast staple is hot and crispy kaya toast with a cup of hot tea/coffee, with a side of half-boiled eggs! Seriously the best start to the day! So I was really excited to make it so we could have that in Melbourne too!

Piggy currant buns with kaya

Lochlan was super lucky and loved to get some delicious soft and fluffy piggy buns from The Bakeanista (check her blog out! She makes the most amazing bread!) and I too had some with the kaya that I made! Perfect combination! Mmmmmm (:

So here is the recipe for the Gula Melaka Kaya that Spencer made!

{Spencer Cooks} Gula Melaka Kaya (Coconut Custard Jam, Recipe from Thermomix Recipe Community)

250g Gula Meleka

3 egg yolks, large

1 whole egg

250g coconut cream (I used Kara carton)

3 fresh pandan leaves, tied into a knot

Steps :

Milling the gula melaka

1) Break the gula melaka into ice-cubed sized pieces before putting them into the thermomix. Mill the gula melaka, speed 10/10secs.

Milled gula melaka

2) Add egg yolks and egg, mix speed 3 until the sugar has dissolved. Using the spatula, scrape the base to make sure all the sugar has dissolved.

Add the egg and egg yolks

3) Cook for 10 mins/90 degrees/Speed 3.

4) Add coconut cream and pandan knot into the mixture, cook for 45 minutes/100 degrees/reverse/Speed 3. Leaving the MC out allowing the steam through.

Adding coconut cream and pandan knot

5) Check the consistency of the kaya, it should be thick, glossy and smooth. If it’s not thicken, repeat step 4 for another 10 minutes. Allow it to cool then place into glass jars/jam jars and keeps well  in the fridge for 2-3 weeks!

Kaya ready!

I was surprised that it wasn’t the deep dark brown kaya I was looking for. But it was still thick, glossy and absolutely delicious! I have also collected more kaya recipes and will be trying them again soon! So stay tuned for the comparison!

Piggy currant bun

Remember to have it with some toast/bun and a cup of hot coffee/tea! (:

Have a great Hump Day everyone and remember to always cook and bake with love!

Australia’s Top 50 Food Blogs

I was surprised and also very excited to be included in this list! It’s not much I know but it’s gonna push me to post and share more with everyone now! (: Thank you so much everyone for your constant support! Have a look at the other brilliant blogs as well!

ps: I’m number 13! hehe

Top 50 food blogs in Australia

Source:rebateszone

Savoury Oats with a Twist!

unnamed-6-1-1

I’ve got a new obsession. Savoury oats! All along, I’ve been having my oats with honey, fruits and even with the addition of Milo (OMG it’s super good haha) but I’ve been trying to see if there are other ways to cook oats and make the little man like it as well!

So i found the recipe from Martha Stewart and I just had to try it out. It had the ingredients that Lochlan loved – cheese & egg – so it must be a winner, right? RIGHT! hehe He absolutely loved it and could finish it all. Of course, his egg was cooked through and I kept mine runny, cause it adds a sauce to the oats, and it’s just absolutely delicious!

Savoury oats

So using Martha Stewart’s recipe as the base, I did added more savoury ingredients that I thought would pump it up! And this morning, I made a winner. With the addition of crispy bacon bits! I mean, how can I not? Bacon makes everything yummier right? ABSOLUTELY! hehe

So here’s the recipe for my favourite version of the savoury oats. You can pretty much add your favourite ingredients and it would taste yummy! hehe

liquid gold

Savoury Oats with Sunnyside Up, Bacon & Cheese (Adapted from Martha Stewart, Recipe for 2 adults, 1 toddler)

1 cup quick oats (I used Macro Quick Oats)

3-4 large eggs (depends on how many eggs each person eats)

3-4 tbs shredded cheddar cheese

1-2 slices of bacon, chopped finely

1-2 tbs chopped chives

1-2 tbs fried scallions

Maggi seasoning (Optional, for adults)

Tamari (Optional, for toddlers)

Steps :

1) In a medium size pot, bring 2 cups of water to a boil. Add the quick oats and simmer till oats are tender, about 5 minutes.

2) While thats cooking, heat a frying pan and fry the bacon bits till crispy. Pour onto a kitchen towel to absorb the oil. Then using the same pan, fry the eggs on a low heat, till all the egg whites are cooked, leaving the yolk runny. For toddlers, flip the egg and cook the yolk through.

3) To serve : Pour the oats into 3 bowls, top with the shredded cheese, then sprinkle some bacon. Top with the sunny side up egg and season with a few drops of maggi seasoning/ tamari. Then sprinkle a bit more bacon, chopped chives and fried scallions. ENJOY!

Savoury oats with runny yolk egg

Let me know what your favourite combinations are! Would definitely like to give them a go (:

Remember to always bake and cook with love! Till the next post, xx!

Banana Cake with Oats & Chia Seeds

Banana Cake with Oats & Chia Seeds

If you’ve been reading my blog for a while now, you would know how much of a banana cake/bread fan I am. I love everything about it. I love to bake it, I love to eat it and I definitely love the smell of it. Just something about the soft, moist cake that is yummy to eat whether its hot out of the oven, or after it’s been sitting on the table for a while.

Plus, who could resist having one after it’s aroma filling the whole house? Just makes me smile thinking about it! So to this date, my favourite banana cake/bread recipe is the one with the nutella swirls. Because honestly, banana and nutella, match made in heaven! But having a toddler, I am always in search of recipes that include healthier ingredients, which would give us a more nutritious result!

So when I saw this recipe on The Domestic Goddess Wannabe, I knew I had to give it a shot and see what he thinks about it. And the result? Lochlan LOVED it! He kept coming back for me and when I gave him a piece to hold, he held on to it tightly, taking the smallest bites, so he could enjoy it for a longer time. YAY!

And I mean, I super love his chubby chub hands! hehe

This cake totally reminded me of the old school banana cakes I had when I was a kid. It was soft, moist and the flavour of the banana was the right level of intensity – STRONG. hehe Just the way I love it!

Banana Cake with Oats & Chia Seeds (Closely adapted from The Domestic Goddess Wannabe)

2 large overripe bananas, mashed

1 egg

120g unsalted butter, melted (You could use olive oil)

3/4 cup soy milk

1 tsp vanilla bean paste

1 1/2 cup plain flour

80g caster sugar

1 tsp baking powder

1 tsp baking soda

1/2 tsp salt

1/2 cup rolled oats

1/8 cup chia seeds

Steps :

1) Preheat oven to 180 degrees Celcius. Spray a mini loaves tin with olive oil spray to make sure it’s well coated.

2) In a bowl, add the mashed bananas, soy milk, the egg, vanilla bean paste and melted butter. Mix till well combined.

3) In another bowl, add the flour, baking powder, baking soda, salt, oats and chia seeds. Using a whisk, mix till the ingredients are well combined.

4) Add the wet ingredients into the dry ingredients and stir till just incorporated. Careful not to over mix, as you don’t want a tough cake!

5) Fill the mini loaves till 3/4 full and bake in the oven for 15-20 mins (checking at 15 minutes with a toothpick, if it comes out dry means it’s done!). Cool it in the tin for 5 mins before turning them out onto a cooling rack.

Enjoy as is or with a hot cup of tea/coffee (or milk for the little kiddos)!

Remember to always bake or cook with love! Have a great week ahead, xx

Ramen Bankara

IMG_1349-1-1

I have to admit. I am quite a ramen lover. A bowl of hot soup that is bursting with flavour and springy noodles, who wouldn’t like that? But a good bowl of ramen is hard to find and because I haven’t had a bowl of ramen from Japan, I have nothing really to compare to. But I know a good broth and a yummy bowl of noodles when I have one!

When Thanh (I Eat Therefore I Am) asked me if I wanted to stuff my face with ramen at Ramen Bankara and other deliciousness on a cold night, there was no way I would turn that down! Thankfully, the Mr took Lochlan into the gym with him that night, and I could head to the tasting event without a worry!

Ramen Bankara

Shop G047, 619 Doncaster Road

Doncaster Westfield Shopping Centre

Menu for the night

It’s been more than a year since the last blogger event I attended, so I was really quite excited. I also got to catch up with some friends which I haven’t met for quite some time! I also got a chance to meet some new ones, which is always a plus!

Agedashi toufu

We started off the evening with some entrees! The Agedashi tofu has always been a dish I love to have when dining at a Japanese restaurant. These deep fried tofu were crispy on the outside and silky smooth on the inside, sitting in a bowl of hot dashi broth and topped with bonito flakes! I love how the bonito flakes always look like they come alive when they are on a dish. Definitely mad some people squirm! hehe Ok back to the tofu, these were definitely a great start to the night!

Gyoza

We also had some gyoza (panfried dumplings) and tori karaage (crispy fried chicken)!

tori karaage

Oh boy were these fried chicken good! Really well seasoned, crispy on the outside and it was really juicy & tender too! Couldn’t stop at one but had to save tummy for the bowls of ramen to come!

Tonkotsu ramen

First up – my favourite for the night – Tonkotsu ramen! This rich and creamy pork bone broth that was slow cooked for 12 hours! This is the premium bowl which comes with the works  – kanuni (braised pork belly), black fungus, pork cha shu, ajitsuki tamago (seasoned boiled egg, which was served on a side for this bowl), bamboo shoots & seaweed! I seriously wanted another bowl of this broth, not to mention the springy Hakata style noodles!

Ramen Bankara

This was the signature Ramen Bankara – The pork broth is infused with the shoyu (soy sauce) and has a hint of sweetness. A great balance of salty and sweet.

Chuka soba

This was something new to me – Chuka soba. The broth is a unique blend of seafood and pork which made it really rich in flavour. There is also a spicy version of this dish for those who enjoy an extra kick! Also, aren’t those tamagos just gorgeous?

Tamgo

They were perfectly cooked, with a molten yolk centre and seasoned really well! We were lucky to have one whole egg to ourselves that night!

Tsukemen

The Tsukemen definitely left a good impression on my tongue and belly that night! It was really different from the usual bowl of ramen I’ve had. Instead the springy noodles were served cold in this dish with a bowl of piping hot broth that is rich and peppery!Tsukemen noodles

So the idea is like having a bowl of cha soba! You dip the cold noodles into the hot broth and slurp away! This would be a perfect dish for the hotter months to come. Definitely heading back for these soon!

Lemon sorbet

After all the savouries I had for the night, and not to mention how full I was, we were served with a couple of desserts. First up was this tangy lemon sorbet that was seriously addictive! I found myself digging my spoon in for more and it kinda cleansed my palette a little!

Trio of ice-cream

Last but not the least, ice cream! A trio of ice-cream – green tea, black sesame and vanilla. The black sesame was a crowd pleaser and the green tea was a perfect balance of the bitterness of the matcha and the sweetness of the ice-cream. A perfect way to end the night!

Thank you to Thanh again and Ramen Bankara for having us and serving us all the delicious dishes for the night! It was an absolute ball and I haven’t laughed so much for a long time! So if you’re looking for a good bowl of ramen, do head to Ramen Bankara and definitely give that bowl of Tonkatsu a go! You won’t regret it!

I was invited to Ramen Bankara by Thanh of I Eat Therefore I Am. All thoughts and opinions are based on my experience at the time of the visit. Thank you so much for this wonderful experience and opportunity!

Ramen Bankara Menu, Reviews, Photos, Location and Info - Zomato

Toddler Eats : Sugarless Carrot Banana Mini Loaves

unnamed-2-1-1

I’ve always wanted to bake something that Lochlan can enjoy for morning tea and I came across this recipe that was perfect. No sugar, and just the natural sweetness from the wholesome ingredients of the loaves!

Enjoying the loaf

I have to admit, I was a little nervous before giving the loaf to the little munchkin, cause I wasn’t sure if he would like it. But thankfully he quite enjoyed it and ate half go the loaf! (:

Cross section

I was really happy with the texture of the loaves too! It was fluffy and light but still moist! Just the way a good loaf should be. Perfect with a cup of hot tea, or a cup of warm milk (for the bub!) Of course if you had extra time and some cream cheese sitting in your fridge, you could always whip some cream cheese frosting for yourself and indulge! hehe

So here’s the recipe for these deliciousness! Hope you and your kiddos would enjoy it as much as we did!

Sugarless Carrot Banana Mini Loaves (Closely adapted to Easy Toddler Meals)

Ingredients :

1 large carrot, finely grated

2 large bananas (or 3 medium bananas), mashed

1 egg

3 tbs coconut oil

1 tsp vanilla bean paste

1/4 cup greek yogurt

1 1/2 cups all-purpose flour

1 tsp baking powder

1/2 tsp baking soda

Steps :

1) Preheat your oven to 170 degrees celcius. Spray some coconut oil/ olive oil into the mini loaf tin, to make sure it’s well coated. Set aside.

2) In a large bowl, mix the grated carrot, mashed banana, greek yogurt, coconut oil, egg and vanilla bean paste till well combined.

3) In another bowl, mix the dry ingredients.

4) Pour the dry ingredients into the wet mixture and stir till well combined. Scoop the mixture into the prepared mini loaf tin and bake for 13-15 minutes or until a toothpick comes out clean when inserted into the middle of the loaf.

Loaves all baked and ready!

5) Allow it to cool for 10 mins in the tin, then remove.

Lochlan analysing the loaf

Enjoy it with your kiddos!

Remember to always cook and bake with love! xx

Toddler Eats : Cheesy Chicken & Veggies Meatballs

unnamed-2-1-1

Now that Lochlan has turned one (where did time go??), I’m trying to wean him from purees and introduce chunkier food, to encourage him to chew. Don’t get me wrong, he knows how to chew. But just prefers the purees cause he could finish it much quicker. haha So this marks the start to my new series of Toddler Eats! Hopefully it will be helpful to mummies out there who also want to try different foods and make them from their kitchen when time permits!

I decided to try making something I thought he might like! I mean, who doesn’t enjoy a good meatball? Especially with the addition of cheeeeese! These are quick and easy and you could have it on its own or mix it with pasta and some homemade tomato sauce and viola! Meatball pasta!

Meatball pasta

Lochlan’s Verdict : 2 1/2 meatballs (together with other food for dinner and strawberries for dessert hehe). I think thats a not too bad start!

 With the addition of cheese, you don’t even need to add salt to it. So it’s perfect even for babies from 10 months! Especially if you wanna do Baby-Led-Weaning. hehe Perfect finger food! These are not just for your little ones at home, the mr and I enjoyed it too!

So here’s the recipe, do give it a shot and let me know what u or your kiddos think!

Cheesy Chicken & Veggies Meatballs (A Food Made With Love Original Recipe)

Ingredients : Makes 24-26 meatballs

250g mince chicken (or meat of your choice)

2 stalks of spring onions, finely sliced

1 small carrot, grated

1/4 apple, grated

2 cloves of garlic, finely chopped

1/2 zucchini, grated

2-3 florets of broccoli, finely chopped

50g cheddar cheese, grated

1 egg

Ground black pepper, to season

Ingredients

(I’ve got a double yolk! Lucky me! hehe)

Steps :

1) Preheat your oven to 170 degrees celcius. Spray/Oil a baking tray/ casserole dish and set it one side.

2) Mix all the ingredients in a big bowl until well combined.

Mixed till well combined

3) Using a tablespoon, roll the mixture into balls. Do note that the mixture will be a bit wet and sticky. Wetting your hands might help in the rolling process.

Rolled out

4) Place the meatballs onto the baking dish, and bake for 12-15 mins, until the meatballs are cooked through and/or slightly browned.

All baked

5) Serve as is or you could cook it in a homemade tomato sauce and toss it through some cooked pasta for a variety!

Enjoy!

P.S : You don’t have to grate the vegetables if you’re cooking for yourself or older kids and want more texture. Just finely diced them and it would be as delicious! Also you could always change the types of vegetables in the meatballs, find a combination that wins the most votes in your house! (:

Have a lovely weekend everyone! Remember to always cook and bake with love!

Till the next post, xx !

Hendriks Cafe

unnamed-11-1-1

Brunch has always been a favourite meal for this little family of mine. We treasure the chance we get to head out, especially on a weekday morning, to enjoy good food with the company of my two loves. It’s been a while since we tried somewhere new. As creatures of habit, we always head back to the cafes that we have tried and loved. But I chanced upon an article by Broadsheet and glad that there is a new place we could try that is on our side of town.

Hendriks Cafe

Hendriks Cafe is located in Mordialloc and a much needed cafe in this area! A huge space with a open kitchen concept, made the space really inviting! It’s always a plus when a cafe has high chairs as well, especially when brunching with a bub! Looking through the menu definitely got us excited as they had some breakfast favourites but with a twist!

Our usual cuppas

We started with our usual cuppas – chai soy latte for me and a large latte for the Mr. I can’t wait till the little munchkin can have baby chinos! I think he would definitely enjoy it!

Indo Fritters

It sure wasn’t easy to make a choice, but my eyes kept going back to the Indo Fritters ($17) – Corn fritters with a son-in-law egg and chilli caramel! If you know me, you know I love my corn fritters. These were crispy on the outside and full of sweet corn kernels! YUM! The bonus was perfectly cooked son-in-law eggs with the molten yolk and the sweet and tangy chilli caramel which had a kick! Such a great combination and one that I wouldn’t even have thought about!

Indo Fritters

Would absolutely head back to have these again!

Whisky Hotcakes

Now. When I saw Whisky Hotcakes ($17) on the menu and read the description, I knew it would be one the mr would love. He’s really into the sweet and savoury combination in a dish these days. Frankly, who wouldn’t be right? Thick, fluffy hotcakes, with bacon and a pecan praline, topped with a whisky infused maple syrup. OH MYYYYY! It tasted as good as it looked!

Avocado for the little munchkin

And for the little guy, he scored himself a side of crushed avocado ($3.50) ! His favourite breakfast food. He actually gets really excited when he sees it and is fed to him! Definitely a baby foodie in the making! hehe

You know it’s good when the little guy wants some of what we are having! I love it when his tiny chub hands reach for our plates and try his best to have a go at our food. Can’t wait till he can eat what we are having! He would definitely be one happy boy, like we were when we left the cafe! Definitely returning to try the other dishes on the menu, and I highly recommend you do too (:

Hope you had a good weekend and soldier on for the new week ahead! Remember to always cook and bake with love. Till the next post, xx !

Click to add a blog post for Hendriks Cafe on Zomato

Nutella Swirled Olive Oil Banana Bread

unnamed-9-1-2

Banana bread has always been an obsession of mine. I love everything about them. I love baking them and I love searching for the perfect recipe so that I could share it with all of you. And I believe, I have!

To date, I’ve baked quite a few versions of the banana bread. One with brown butter, another with maple syrup & chocolate, one with sour cream & maple and one that is eggless & vegan! But this one, this one is my go to recipe when I want to have banana bread and I know that it will be delicious and also really easy to make! You don’t need a mixer for this, just two bowls and a hand whisk!

unnamed-7-1

Not to mention it has pretty swirls of nutella in the middle and above! Banana & Nutella, a match-made in heaven! I mean, how can it not be good with the addition of nutella? Impossible! hehe Plus, it’s made with olive oil, so that makes it relatively healthy no? hehe Trust me, this bread is moist on the inside, and crumbly on the outside. Have it warm with a scoop of ice cream (I had it with peanut butter ice cream! YUMMO!) and you will definitely have a happy belly!

So if you’re a banana bread lover like me, I urge you to give this recipe a go! You will definitely not regret it! hehe

Nutella Swirled Olive Oil Banana Bread (Adapted from Whisk Affair)

2 cups of plain flour

1/2 tsp baking soda

1 tbs baking powder

1/4 tsp salt

1/2 cup packed brown sugar

3 eggs, room temperature

1/3 cup + 1 tbs of olive oil

1/2 cup of greek yogurt

3 large bananas, mashed

1 tsp vanilla bean paste

5 tbs nutella (or more if needed!)

Steps :

1) Preheat the oven to 170 degrees celcius and oil the mini loaf baking tray. Set aside.

2) In a large bowl, mix the dry ingredients together and set aside. In another bowl, whisk the mashed banana, eggs, olive oil, trek yogurt and vanilla paste until well combined.

3) Add the liquid ingredients to the dry ingredients and mix until just combined. Careful not to over mix or it will get too dry.

4) Pour the mixture into the mini loaf tins till its 1/3 filled. Using a teaspoon, put a teaspoon of nutella into each loaf and use a toothpick to create a swirl. Fill it with some more batter until the tin is 2/3 filled. Spread another heap teaspoon of nutella on the top and use the toothpick to create the swirls once again.

IMG_7611-1

5) Bake for 20 mins, rotating the tray 12 mins into the baking time, until a toothpick inserted comes out clean. Cool in the loaf tin for 5 mins before removing and allow it to cool on a wire rack. Or have it warm with a scoop of ice cream!

Enjoy!

Hope you all had a great weekend! Have a fantastic week ahead and there will be more posts up soon, I promise! Till the next post, remember to always cook and bake with love! xx