{Spencer Cooks} Vegetarian Mushroom Bao

IMG_6620-1-1

I love baos (steamed buns) of all sorts! It’s the one thing I would order when I’m at yumcha. So when I got saw a recipe to make these mushroom looking vegetable buns, I leaped at it!

Before having Spencer, I would never think about making the dough for the steamed buns. But it was just easy peasy and I loved how it turned out! Soft and fluffy, and these are perfect if you’re a vegetarian! I might or might not have stopped at one. haha

IMG_6616-1

How cute do they look? hehe You would not believe what is the ingredient that the buns are dipped into before steaming them. Any guesses?? COCOA POWDER! I was a bit hesitant to do it, as I wasn’t sure if that would turn the buns sweet. But they didn’t! I couldn’t really taste the chocolate at all. Magical! I was totally amazed!

So here’s the recipe. I hope you’ll try them and let me know what you think!

Vegetarian Mushroom Buns (Recipe by Janice Tung)

Ingredients :

For the filling:

15g vegetable/olive oil

2-3 pieces dried shiitake mushrooms, soaked and diced (marinated with 2 tsp of sesame oil, 1 tsp light soy sauce, 1 tsp oyster sauce and 1 tsp sugar)

30g carrots

1 pc seasoned tofu, diced

80g turnip

30g chives, diced and marinated with 2 tsp of oil & a pinch of salt)

1/2 tbs dark soy sauce

salt and pepper, to taste

For the buns :

130g water

20g oil

20 caster sugar

1 tsp instant yeast

250g pau flour (you can get them from asian supermarkets)

pinch of salt

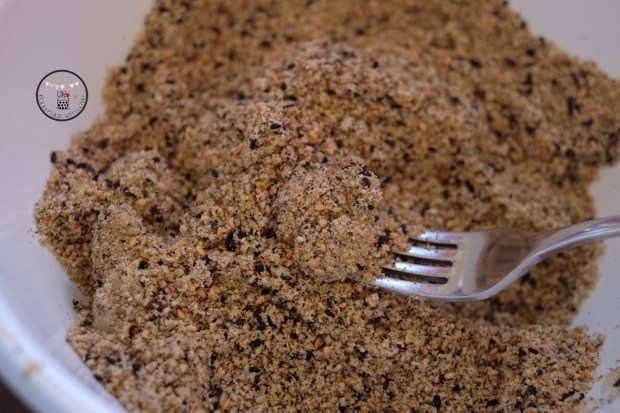
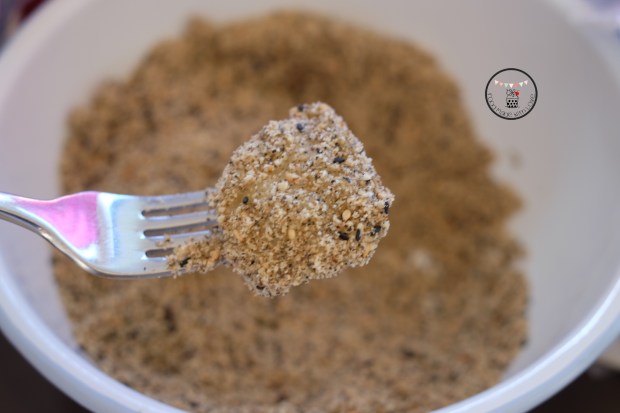
 2-3 tbs cocoa powder

IMG_6592-1

Method :

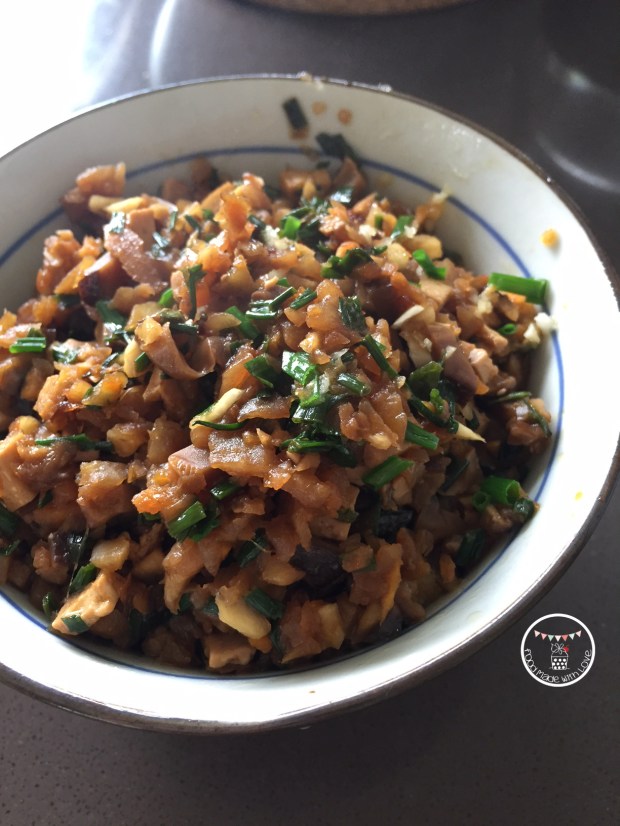
  1. To make the filling: In the Thermomix bowl, add the carrots, turnips and chives and chop for 4 seconds/sp 5/ MC on.
  2. Add the rest of the ingredients of the filling and cook for 5 mins/ 120C/ Reverse Spoon/ MC on. Set aside. Wash and dry the bowl. IMG_6589-1
  3. To make the buns : Add the water, oil, caster sugar and instant yeast into the bowl. Mix for 1 min/ 37C/ Sp 2/ MC on. Add the pau flour and knead for 2 mins.
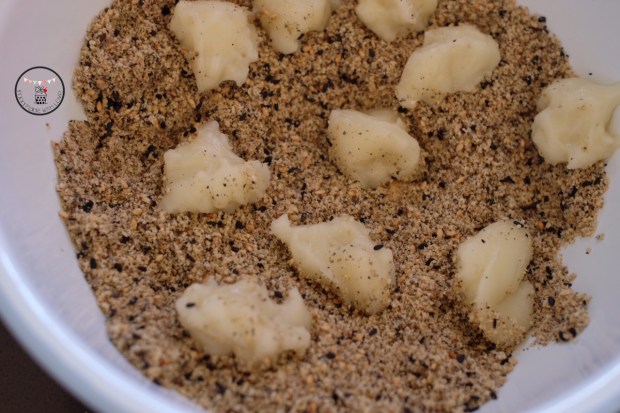
  4. Transfer the dough onto a Thermomat/ a lightly floured surface. Divide the dough into 16 pieces and form into round shapes. Roll into flat pieces. Place 1 heaped teaspoon of filling into each piece and pinch sides together.Wrapping the vegetable bao-1
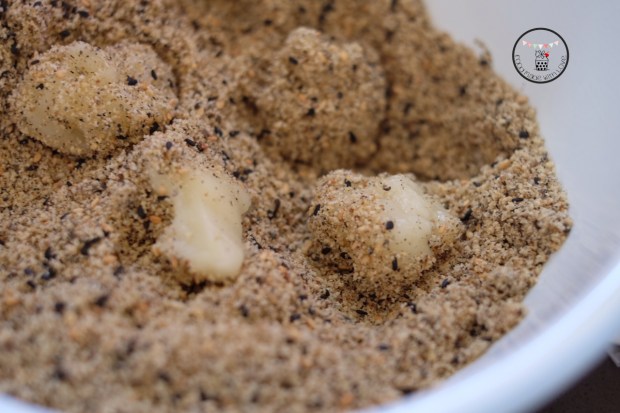
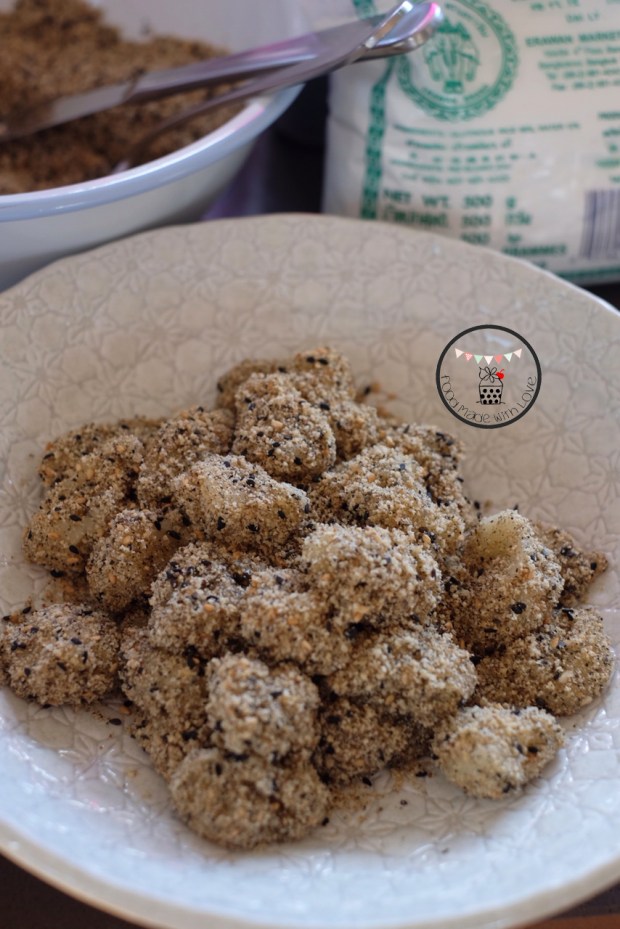
  5. Have a bowl of water on the side. Dip the bun into the water and then into the cocoa powder. Using a sharp knife, lightly cut a cross (X). Place the buns into the Varoma dish and tray. Allow to proof for 30 minutes. IMG_6600-1
  6. Place 600g of water into the TM bowl, stack the Varoma into position and steam for 18 mins/ Varoma/ Sp 1.

Enjoy it immediately while it’s hot! If you are freezing these, just resteam them for 10 minutes and enjoy them for breakfast or tea!

Follow me on Thermolove to get more inspiration!

Remember to always cook and bake with love!  

Summer Salad In A Jar

img_1793-1-1

It’s Summer and we are in 2017! Happy New Year everyone! I hope 2016 has been good for you, but I hope even more that 2017 will be an amazing year with lots of opportunities for you to strive on, lots of love, happiness and that everyone will be in the best of health!

To start the year on the right note, I decided to change the way we eat, and steer it towards eating as healthy as possible! So when Croud Australia contacted me to send me a WW Freshbox that’s completely vegetarian by the Aussie Farmers Direct, I couldn’t say no!

fullsizerender-2-1

 It’s a box filled with fresh vegetables and beautiful produce! What’s great about each box is they come with recipes that you could follow too! How easy is that? I love the convenience!

When I saw what I had in my box ( 3 meals for 2 people, $64) a few ingredients jumped out at me and I really wanted to make a vibrant salad that we would be able to even have it on the go and with a salad “dressing” that would be exciting for the taste buds too.

img_1774-1

So I decided to make a kale & basil toasted walnut pesto and it absolutely binds all the ingredients together! The perfect dressing (and healthy too with a superfood in it!) for the salad and if you have people you’re making for that loves and needs meat (like the mr), you could easily grill some meat and pop it on as well! It’s a really versatile recipe, and you can add your favourite ingredients too!

FullSizeRender-3-1.jpg

Don’t you just love the colour? It tastes absolutely amazing too!

So here’s the recipe for the perfect Summer salad!

img_1791-1

Summer Salad in A Jar (An original Food Made With Love recipe)

For the kale & toasted walnut pesto:

40g toasted walnut

80g kale leaves, stem removed

35g basil leaves

2 large garlic cloves

80g grated parmesan

1 tsp salt

150ml olive oil

Steps:

  1. Add the kale, basil, garlic cloves and salt in a food processor and pulse for 10 to 12 times, till you get a fine chop.
  2. With the motor running, slowly pour the olive oil into the bowl. Scrap the sides of the bowl.
  3. Add the walnuts, garlic cloves & parmesan, continue to pulse until the mixture is well combined. Set aside.

Note: I used this as a dressing for my salad, but you could use this in your pastas, or coat it with some grilled chicken!

For the salad:

350g butternut pumpkin, cut into cubes

1 red capsicum, sliced length-wise

1 can of chickpeas, drained

1 large handful of rocket leaves

1 large handful of baby spinach leaves

30g Greek style feta, crumbled

3 tsp smoked paprika

1 tsp ground cumin

2 tsp ground coriander

1 tsp salt, and extra for seasoning

ground black pepper

2 tbs olive oil

Steps :

  1. Preheat the oven to 180 degrees Celcius. Line the baking tray with some aluminium foil, drizzle with 1 tbs of olive oil, and place the butternut pumpkin and red capsicum onto the tray. Season the butternut pumpkin with the smoked paprika and season with some salt. Bake for 20 mins or until the pumpkin is tender. Set aside to let it cool down.img_1784-1
  2. In a small nonstick pan, heat 1 tbs of oil over medium heat. Add ground coriander, cumin & salt, and cook for a minute. Remember to keep stirring, so that it doesn’t burn. Add the drained chickpeas and stir for 5 minutes or until lightly toasted and the chickpeas are well coated with the spices. Set aside.
  3. To plate : In a large jar, place the rocket and baby spinach leaves into the base. Add the butternut pumpkin and the red capsicum then sprinkle with the crumbled greek feta. Top with the spiced chickpeas and finally the kale & toasted walnut pesto.
  4. You could shake it gently to coat the contents with the pesto dressing, or if you have access to a plate, pour it out and mix it gently. Enjoy on its own or with some grilled meats!

           ENJOY!

Remember to always cook and bake with love!

xx

PS: Thank you Croud and Aussie Farmers Direct for this opportunity to try and love the Freshbox! Will be trying some of the recipes that are on the website too! Stay tuned, more recipes to come!

{Spencer Cooks} Muah Chee

img_6451-1-1

I was always someone who loved snacking. Afternoon tea times are a time of the day I look forward to as I get to sit down, have a hot cuppa and something savoury or sweet to just fill my tummy before dinner. There are lots of small snacks that is easily attainable back in Singapore. However, it is a little more difficult to find it here.

So when I chanced upon a Muah Chee recipe, I HAD TO make it! It was the perfect snack for a Sunday afternoon. Muah Chee is a snack that we usually can get from night markets or hawker stalls. Small pieces of glutinous rice balls rolled in a sugar, peanut and/ or black & white sesame mixture! Every bite satisfies both the sweet and savoury craving to be honest! Which is why I love them!

img_6452-1

I couldn’t quite believe how quick and easy it was to make this in the Thermomix. Everything was done and ready to be enjoyed in 20 mins! And I can’t really put the joys of being able to make something from scratch in the comfort of my own home in words! So I will let the pictures do the talking! hehe

img_6463-1

Little nuggets of deliciousness wrapped in a sugary peanut, white and black sesame mixture! SO SO GOOD!

Here’s the recipe for the muah chee. For those who have been craving like me, and to those who’s never tried it before. Please do give it a go! You won’t regret it!

img_6456-1

Muah Chee 

150g roasted peanut (without skin)

30g toasted white sesame

30g toasted black sesame

40g coconut sugar

120g glutinous rice flour

180g water

2 tbs olive oil

1000g water, for steaming

Steps :

In the TM bowl, add the peanuts, half the amount of white & black sesame, and sugar. Chop for 5secs/ Speed 8.

Pour the mixture into a bowl and mix the rest of the sesame seeds. Set aside.

img_6466-1

In the TM bowl, add the glutinous rice flour, water and oil and mix for 1 min/ Speed 6. You should get a smooth flour mixture.

img_6469-1img_6464-1

Pour into a shallow bowl and place the bowl into the Varoma deep tray. Place 1000g of water into the TM bowl and place the Varoma deep tray on top of the lid. Steam the mixture for 15mins/ Varoma/ Speed 3.

img_6460-1

Once steamed, use a teaspoon, scoop and cut into pieces and toss into the peanut & sesame seed mixture. Make sure the glutinous rice balls are coated well.

img_6459-1

Serve and enjoy immediately!

img_6461-1

Hope you will give this a go and let me know what you think! I am salivating just looking at the pictures! Think I will have to make it again this weekend! hehe Have an awesome weekend everyone!

Remember to always cook and bake with love!

{Spencer Cooks} Hainanese Chicken Rice

dscf5320-1-1

One thing I truly miss is the food from back home. So when I got hold of the recipe of Hainanese Chicken Rice from the Taste of Asia Thermomix cookbook, I HAD TO try making it. Of course, I also had to make the dipping sauces, or else it wouldn’t be complete.

Prior to having Spencer, I have made chicken rice before, and it turned out great. But the multilayer cooking does make it a lot easier, and I have to say, the taste definitely doesn’t lose out to cooking it in the traditional way! Plus it was a huge hit with the two boys! hehe HOORAY!

dscf5291-1

One thing I cannot do without when having chicken rice is the dipping sauces. Especially this ginger dipping sauce! I usually buy them off the shelf at an asain supermarket, but I love that I am able to make it from scratch and also to get it on the table in about 5 mins!

dscf5293-1

Of course, the chilli dipping sauce too!

dscf5323-1

This is definitely is and will continue to be the staple in our house. Succulent chicken pieces with flavourful rice, I cannot think of anything that is more comforting for dinner.

I was asked by a customer at a Varoma cooking class recently to post about how I cooked my chicken rice. Sorry it took so long, but here it is! Step-by-step! I hope you all will enjoy it as much as we do!

Hainanese Chicken Rice (Adapted from Taste of Asia)

Ginger Dipping Sauce

120g young ginger, peeled

50g eschalots, peeled

100g vegetable oil

1/2 tsp salt

Steps:

  1. Place ginger and eschalots into the bowl and chop for 5 secs/ Speed 7. Scrape the side of the bowl.dscf5285-1
  2. Add remaining ingredients and blend for 20 secs/ Speed 8.dscf5286-1
  3. Scrape down the sides of the bowl and cook for 5 mins/100 deg C/ Speed 2. Pour into bowl or mini thermoserver, and set aside to have with Hainanese chicken rice.

dscf5289-1

Note : Can be kept in a jar for 1 week or frozen for 3 months.

Chilli Dipping Sauce

100g big red chillies, cut into 3 pieces

20g ginger, peeled

50g garlic, peeled

80g white vinegar

1 tsp salt

1/2 tbs sugar

Steps:

  1. Place chilli, ginger and garlic into the bowl and chop for 5 secs/ Speed 8. Scrape the sides of the bowl, and repeat process for 2 more times.
  2. Add remaining ingredients and blend for 1 minute / Speed 6.
  3. Add salt and sugar. Pour into a serving bowl or mini thermoserver and set aside.

Hainanese Chicken Rice (Serves 4-6)

2 tsp chinese wine

2 tsp light soy sauce

2 tsp sesame oil

1 whole chicken (about 1.7kg)

4 cloves of garlic

2 spring onion, cut into half

8 slices of ginger, peeled

4 eschalots, peeled

1 tbs olive oil

300g jasmine rice, rinsed

1.5L chicken stock

2 pandan leaves

A packet of bean sprouts

Fried shallots & thinly sliced spring onion, to garnish

Steps :

  1. Mix the chinese wine, soy and sesame oil in a small bowl and rub it all over the chicken as well as inside the cavity.dscf5297-1
  2. Stuff two cloves of garlic, spring onion, and 4 slices of ginger into the cavity and place into the Varoma dish. Make sure the chicken doesn’t cover all the holes to ensure the steam can be circulated. Set aside. dscf5301-1
  3. Place the remaining garlic, ginger and eschalots and oil into the bowl and sauté for 2 mins/ Varoma temperature/ Reverse, Speed 2. Add the rice and sauté for 2 mins/ 100 deg C/ Reverse, Speed 2. Pour mixture into the steaming basket and place pandan leave in the middle and set aside.dscf5309-1dscf5312-1
  4. Place 1 L of chicken stock into the bowl. Place the steaming basket of sautéed rice into the bowl as well and set the Varoma into position. Steam for 20 mins/ Varoma temperature/ Speed 4. Remove the steaming basket from the bowl, and place the rice into the Thermoserver to keep warm while the chicken continues steaming. dscf5303-1
  5. Top up the bowl with another 500ml of chicken stock. Replace the Varoma back into position and continue cooking for another 30-45 minutes/ Varoma temperature/ Speed 4, depending on the size of your chicken. In the last 10 minutes of steaming, add the bean sprouts around the chicken to steam. dscf5313-1
  6. Mix 3 tsp light soy sauce, 2 tbs of hot water, 1/2 tsp sesame oil and 1/4 tsp of sugar in a bowl. Chop up the chicken and pour this sauce over the chicken before serving.

dscf5315-1

Garnish with fried shallots and thinly sliced spring onions. Serve with the two dipping sauces prepared and a thick black soy sauce.

dscf5321-1

Tuck in and enjoy!

Would love to hear what you think after you’ve tried this! Email me photos of your creation as I would love to see them!

Follow me on Thermolove to get more inspiration!

Remember to always cook and bake with love!  

{Spencer Cooks} Claypot Rice

IMG_5917-1-1

Sine I had Spencer, I’ve been trying to convert my favourite recipes into one which I could use the Thermomix to cook in. Why you ask? There is less to wash (just the bowl) and it cooks quicker, without me needing to worry about burning anything!

This is a family favourite and I’ve cooked it in a few different ways. One of the most convenient way is to cook it in the rice cooker. That is before I tried making it using Spencer. hehe Of course, the main reason why people love having claypot rice is because they love the crispy bits at the bottom of the claypot. And yes, using the Thermomix won’t give you that result, but you can easily transfer everything into a claypot after it’s cooked and cook it over the stove for another 5 mins on high heat.

img_5914-1

The flavour though is still as delicious and with all my other dishes, it’s just full of wholesome ingredients. Every mouthful has a bit of chicken, chinese sausage, rice, shiitake mushrooms, fried shallots and spring onion. What’s not to love?

So here’s the steps to cooking it in a Thermomix if you have one, if not just click on the link about to make it in your rice cooker (:

Ingredients:

350g chicken thigh, cut into small chunks

200g jasmine rice

2 chinese sausages (lup cheong), sliced thinly

2 chinese liver sausages (optional), slice thinly

8 dried shiitake mushrooms, soaked and thinly sliced

4 cloves garlic

1 small onion (60-80g)

2 inch ginger, peeled and cut into coins

20g olive oil

900g water

For the marinade:

20g sesame oil

10g tamari/soy sauce

20g oyster sauce

20g dark sauce

10g black vinegar

10g shaoxing wine

pinch of ground white pepper

2 spring onions, finely sliced

fried shallots, to serve

thick dark sauce, to serve

IMG_5918-1

Steps :

  1. In your Thermomix bowl, place the garlic, onion & ginger and chop for 5 secs/sp 5/MC on. Scrape sides and add olive oil. Saute for 3 mins/100 degrees/reverse/sp 1/MC on.

IMG_5926-1

2. Add the chinese sausage and liver sausage, if using, and sauté for 2 mins/100 degrees/reverse/sp1/MC off. Then add the shiitake mushrooms and sauté for a further 3 mins/100degrees/reverse/sp 1.

IMG_5924-1

3. Add the chicken thigh pieces as well as the marinade and stir fry for 5 mins/100 degrees/reverse/spoon.

IMG_5922-1

4. Insert steaming basket into the bowl and weigh out 200g of jasmine rice. Rinse the rice under running water then toss it into the bowl with the rest of the ingredients. Fry the mixture for 1 1/2 mins/100 degrees/reverse/spoon. Place the steaming basket on a bowl, then carefully pour the rice & meat mixture into the steaming basket.

IMG_5920-1

IMG_5919-1

5. Without rinsing the bowl, place the steaming basket into the bowl and pour the sauce back into the bowl, as well as 900g of water. Cook the rice for 25 mins/Varoma/sp4/MC on, stopped at 15 mins to give it a stir using your spatula.

IMG_9658-1

6. Once it’s done, you can pour it into your thermoserver, and top it with the sliced spring onion and fried shallots and a swirl of thick dark sauce. If you prefer the crispy bits, place the cooked rice into a claypot and cook it over high heat for 5-10 mins, keeping a close eye to make sure it doesn’t burn. Then top it with spring onion, fried shallots and thick dark sauce when serving.

IMG_5916-1

ENJOY!

Toddler Eats : Cheesy Chicken & Veggies Meatballs

unnamed-2-1-1

Now that Lochlan has turned one (where did time go??), I’m trying to wean him from purees and introduce chunkier food, to encourage him to chew. Don’t get me wrong, he knows how to chew. But just prefers the purees cause he could finish it much quicker. haha So this marks the start to my new series of Toddler Eats! Hopefully it will be helpful to mummies out there who also want to try different foods and make them from their kitchen when time permits!

I decided to try making something I thought he might like! I mean, who doesn’t enjoy a good meatball? Especially with the addition of cheeeeese! These are quick and easy and you could have it on its own or mix it with pasta and some homemade tomato sauce and viola! Meatball pasta!

Meatball pasta

Lochlan’s Verdict : 2 1/2 meatballs (together with other food for dinner and strawberries for dessert hehe). I think thats a not too bad start!

 With the addition of cheese, you don’t even need to add salt to it. So it’s perfect even for babies from 10 months! Especially if you wanna do Baby-Led-Weaning. hehe Perfect finger food! These are not just for your little ones at home, the mr and I enjoyed it too!

So here’s the recipe, do give it a shot and let me know what u or your kiddos think!

Cheesy Chicken & Veggies Meatballs (A Food Made With Love Original Recipe)

Ingredients : Makes 24-26 meatballs

250g mince chicken (or meat of your choice)

2 stalks of spring onions, finely sliced

1 small carrot, grated

1/4 apple, grated

2 cloves of garlic, finely chopped

1/2 zucchini, grated

2-3 florets of broccoli, finely chopped

50g cheddar cheese, grated

1 egg

Ground black pepper, to season

Ingredients

(I’ve got a double yolk! Lucky me! hehe)

Steps :

1) Preheat your oven to 170 degrees celcius. Spray/Oil a baking tray/ casserole dish and set it one side.

2) Mix all the ingredients in a big bowl until well combined.

Mixed till well combined

3) Using a tablespoon, roll the mixture into balls. Do note that the mixture will be a bit wet and sticky. Wetting your hands might help in the rolling process.

Rolled out

4) Place the meatballs onto the baking dish, and bake for 12-15 mins, until the meatballs are cooked through and/or slightly browned.

All baked

5) Serve as is or you could cook it in a homemade tomato sauce and toss it through some cooked pasta for a variety!

Enjoy!

P.S : You don’t have to grate the vegetables if you’re cooking for yourself or older kids and want more texture. Just finely diced them and it would be as delicious! Also you could always change the types of vegetables in the meatballs, find a combination that wins the most votes in your house! (:

Have a lovely weekend everyone! Remember to always cook and bake with love!

Till the next post, xx !

Chicken Tagine – MealDish

chickentagine-1-1

Good evening dear readers! So sorry for the hiatus! It’s been a busy few months with Baby Ho’s grandparents (both paternal and maternal) and uncle & aunty coming to visit him consecutively! So I haven’t had the chance to sit down and churn posts out! But I will be doing it whenever I can, I promise!

So a few months back, I was introduced to MealDish. A website that aims to help people eat healthier, eat fresh, whilst minimising food waste and saving them time and money. This was absolutely perfect for me, especially since I can only get down to cooking with Baby Ho is asleep!

So off I went to the website and it’s so simple to use and follow!

MealDish 1

You just have to choose what you like, the number of recipes you want and then click the number of people you’re cooking for and get a meal plan! As easy as that!

MealDish 3

If you have any particular cuisine you would like to try, or specific ingredients to exclude or you have intolerances, there are options for you to tick too! So it’s really for everyone. I did different options and there are heaps of recipes to choose from. They even suggests side dishes that would go perfectly with the recipe you decide to cook that day. Sounds good, no?

MealDish 2

So I decided to just go with the quick option and choose the type of protein I wanted to cook with – Chicken! These were the 5 options I was given, and straight away I was drawn to the chicken tagine recipe, especially cause my beautiful tagine has been sitting on the shelf ever since I made my Moroccan meatballs one and half year ago! haha So it was time to get it on the stove again.

MealDish 4

If you’re a person who loves order and likes to get everything ready before you cook, Mealdish is definitely for you. The recipe comes with ‘Preparation Steps’ so that you have everything ready to go when you start cooking, missing nothing out! This cuts your cooking time and dinner will be on the table, pipping hot, in no time!

MealDish 5

Of course, there’s ‘Cooking Steps’ which are clear and easy to follow. What’s best about this website is that they have a ‘Shopping List’ tailored to the number of people you are cooking for. So there’s no waste and you just buy what is needed!

MealDish 6

Chicken Tagine

The results were as good as I thought it would be! The Mr loved it and even though I made enough for 4 people, we only had a serve left! What’s best is, this recipe had both protein and vegetables rolled into one! So we only needed that one dish for dinner. Paired with toasted Turkish bread – Dinner was ready within an hour!

So if you are looking for inspirations to cook your family or even just yourself something delicious, and want something quick and easy, hop onto the MealDish website and you will definitely find something you fancy!

Here’s the ingredients used for this dish. The steps are as described in the ‘Cooking Steps’ above! Or you could always just head to the website and search for the recipe to get the ingredient amounts tailored to the number of people you are cooking for!

Ingredients :

(For 4 people)

3/4 Onion whole

4 Garlic cloves

1 1/4 Celery stick

3/4 can tinned tomato

200g Pumpkin

2 tsp Coriander

3/4 tsp Ground Ginger

3/4 Cinnamon Stick

1/4 Lemon

1/4 cup apricot (I used raisins)

3/4 cup Chicken stock

8 Chicken drumstick

3/4 cup couscous

2 tbs fresh coriander

Chicken Tagine

Have a great rest of the day and hope you all will have an awesome hot dinner tonight since it’s freezing here in Melbourne!

Till the next post, remember to always cook and bake with love! xx

Ratatouille & A Good Food and Wine Tickets Giveaway!

Ratatouille

I’ve always wanted to give this a try. Ever since I watched the little rat who could cook this dish perfectly in Ratatouille! The vibrant colours just catches my eye instantly, and I think it’s such a celebratory dish – A celebration of colours!

Also, it was my brother’s birthday and I just wanted to cook him something special! Of course, I didn’t only cook him one dish, I made 4! haha This dish pairs perfectly with seafood, so I made some white wine and cream mussels, homemade garlic bread and mushroom risotto! Mmmm!

kors birthday

mushroom risotto

Don’t you love just cooking for people you love? It’s seriously something I love to do. And seeing their reaction when they take the first bite, it’s worth all the time and effort!

Ratatouille

Making the ratatouille was so much fun! One reason was that I got to play with the mandolin. Slicing those vegetables into the same thickness couldn’t be any easier! Fastest prep ever! haha So if you would like to impress your guest the next time u cook for them, I highly recommend making them ratatouille! My family loved how it looked, and enjoyed every single bite!

Ratatouille

Ratatouille (Adapted from The Walsh Cookbook)

Ingredients : 

1 medium green zucchini

1 medium yellow zucchini

1 eggplant (preferably the thin ones)

1 red capsicum

1 yellow/green capsicum

3 tomatoes

1 red onion, diced

2 cloves of garlic, finely chopped

1 can of tomato puree

1 tsp red chilli flakes

1 tsp italian herbs/ mixed herbs

1 tsp salt

2 tbs olive oil

Parmesan cheese

Steps :

1) Preheat oven to 170 degrees celcius. Try to get the vegetables around the same size, so that they would look neater in your dish! Slice all the vegetables using a mandolin and set aside.

2) Heat a cast iron pot (or any pot that can be used in an oven) over a medium-high flame. Add the olive oil, garlic and onion and sauté till fragrant, careful not to burn them, as they will have a bitter after taste. Add in the tomato puree, salt, herbs & chilli flakes, and allow it to simmer for 5 mins.

3) Carefully arrange the vegetables, alternating the slices of zucchini, eggplant, capsicum and tomato. Continue laying them till you fill your dish and cover with a baking paper to allow it to steam and cook, keeping all the juices in. Bake for 45 mins.

Covered with baking paper

4) Remove the baking paper and sprinkle the parmesan cheese over the top and serve!

How easy is that? And I can promise you that everyone will definitely enjoy this! So definitely give it a try when you can!

~~~~~~~~~~~~~~~~~~~~~~~~~~~~~~~~~~~~~~~~~~~

Okie. So now… time for the GIVEAWAY!

GFWS Citi_Logo 2015-02

So everyone knows the one event I look forward to every year is no doubt the Melbourne Good Food and Wine Show. Endless food & wine, beautiful produce and you get to meet your favourite chefs!

Good Food Theatre

This year, I am lucky enough to be given 2 double passes to giveaway to my readers! Whoopeedoo! What’s more exciting is that this year, Ainsley Harriott will be there for all 4 days of the show (5-8 June), along with Miguel Maestre & Alastair McLeod! So you definitely don’t want to miss the show this year! I can still remember when the Mr bought me tickets to a Private Dining session with Manu Feildel 3 years ago! Definitely a dream come true and an experience I will never forget!

How do you win those tickets? Easy!

  • Leave a comment and share with me the favourite dish you love to cook for your loved ones for a special occasion!
  • This giveaway is only open to Australian residents! (Sorry international readers!)
  • Please join me on my journey! Follow me on FacebookInstagram and Twitter! Let me know once you have followed me!
  • You may re-enter daily! One entry a day! (Oh yeah!)
  • Winners will be announced on the 29th of April, 10pm.
  • Winners will be picked via random.org and notified on this blog post and via email.

So what are you waiting for? Let’s go!

~~~~~~~~~~~~~~~~~~~~~~~~~~~~~~~~~~~~~~~~~~~~~~~

WINNERS!

Congratulations to Good Food Good Karma and Ross! Here’s what they said :


Comment Number 8 Winner 1 - Number 8

Comment number 6 Winner 2 - Number 6

Salmon and roast! Two delicious things I too would cook for loved ones at a special occasion! Congrats again and I will be in contact with you soon, through email! Thanks everyone for participating!

Disclaimer : The tickets were given in compliments of Red Agency and I wasn’t paid to run this giveaway. 

My Mr The Chef : Chicken Money Bag

IMG_4260-1-1

I am truly a lucky woman. I married a man who can seriously cook some delicious food! Although he’s really busy, he still takes time to cook something once in a while, which I am super thankful for! If you’ve followed me for a while now, you would have seen some of his creations : Hainanese chicken riceroasted beef ribshomemade bacon and polenta chips!

Ready to be served

I’m  not sure if you remember seeing this dish on Masterchef last year, but this was a dish by the ever so talented – Maggie Beer! The Mr wanted to make it the moment he saw it and boy am I glad he did. It was absolutely delicious! Tedious to prep, but all the hard work definitely paid off! Just imagine golden crispy chicken skin (like yum!) and the meat is just succulent and full of flavour on the inside! Together with the tomato chutney, it’s just the perfect pair!

Skinning the chicken

The trickiest part of the dish is probably skinning the whole chicken and keeping the skin whole, making sure there are no holes! The Mr did such a good job! He got it out in one go! Don’t think I would be able to do it. haha

So here’s the recipe from Maggie Beer! Give it a try, the hard work is definitely worth every delicious bite!

Chicken Money Bag with Preserved Lemon and Tomato Chutney (Recipe closely adapted from Maggie Beer, Serves 3)

For the chicken :

50g unsalted butter, plus extra for greasing

2 tbs olive oil

3 shallots, finely chopped

225g white button mushrooms, sliced

1 tbs lemon thyme leaves, chopped

1/3 cup white wine (I didn’t have Verjuice)

1.8kg whole chicken

100g chicken fat, finely chopped

1 1/2 tbs preserved lemon rind, chopped

1 1/4 tbs tarragon, chopped

15g sea salt flakes

1 egg

For the Preserved Lemon & Tomato Chutney : 

1 1/2 tbs Olive oil

1 onion, diced

2 cloves of garlic, chopped

2 sprigs of rosemary, finely chopped

1/4 cup white wine (Use Verjuice if you have it!)

800g tomato, roughly chopped

100g preserved lemon, rinsed and chopped

110ml Red wine vinegar

90g caster sugar

Steps :

1) Preheat oven to 200 degrees celcius.

2) Place a heavy based pan over medium-high heat, add butter and heat until it has turned nutty brown. Add olive oil, shallots and mushrooms and cook for 5 minutes. Add thyme, toss to combine, and season with salt.

3) Deglaze the pan with white wine and cook until it is sticky and reduced. Place mushroom mixture in a large bowl, and set aside to cool.

4) Skin chicken and place in a bowl. Remove chicken marylands, roughly chop leg and thigh meat, then pulse in a food processor to a coarse paste. Add chicken fat and pulse to combine. Remove breasts and cut into two centimeters dice.

Prepping the chicken and mushroom mixture

5) Finely chop mushroom mixture, then add the preserved lemon rind and tarragon to cooled mushroom mixture and mix until well combined. Add chicken leg mixture, diced chicken breast, sea salt flakes and egg to the bowl and slap the mixture against the side of the bowl until combined.

Prepping the ingredients

Chicken mixture

6) Cut chicken skin into three even triangular shaped pieces.

7) Over a 6cm springform baking tin, place a sheet of cling wrap, then spread skin over. 

Making the money bags

8) Add chicken mixture, bring each end of the skin together to create a pouch, then place in the fridge for ten minutes to allow the skin to set.

Adding the chicken mixture

Bringing the skin together to create a pouch

9) Invert baking tins onto a baking tray and carefully lift tins to remove. The skin should remain neatly tucked underneath, holding the parcel together as it cooks.

All ready to be baked!

10) Place baking tray into oven, and cook for 25-30 minutes or until the skin is golden brown. If you have a meat thermometer, check to see that the internal temperature has reached 62 degrees celcius.

Baked till golden brown

11) Remove from the oven and allow it to rest for 15 minutes.

12) For the chutney : Heat olive oil in a saucepan over medium heat. Add onion and cook for five minutes until softened and translucent. Add garlic and rosemary, and cook for two minutes.

13) Deglaze the pan with white wine then add the rest of the ingredients. Bring to the boil, then reduce to a rapid simmer and cook until the mixture is reduced to about two cups and a chutney-like consistency. Remove from heat, and place into a bowl to cool. Season to taste with salt.

14) To serve : Slice the chicken money bags and serve on the tomato chutney. Enjoy! (:

chicken money bag sliced

Enjoy the coming weekend everyone! (: Hope this has inspired you to cook something special for your loved ones this weekend! Remember to always cook and bake with love!

Till the next post, xx

HUON Smoked Salmon Bouquet Quiche

IMG_9891-2-2

I’m late, I’m late, I’m late! That was the only thing on my mind when I was trying to come up with something to make for the HUON Blogging Challenge as the post is due tomorrow! I have to admit, I was a bit hesitant to take up the challenge as we had to use smoke salmon and the only way I could have it is cooking it!

HUON smoked salmon banquet rolls

While looking at the HUON Reserve Selection range and deciding on what I should get, I was drawn to the banquet rolls immediately! If only I could have them as is, cos I would love to have man a roulette out of it! Oh wells! haha Have to concentrate on what I can have!

ingredients used

So I did what I usually do to get inspirations for the dish I want to make – walk down the aisles of the supermarket! It’s seriously the best place to come up with ideas for what to cook! Absolutely love doing it. hehe So I decided to make a quiche, for the first time! I know, what’s so exciting about a quiche? Well, I decided to make it look very different from a usual quiche, turning the salmon rolls into bouquet of flowers!

Smoked salmon bouquet quiche

I was super nervous making it because I’ve never made a quiche before, and I didn’t know if the shapes were going to last through the baking process! Thank goodness, the flowers were still “blooming” when I took it out of the oven. HOORAY! It worked! hehe The mr and sister-in-law really enjoyed it too! That’s always a plus! (: So here’s the recipe! Hope you will enjoy it as much as we did!

Smoked Salmon Bouquet Quiche (Serves 4-6 people)

For the sour cream short crust pastry : (Recipe from Maggie Beer)

125ml sour cream

250g plain flour, extra for dusting

200g butter

For the filling : 

200g HUON Reserve Selection banquet rolls

1 leek (white part, halved lengthwise and thinly sliced)

8 mushroom cups, sliced

10g chives, finely chopped

6-8 sundried tomatoes, finely chopped

1 tbs olive oil

10g unsalted butter

salt and black pepper, to season

200ml thickened cream

150g shredded cheddar

4 eggs

Steps :

Kneading the dough into a ball

1) For the short crust pastry : Preheat the oven to 200 degrees celcius. Dice the butter then pulse it in a food processor with the plain flour till it resembles bread crumbs. Add the sour cream and pulse it further till it resembles a dough.

Rolling out and dough and blind baking

2) On a clean surface, dust a bit of plain flour and knead the dough into a ball. Wrap the dough in cling wrap and allow it to rest in the fridge for 20 minutes. Roll the pastry out to 3-5mm thickness and roll it over 24cm quiche baking tin that has been oiled. Blind bake the pastry for 10-15 minutes, or until it’s lightly golden. Allow it to cool while preparing the other ingredients.

Lining the tin with the pastry

2)  For the filling : Heat a large heavy-based pan on high and add the olive oil. Fry the leek till soft and fragrant, then add the mushrooms. Season with salt and pepper and allow the mushrooms to fry till slightly caramelised. Add the butter and fold in the mushroom mixture. Set it aside and allow it to cool before placing it in the pastry case. Sprinkle the chives and sundries tomatoes evenly around the pastry case.

Frying the leek and mushroom mixture

3) Cut each banquet rolled salmon into half and place them in a shape of a flower. ( I did 3 large flowers, and 3 small flowers. But you can do as many as you like! Bring out your artistic side! )

4) Combine the thickened cream and eggs in a bowl and mix them till well combined. Pour it slowly into the case and around the smoked salmon, careful not to get any on.

eggs and cream mixture

5) Top the quiche with shredded cheddar, once again avoiding the smoked salmon.

6) Reduce the oven to 190 degrees celcius and bake the quiche for 35-40 minutes, or until the egg mixture is set and the top is golden brown.

Smoked salmon bouquet quiche

7) Serve with a side of salad with your favourite dressing and with extra sour cream to go with the quiche! Indulgence! ENJOY!

Quiche with a side of salad

I have to say I really enjoyed making those flowers out of the smoke salmon rolls! To make it look more like flowers, I piped stalks and leaves using the sour cream and fill the leaves with chopped chives! hehe I’m no artist, but I think this is the best I could do!

Hope you enjoyed the recipe, and do give it a try! I didn’t get to eat the smoked salmon on it’s own (before cooking), but the mr and sister-in-law said it was delicious and not as salty as the others they’ve had! Which is always a plus! Have a great weekend everyone!

Remember to always cook and bake with love! Till the next post, xx