HUON Smoked Salmon Bouquet Quiche

IMG_9891-2-2

I’m late, I’m late, I’m late! That was the only thing on my mind when I was trying to come up with something to make for the HUON Blogging Challenge as the post is due tomorrow! I have to admit, I was a bit hesitant to take up the challenge as we had to use smoke salmon and the only way I could have it is cooking it!

HUON smoked salmon banquet rolls

While looking at the HUON Reserve Selection range and deciding on what I should get, I was drawn to the banquet rolls immediately! If only I could have them as is, cos I would love to have man a roulette out of it! Oh wells! haha Have to concentrate on what I can have!

ingredients used

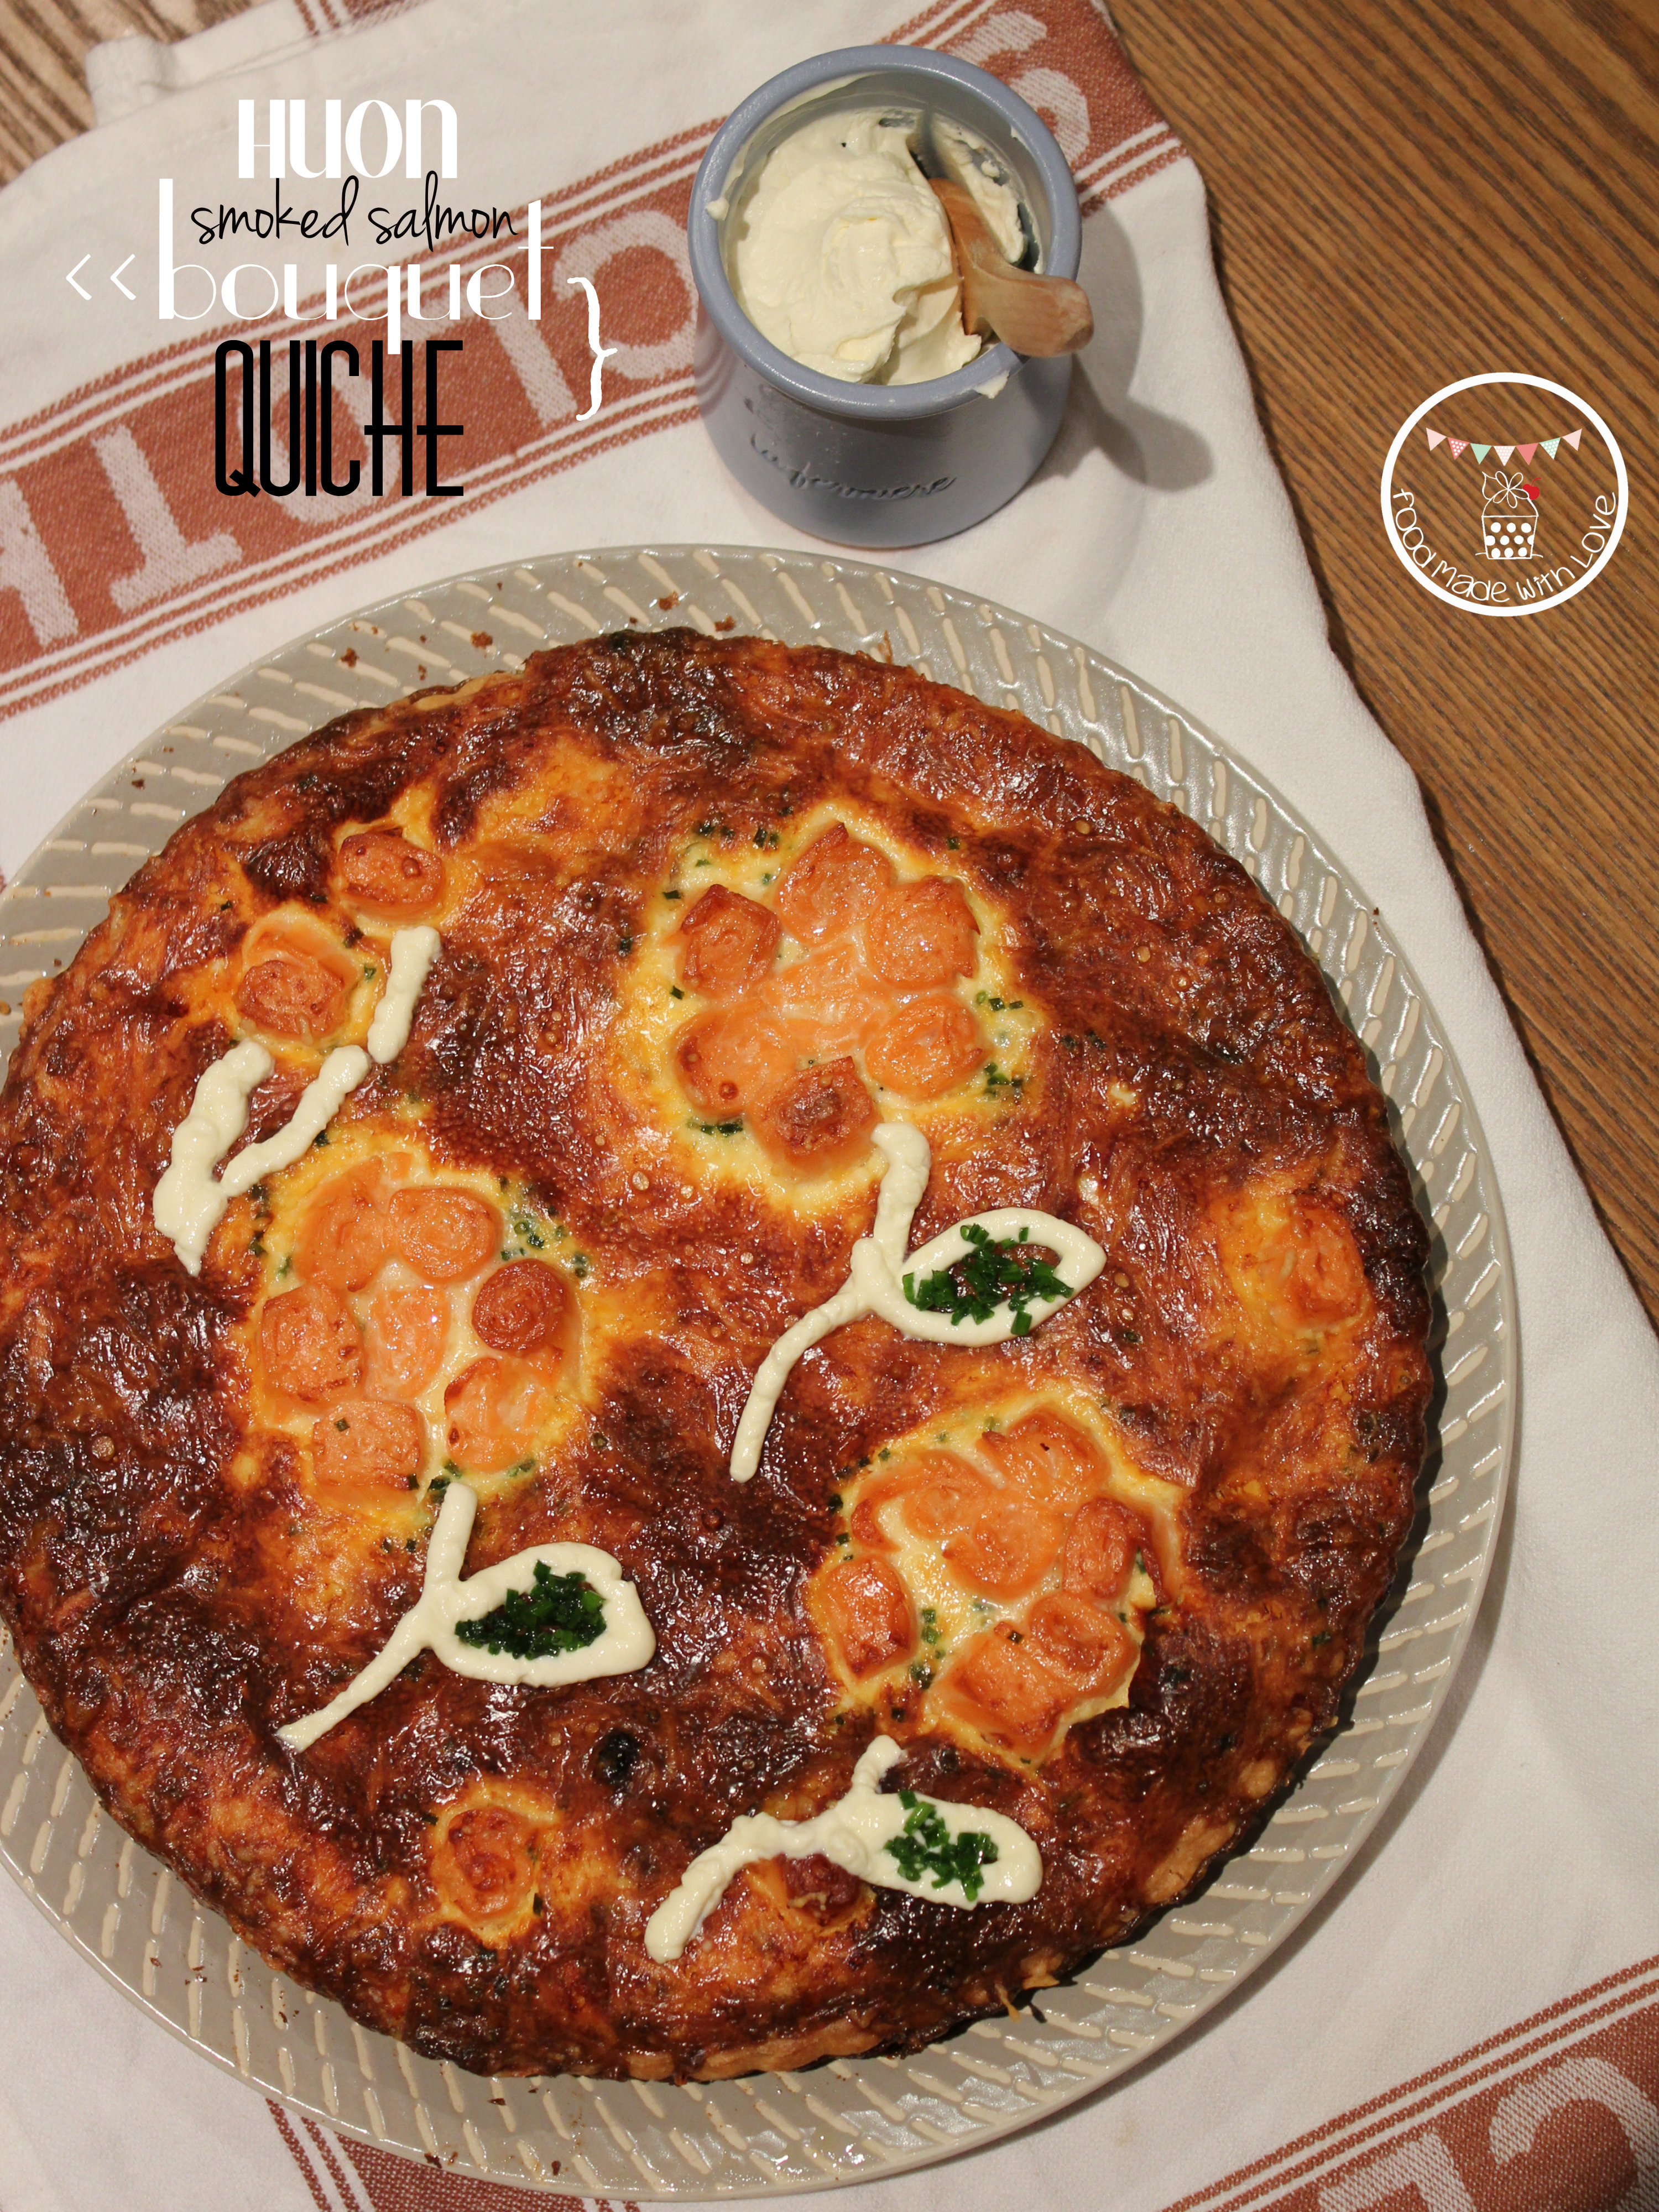
So I did what I usually do to get inspirations for the dish I want to make – walk down the aisles of the supermarket! It’s seriously the best place to come up with ideas for what to cook! Absolutely love doing it. hehe So I decided to make a quiche, for the first time! I know, what’s so exciting about a quiche? Well, I decided to make it look very different from a usual quiche, turning the salmon rolls into bouquet of flowers!

Smoked salmon bouquet quiche

I was super nervous making it because I’ve never made a quiche before, and I didn’t know if the shapes were going to last through the baking process! Thank goodness, the flowers were still “blooming” when I took it out of the oven. HOORAY! It worked! hehe The mr and sister-in-law really enjoyed it too! That’s always a plus! (: So here’s the recipe! Hope you will enjoy it as much as we did!

Smoked Salmon Bouquet Quiche (Serves 4-6 people)

For the sour cream short crust pastry : (Recipe from Maggie Beer)

125ml sour cream

250g plain flour, extra for dusting

200g butter

For the filling : 

200g HUON Reserve Selection banquet rolls

1 leek (white part, halved lengthwise and thinly sliced)

8 mushroom cups, sliced

10g chives, finely chopped

6-8 sundried tomatoes, finely chopped

1 tbs olive oil

10g unsalted butter

salt and black pepper, to season

200ml thickened cream

150g shredded cheddar

4 eggs

Steps :

Kneading the dough into a ball

1) For the short crust pastry : Preheat the oven to 200 degrees celcius. Dice the butter then pulse it in a food processor with the plain flour till it resembles bread crumbs. Add the sour cream and pulse it further till it resembles a dough.

Rolling out and dough and blind baking

2) On a clean surface, dust a bit of plain flour and knead the dough into a ball. Wrap the dough in cling wrap and allow it to rest in the fridge for 20 minutes. Roll the pastry out to 3-5mm thickness and roll it over 24cm quiche baking tin that has been oiled. Blind bake the pastry for 10-15 minutes, or until it’s lightly golden. Allow it to cool while preparing the other ingredients.

Lining the tin with the pastry

2)  For the filling : Heat a large heavy-based pan on high and add the olive oil. Fry the leek till soft and fragrant, then add the mushrooms. Season with salt and pepper and allow the mushrooms to fry till slightly caramelised. Add the butter and fold in the mushroom mixture. Set it aside and allow it to cool before placing it in the pastry case. Sprinkle the chives and sundries tomatoes evenly around the pastry case.

Frying the leek and mushroom mixture

3) Cut each banquet rolled salmon into half and place them in a shape of a flower. ( I did 3 large flowers, and 3 small flowers. But you can do as many as you like! Bring out your artistic side! )

4) Combine the thickened cream and eggs in a bowl and mix them till well combined. Pour it slowly into the case and around the smoked salmon, careful not to get any on.

eggs and cream mixture

5) Top the quiche with shredded cheddar, once again avoiding the smoked salmon.

6) Reduce the oven to 190 degrees celcius and bake the quiche for 35-40 minutes, or until the egg mixture is set and the top is golden brown.

Smoked salmon bouquet quiche

7) Serve with a side of salad with your favourite dressing and with extra sour cream to go with the quiche! Indulgence! ENJOY!

Quiche with a side of salad

I have to say I really enjoyed making those flowers out of the smoke salmon rolls! To make it look more like flowers, I piped stalks and leaves using the sour cream and fill the leaves with chopped chives! hehe I’m no artist, but I think this is the best I could do!

Hope you enjoyed the recipe, and do give it a try! I didn’t get to eat the smoked salmon on it’s own (before cooking), but the mr and sister-in-law said it was delicious and not as salty as the others they’ve had! Which is always a plus! Have a great weekend everyone!

Remember to always cook and bake with love! Till the next post, xx

Thai Fish Cakes & Red Nam Jim

Thai fish cake with red nam jim

Thai food. I absolutely adore it. It’s just a cuisine that makes the tongue do a dance after every bite/ mouthful! Sweet, sour, salty, spicy, tangy! All rolled into one! Absolutely mouth-watering! However, I have to admit, thai is the one cuisine that I seldom cook at home. I usually head out to the restaurants and leave it to the pros! Especially with the balancing of the flavours!

thai fish cakes

But I decided to be adventurous one Friday afternoon after getting off work early. I saw Wince (The Hungry Excavator) post a photo of him making some Thai Fish Cake earlier in the week, and I knew instantly I had to make some! So I looked for a recipe during my lunch time, and off I went to Springvale to grab the ingredients after work!

Thai fish cakes close up

It actually wasn’t too difficult to make! In fact, the only time consuming thing was cutting the long snake beans thinly. Besides that, everything is whizzed in the food processor and viola! You’ve got some delicious fish cakes for dinner! hehe So give these a shot. They are perfect party food, and are also great as starters. hehe Oh yes! Let’s not forget the spicy and tangy red nam jim sauce to go with the fish cakes! SO GOOD! The mr couldn’t get enough!

Thai Fish Cakes with Red Nam Jim (adapted from SBS, a Teage Ezard recipe)

600g fish paste

70g red curry paste

1 egg

1 tbs fish sauce

1 tsp sugar

4 fresh kaffir lime leaves, finely shredded

10 snake beans (or green beans), thinly slices

Vegetable oil for shallow frying

Steps :

1) In a food processor, place the fish paste, red curry paste, egg, fish sauce and sugar and blend till mixture is smooth and well combined.

Blending the ingredients in the food processor

2) Scoop the mixture into a large mixing metal bowl and add the finely shredded kaffir lime leaves and snake beans.

Adding the snake beans and kaffir lime leaves

3) Mix them together till everything is well combined.

All well combined

4) In a non-stick pan, heat some vegetable oil on medium heat, enough for shallow frying. Roll the mixture into balls and flatten them with your palm. Mine was about 5 cm in diameter and about 1 cm in thickness. Fry them until both sides are brown and crispy.

Frying them

frying both sides till brown and crispy

5) Drain them on some paper towel and serve them with the homemade red nam jim sauce (to follow).

cross section

Red Nam Jim Sauce

2 red birdseye chilli, seeded and roughly chopped

4 long red chillies, seeded and roughly chopped

2 cloves of garlic, peeled

Handful of coriander leaves and roots

2 tbs shaved palm sugar, add more if needed to balance flavour

125ml lime juice

1 1/2 tbs fish sauce

Steps :

1) In a mortar and pestle, add the chillies, garlic and coriander and pound till it forms a paste. Do be patient, as this might take a while!

Pounding the ingredients

2) Add the palm sugar and combine. Add the lime juice, a little at a time, until the mixture is well combined then add the fish sauce to balance the taste. It should be a little like a wetter version of a salsa. Remember to taste and add more of the flavourings to balance the sweet, sour and tang!

Thai fish cakes and red nam jim

ENJOY!

Remember to always bake and cook with love! xx

Crab Bee Hoon Soup

IMG_3295-1-1

Fridays in the Ho Clan only means one thing – Seafood day ! (: After all the poultry and red meat we have for the rest of the week, we abstain from them on Fridays and have seafood instead. Most of the time, I would make either fish or prawns (or both). But once in a while, I would do the occasional splurge and treat ourselves to something different. This time, it’s crab!

cleaning the crab

The Mr and I went to Springvale to scout for a mud crab. Thankfully, they sold live ones! But being the noob us, we didn’t really know how to pick! haha So we asked the store owner, and she kindly chose one for us. The Mr was a little disappointed that all the mud crabs were female, as he was really looking forward to having some crab roe! Maybe next time! hehe

Of course, the first thing we did when we got home was to pop the crab into the freezer so that it would fall into a deep sleep so that we could clean it out the humane manner. I didn’t dare do it, so the Mr had to help me with the killing and cleaning. hehe Thank goodness he was home! (:

crab bee hoon soup

I have been craving for some crab bee hoon (thick rice vermicelli) soup for the longest time! I remember the first time I’ve had it was at Mellben Seafood in Singapore. They, in my opinion, has the best crab bee hoon soup I’ve ever tasted! Being the instagram stalker that I am, I saw one of my friend’s post of their crab bee hoon soup and I couldn’t resist the temptation of trying it out on my own! hehe

crab bee hoon soup

The broth was so full of flavour with the subtle milkiness of the evaporated milk. Definitely satisfied my cravings! heh I have to say, it was surprisingly easy, besides the cleaning of the crabs! You could get it on the dining table within 30 minutes after everything is prepared. How good is that? As close to instant gratification as I can get! hehe

So do give this a go. Especially if you’re craving for something comforting for this cold winter nights we are having now! You’ll have warm, toasty and happy bellies for sure!

Crab Bee Hoon (Thick Rice Vermicelli) Soup (adapted from Rasa Malaysia)

1 kg mud crab, cleaned and cut into pieces

2oog dried thick vermicelli noodles

4 tbs unsalted butter

6-10 slices of peeled ginger

3 cups fish stock

1/2 cup evaporated milk

3 bunches of baby bok choy

1-2 stalks of spring onion, cut into 2-inch pieces

1 tbs shaoxing wine

1/2 tbs fish sauce, or according to taste

white pepper, for seasoning

fried shallots, garnish

crabs cleaned and cut into pieces

Steps :

1) Cook the dried thick vermicelli noodles according to the package till al dente. Drain the noodles in a colander and rinse them under cold water to remove the starch. Drain and set aside.

2) In a claypot or heavy-based pot, add the butter and allow it to melt. Add the sliced ginger and fry till fragrant.

frying the ginger in melted butter

3) Add the stock and bring it to a boil.

Bringing the broth up to a boil

4) Then add the evaporated milk followed by the crab.

Add the crab and evaporated milk

5) Cook for a few minutes until the crab turns red and is cooked. Add the baby boy choy, shaoxing wine, spring onion and season with fish sauce and ground white pepper. Bring to a boil, and add the rice noodles. Allow it to boil for a few minutes, garnish with fried shallots and serve!

crab bee hoon soup served!

 ENJOY!

My favourite part of the crab is definitely the pincers. It’s just full of sweet flesh and after I was done with mine, I just wanted more! So dear readers, which is your favourite part of the crab? heh Would love to know and how do you like to have your crabs too! hehe

Hope you all had a lovely week and not long till the weekend! So hang in there! Remember to always cook and bake with love! xx

Prawn Aglio Olio & A Wine Giveaway {Winners Announced}

Prawn aglio olio with Taylors Estate Pinot Gris

Good evening my dear readers! (: I hope that all of you had a wonderful weekend especially if you had a long one because of the Anzac Day holiday. I’ve got some exciting news to share with all of you! (: A week back, I received an email from  Taylors Wines who wanted me to do a wine giveaway on my blog. Of course, I said yes! hehe I was also so lucky to received not one, but two bottles of Pinot Gris to taste! How generous are they? Couldn’t be happier!

Pinot Gris came in the mail

Before I go into more details of the wine and the giveaway, I would like to tell me my thoughts about the Pinot Gris! Pinot Gris has always been one of my favourite type of wine. hehe I had a glass before bed one night, and really love how clean and crisp it tasted with tones of pear and apple. I knew instantly what would pair with it perfectly – seafood. My dearest husband read my mind, and made an amazing prawn aglio olio with pan seared scallops for dinner the following night!

Prawn aglio olio with seared scallops paired with a glass of pinot gris

He even used some of the wine in the sauce and it was so good! I wanted more (: The prawn and scallops were so sweet & succulent, it just complimented the wine perfectly.

Prawn aglio olio with seared scallops

Prawn Aglio Olio with Pan Seared Scallops (The mr’s original recipe, serves 2)

5 cloves of garlic, finely chopped

3 small chillies, de-seeded and finely chopped (you can increase or reduce the amount of chilli depending on how spicy you like your dish to be!)

2 tbs fresh basil, finely chopped

1/2 cup white wine (I used Taylors Estate Pinot Gris)

2 tbs olive oil (plus an extra tbs for the scallops)

Salt & pepper, to season

12 prawns, peeled and cut into chunks

6 scallops, left whole

Pasta of your choice

Freshly grated parmesan cheese, to garnish

Steps :

1) Cook the pasta according to the instructions on the package. Strain and run under cold water so that the pasta will not stick together. Set aside while cooking the sauce.

2) In a heavy based pot, heat the olive oil on medium fire and fry the garlic and chilli till fragrant.

3) Add the prawns, and fry till it’s coloured and no longer translucent. Add the chopped basil and white wine. Allow this to simmer for about 5 minutes.

4) Pour the pasta into the sauce and mix it well. Set aside, and keep it warm.

5) Pat dry the scallops and season with sea salt. Heat a non-stick pan on low-medium fire and add 1 tbs of olive oil. Place the scallops into the pan and flip every 30 seconds. Repeat each side for about 3 times, or until the scallops have a nice golden brown sear.

6) Place the pasta on a plate and top with 3 scallops per person. Garnish with some freshly grated parmesan cheese. Serve with a glass of Pinot Gris. ENJOY!

Prawn aglio olio with seared scallops

And now, the part that you’ve been waiting for so patiently…. the giveaway! (:

Taylors Wines is a family-owned wine company, in South Australia’s stunning Clare Valley, that was born from a passion of producing exceptional,  hand crafted wines. They are “Bringing great wines to life” and would love to give two lucky readers two bottles of their beautiful Taylors Wine –  Taylors Estate Pinot Gris 2011 and Taylors Estate Shiraz 2010.

Taylors Estate wines

How do you win these amazing wines?

To enter this giveaway:

  • All you have to do is to leave a comment at the end of the post to let me know : What is your favourite wine and what do you like to pair it with? 
  • Open to Australian residents only! (So sorry!)
  • Please make sure you’re of a legal drinking age and be able to provide a proof of age (it is needed to be sent to the company before they can send you the wine)
  • The winners will be drawn on the 5th of May 2013, Sunday at 10pm (Melbourne time).
  • You may reenter daily, one entry a day (YAY!)
  • Winner will be picked via random.org and announced on this blog and notified via email

Good luck and have a great week ahead! (:

Remember to always cook and bake with love!

This is a sponsored post by Taylors Wines. I tasted the Pinot Gris with compliments of Taylors Wines, however, the review, opinions are honest and based on my personal taste and preference. The recipe is a Food Made With Love original.

~~~~~~~~~~~~~~~~~~~~~~~~~~~~~~~~~~~~~~~~~~~~~~~~~~~~~~~~~~~~~~~~~~~~~~~~~~~~~~~~

And the winners are….. Diana and Coco!! (: Congratulations!

Winner - Number 4

Diana

Winner - Number 13Coco

Congratulations you two! (: Will be dropping you an email or a reply soon! Hope you enjoy the wines! hehe Have a great week ahead! xx

~~~~~~~~~~~~~~~~~~~~~~~~~~~~~~~~~~~~~~~~~~~~~~~~~~~~~~~~~~

Update : Unfortunately, I can’t get hold of Diana and Ross (who was picked after not hearing from Diana) so I had to pick another winner! Congrats Zoe!! (: Hope you will enjoy this wine with Jeff!

New winner

comment number 20

Seafood Mentaiko Pasta

Seafood Mentai Pasta

Happy Monday everyone! I hope you had a good start to the short week and no one had the Monday blues! (: Even if you did, hopefully this post would brighten up your day a little bit! hehe Recently, I chanced upon a small packet of flying fish roe (toboki) and just had to buy it! There was one dish I’ve been wanting to get, but couldn’t get hold of any fish roe to make it! So you can imagine when I saw it, I knew what I was going to make for dinner that day – seafood mentaiko pasta! Mmmmm (:

Flying fish roe

Mentaiko is just a cream-based fish roe sauce that is so delicious and not overly heavy. I know many a times, when you have cream-based pasta, it tends to be a little too thick and you end up not being able to finish the plate. But trust me, this is one creamy pasta which you would want to slurp every single drop and be tempted to lick the plate! hehe I first had this pasta many years back in Singapore at a Japanese cafe. It was the first time I had pasta at a Japanese cafe and I totally loved it! Just couldn’t have enough! Till this day, I could still remember the taste of it, and that to me means it was one super-awesome-yummilicious dish!

Seafood in mentaiko cream sauce

So I headed to my favourite Japanese blog, Just One Cookbook, that always had amazing recipes ( do head to her blog and look at her beautiful bento boxes for her children, so so detailed and I can just imagine how excited they are when they see it! ).  I changed it up a little bit but the sauce was delicious! In fact, the sauce wasn’t thick or heavy at all, which was great! hehe To add a little more richness to the dish I added a soft boiled egg so the runny yolk would flavour the sauce too. The mr and sister-in-law loved it! So I urge you to give this a try, especially if you like cream-based pastas! hehe

seafood mentaiko pasta

Seafood Mentaiko Pasta (adapted from Just One Cookbook, serves 6)

1kg seafood marinara

1 packet (about 50-100g) of tobiko (flying fish roe)

3 tbs japanese mayonnaise (kewpie)

3/4 cup of thickened cream

30g unsalted butter

2 small onions, finely chopped

4 cloves of garlic, finely chopped

1 cup fish stock

salt & pepper, to taste

shredded nori (seaweed), to garnish

6 soft boiled eggs, to serve

250g pasta (I used linguini but you can use any you fancy)

Steps :

1) In a large bowl, mix the tobiko, mayonnaise and cream gently until well combined. Set aside.

Tobiko, cream and mayonnaise

2) Boil a pot of water and cook the pasta according to the instructions on the packet. Drain and run it under cold water to make sure they don’t stick together. Set is aside.

3) In a heavy based pan or pot, add the butter and allow it to melt completely before adding the chopped onions and garlic. Fry till fragrant, with caution not to burn it or it will taste bitter.

Frying the onion and garlic

4) Add the seafood marinara and mix it well to make sure it is coated with the buttery onion and garlic mixture. Add the fish stock and allow it simmer for 15 minutes or until the seafood is completely cooked through.

Adding in the seafood

5) Use a strainer to take the seafood out and place them in the creamy tobiko mixture, reserving the liquid in the pot. Give it a good stir and make sure the seafood is well coated with the creamy sauce. Bring the liquid in the pot to a boil and reduce it till about around 1/4 cup and add that to the seafood mixture. Then add the pasta and slowly stir to combine everything together. Season with salt and pepper, careful not to over salt it as the tobiko can be quite salty (depending on how much you put)!

6) To serve, place some pasta and seafood on a plate, and add some mentaiko sauce. Top the pasta with a soft boil egg and sprinkle with some shredded nori. Cut through the egg and allow the egg yolk to flavour and thicken the sauce. ENJOY!

PS : Just found out mentaiko is different from tobiko! But you can use either and it will still be delish I’m sure! Sorry about that! (:

Have a great short week ahead dearest readers and remember to always cook and bake with love! (:

Fusion Friday : Seafood Green Curry Penne

TGIF everyone! (: I’m sure everyone is as thankful as I am that the weekend is here and if you’re as lucky, you would have Monday off and thus having a long weekend! Hurray! To celebrate, I’m going to share with you the recipe I promised from my last post of the Fresh Food Market at Highpoint!

I have to say, I’m not a huge fan of fusion food, but I will never turn down the chance to try it when it is presented in front of me. So as I was walking around the Fruit & Vegetable market and bouncing ideas off the Mr, he suggested that I should do an asian flavoured pasta dish! WAH! Why not, yes? So the first thing that came to my mind was green curry! I see this less fusion, more a pasta with an asian flare! hehe

I do apologise that I didn’t quite have the patience or time to make my own green curry paste, but I did find one that I’ve used before, so I knew it would taste yummy. If you have a green curry paste recipe to share with me, I would be more than happy to try it during my holidays! (:

So these were the ingredients I used for my dish. Which includes fresh ingredients that I got from the market, and a few that came in the hamper given by compliments of Highpoint and Mango! (: I am sure you have some things in the pictured stored in your pantry. I realise I didn’t place the onion and garlic that I used from my pantry in the picture. hehe But I’ve definitely written them in my recipe, so fear not!

This pasta dish definitely has a kick to it. It might most definitely be the green curry paste I used but I do love a dish with that leaves my tongue tingly and tummy warm and fuzzy! hehe So if you do like spicy food, and want to try something different, I urge you to give this a try! The Mr and I both loved it and would definitely make this again soon! (:

Seafood Green Curry Penne (a Food Made With Love original recipe, serves 4)

1/2 large onion, finely chopped

3 cloves of garlic, finely chopped

5 shiitake mushrooms, cut into quarters

3 green thai eggplant, cut into quarters

4 purple thai eggplants, cut into wedges

3 small Adelaide tomatoes, cut into chunks

5 grape tomatoes, sliced into half

50g fish cake, cut into strips

100g green curry paste

400ml light coconut milk

300ml water

500g supreme marinara mix

400g dried penne (or any type of pasta you prefer)

2 tbs olive oil

handful of Thai basil leaves

fried shallots and coriander, to garnish

Steps :

1) In a large pot of water, add some salt and bring it to a boil. Cook pasta according to the directions on the packet. Drain and run it under cold water. Set it aside while preparing the green curry.

2) In a frying pan/wok, heat the olive oil on medium heat and fry the green curry paste till fragrant. Add the chopped onion and garlic and fry till it’s soft. Be careful not to burn the garlic, as there would be a bitter after taste.

3) Carefully add the coconut milk into the pan. Stir it until the paste is mixed well and combined with the coconut milk.

3) Add the eggplants and cover the pan, allowing it to simmer for 10 minutes. Then add the tomatoes and mushrooms and return the lid on the pan. Simmer for another 10 minutes or until the tomatoes are soft.

4) Add the water, fish cake and seafood and allow it to come to a boil. Careful not to boil it for too long, as the seafood might over cook and get tough! Add the thai basil leaves and stir it into the sauce.

5) Pour in the cooked pasta and toss it well, making sure every single penne is coated with the sauce. If it’s looking a little dry, add a bit more water and give it a good stir.

6) Garnish with fried shallots and chopped coriander before serving.

Enjoy! (: I know it seems like alot of preparation to go through, but do give this a try and let me know what you think and if you added other things! Would definitely love to try other combinations. Have a great weekend everyone! (:

Remember to always cook and bake with love!

Seafood Paella

I really wanna go to Europe. It has been a ultimate dream to head there for a holiday with the mr. We are in the midst of planning and saving. But not sure when that dream would officially take off! Of course there are a few must go places besides the obviouse France and Italy. But there are others that I would love to visit too! One of which, is Spain. Shopping in Madrid and of course trying the food the country has to offer!

But since it’s going to be at least a while before we get there, I thought I’d bring one of the famous dish you can find in Spain : Paella.

I remember walking at South Melbourne market one of the Saturdays, and seeing huge paella pans cooking these yummy rice with stock bubbling away. Every grain of rice would absorb the delicious and flavourful stock, plump up and become this amazing dish with lots of ingredients, which reminds me of claypot rice. haha I’m not sure what the traditional ones have, but because it was Friday, I used a variety of seafood when I cooked mine! (: Plus, I crank the heat up the last 5-10 mins when cooking to get a crispy base! hehe Just how the mr likes it!

I have to say, I was quite surprised at how easy it was to cook it. You don’t have to stand next to the pan and keep stirring like a risotto. Just let the rice do it’s own magic, and just keep an eye on it every 10-15 minutes as it is cooking. Place the seafood and before you know it, dinner will be served! So give it a shot, just simply delicious! hehe (:

Seafood Paella (adapted from Carlos Lopez on SBS Food, serves 2-3)

2 cloves of garlic, finely chopped

1 onion, finely chopped

1 large red chilli, finely chopped

1 tomato, chopped

2 tbs olive oil

1/4  red capsicum, roasted and thinly sliced lengthwise

1/4 green capsicum, roasted and thinly sliced lengthwise

 375ml fish stock

160g arborio rice

pinch of saffron

1 tsp hot paprika

1 calamari (about 200g), diced

8 king prawns

12 mussels

200g basa fillet, sliced

12 pippies/clams

salt and pepper, to season

3 tbs chopped parsley

Steps :

1) In a non-stick shallow frying pan (I used the IKEA 365+ series) / paella pan, heat the olive oil over medium heat and fry the garlic, onion, chilli until soft and fragrant. Do be careful not to burn it, as it will turn bitter.

2) Add the rice and give it a stir to make sure each grain of rice is well coated with the oil.

3) Add the chopped squid and fry for 2-3 minutes and stir in the fish stock, saffron, salt, pepper and paprika. Allow the stock to come to a boil and the rice will start absorbing the stock.

4) Keeping the heat at medium, add the fish and prawns and allow it to cook for 10 minutes. At this point, the stock would have reduced and the rice would have swelled and you could see it resurfacing. Add the mussels, pippies, and chopped tomatoes and cook until all the shells are open.

5) Turn the heat to high for the last 10 minutes to get the crispy base that would add a really nice texture to the dish. (Optional but highly recommended). Place the slices of roasted capsicum and and garnish with chopped parsley before serving.

Note : Try to resist from stirring the dish while it’s cooking or else it won’t have the nice crust! (:

ENJOY!

Corn & Okra Fritters with Smoked Salmon

Corn fritters. Who doesn’t like them? Whenever I go for brunch, I will first look out for corn fritters on the menu and if there isn’t any then I will venture out to try something else! That’s how much I like corn fritters. Nothing better than having something crispy on the outside and soft on the inside with corn kernels bursting in your mouth with every bite! mmmm.

Corn fritters at Replete Providore sparked my obsession with fritters (:

The best corn fritters I had was at Replete Providore in Hawthorn and I couldn’t get enough of it after that! I can proudly say Replete Providore sparked my addiction to corn fritters (yes, it was THAT good!)! They serve theirs with bacon, sour cream and tomato-chilli relish which was sweet and tangy which I love!

But cause I made these on a Friday, and it’s meatless Friday. I had to use something else besides bacon. So opening the drawers in the fridge, I found my last packet of smoked salmon! The first was used to make the tomato and cream smoked salmon pasta a week ago! *PHEW* Lucky I had a packet left, as I was sure the saltiness of the smoked salmon would be perfect with these fritters!

 Instead of layering it with sour cream and the tomato-chilli relish, I thought I made it less sinful (just a tad bit) by mixing plain greek yogurt with the aubergine (eggplant) and chilli pickle I bought from a little store at Mount Dandenong a while back.

It was perfect! Creamy-sourish-spicy and added just a little touch of sweetness with some sweet chilli sauce as garnish.

These fritters were crispy and I added cheese to it so it was cheesy in the center. Everything you would want in your breakfast. The addition of okra was surprisingly good because it added an extra crunch. Just love different textures in my dishes! hehe So if you’re a corn fritter lover like me and wanna try whipping this up, here is the recipe! (: I’m very sure you will love it! Cos the mr and I both did!

Corn & Okra Fritters with Smoked Salmon (makes 5 relatively large fritters, serves 2)

 12 pieces of okra, sliced

1/2 cup of corn kernels, roasted in the oven and cooled down

1/2 cup + 2 tbs plain flour

1/2 cup chredded tasty cheese

4 mini bocconcini, sliced thinly

2 tbs grated parmesan cheese

1/2 tsp sea salt

1/3 cup whole milk

1 egg

freshly ground black pepper, to season

fresh coriander, for garnish

2 tbs sweet chilli sauce, for garnish (1 tbs for each stack)

vegetable oil, for frying

aubergine & chilli pickle yogurt dressing (optional, recipe to follow)

100g smoked salmon

Steps :

1) Heat the vegetable oil in a deep frying pan over medium heat while preparing the fritter batter.

2) In a large mixing bowl, combined the okra, corn kernels, the cheeses, salt and pepper and mix it well. Add the flour and stir with a wooden spoon/spatula. Add the milk and egg and mix until there are no dry flour left in the bowl.

3) Once the oil is hot enough (test this by dropping a little of the batter into the oil, it should bubble vigorously), drop 2 heap tablespoons of batter into the oil and flatten it with a wooden spoon. Make sure it’s not too thick, or else the middle might be raw after being pan-fried.

4) Fry the batter one at a time, or at most 2. Fry each side for 2-3 minutes or until each side is a beautiful golden brown. Remove and place on a paper towel to absorb excess oil.

5) Serve with alternate layers of fritters, yogurt dressing and smoked salmon in a stack and top with a tablespoon of sweet chilli sauce for each stack and fresh coriander. Make sure you serve the fritters warm/hot!

Aubergine & Chilli Pickle Yogurt Dressing

2-3 heap tbs of aubergine & chilli pickle (or any relish you have in your pantry)

4-5 tbs plain greek yogurt

Step :

Just mix the pickled relish and the greek yogurt together till well combined. Chill in the fridge till ready to be used!

oh yes, if you don’t have the aubergine and chilli pickle, you can use any relish you want and use plain greek yogurt or sour cream instead! The beauty of making your own breakkie at home – use what you have at home and let your creativity run wild!

Enjoy! (:

{Quick & Easy} Smoked Salmon Pasta

Aren’t there days that you just want to whip something up in the kitchen as quickly as possible? We came back way past lunch time and just needed to get some food in our system. So I looked into our fridge and found a packet of smoked salmon. Perfect! (: I got the dish plated in less than 30 minutes! Talk about quick aye?

Cream and Tomato Smoked Salmon Pasta (serves 2)

100g smoked salmon

2 cloves of garlic, finely chopped

1/2 onion, finely chopped

6 sundried tomatoes, finely chopped

2 tbs tomato paste

50ml dry white wine

100ml thickened cream

50g butter

salt & ground black pepper, to season

chopped parsley & chilli flakes, to garnish

100-125g dried pasta (cooked according to the packet, drained and set aside)

Steps : 

1) Place a heavy-based pan over medium heat and melt the butter. Add the garlic, onion and sundried tomatoes and fry till the onions soften. Careful not to burn the garlic, as it will turn bitter.

2) Add the white wine and cream and allow it to come to a boil. Add the tomato paste and mix till well combined. Pour the pasta into the pan and mix it well, making sure the pasta is coated well with the sauce.

3) Take the pan off the heat, and put in the smoked salmon. Fold the salmon into the pasta and bring it back onto the heat for a further 2-3 minutes. Season with salt and freshly ground black pepper.

4) Serve and garnish with parsley and chilli flakes. ENJOY! (:

Easy peasy, quick & easy!

Garlic and Chilli Clams

Been missing home quite a bit lately and one thing that gives me great comfort is food. Not just any food, but specifically mummy-inspired food! When I do head back for the holidays, I try to have as many meals as I can at home, cause mummy would just make all my favourites. Yup, I’m very blessed (:

So last Friday, when I was walking around Springvale market, and feeling homesick, I decided to make a dish that would make me warm and fuzzy inside. And one thing came to my mind – garlic and chilli clams. Spicy and the broth that accompanies it would be perfect with rice/quinoa and the best thing to have on a cold night!

and it’s really not difficult to make. Could get it from the pan to the dining table in less than 30 mins! We had this with the cheesy butter prawns in my previous post and with steamed jasmine rice, everything was just finger licking good! (I mean it, you need to use your hands to pick the clams up and SLURP! haha) Doesn’t food just taste better when you use your hands?

Garlic and Chilli Clams (Adapted from mummy’s Recipe)

800g clams, cleaned well soaking in cold water for at least 1 hour (changing water frequently)

8 cloves of garlic, finely chopped

3 large chillies, finely chopped

small knob of ginger, slice thinly

1 tbs shaoxing wine

2 tbs fish sauce

1 cup water

2 tbs vegetable oil

salt and pepper, to season

fresh coriander, to garnish

Steps :

1) In a heavy-base wok, heat the oil on high heat and fry the garlic and chilli till fragrant, not till the garlic turns brown and be careful not to burn the garlic or there will be a bitter taste.

2) Add the clams and fry till well combined. Add the shaoxing wine and allow the wine to cook down. Add the fish sauce and season with salt and pepper. Add water and cover the wok, lowering the heat, allowing the clams to simmer for 15mins or until all (if not most) of the clams have opened. Discard those that are close.

3) Serve in a large bowl and garnish with coriander. ENJOY! (: Remember to use your fingers and slurp all the remaining broth that’s leftover once you’re done with the shells! hehe

So what’s the food that comes to your mind when you think of home? (: