{Spencer Cooks} Claypot Rice

IMG_5917-1-1

Sine I had Spencer, I’ve been trying to convert my favourite recipes into one which I could use the Thermomix to cook in. Why you ask? There is less to wash (just the bowl) and it cooks quicker, without me needing to worry about burning anything!

This is a family favourite and I’ve cooked it in a few different ways. One of the most convenient way is to cook it in the rice cooker. That is before I tried making it using Spencer. hehe Of course, the main reason why people love having claypot rice is because they love the crispy bits at the bottom of the claypot. And yes, using the Thermomix won’t give you that result, but you can easily transfer everything into a claypot after it’s cooked and cook it over the stove for another 5 mins on high heat.

img_5914-1

The flavour though is still as delicious and with all my other dishes, it’s just full of wholesome ingredients. Every mouthful has a bit of chicken, chinese sausage, rice, shiitake mushrooms, fried shallots and spring onion. What’s not to love?

So here’s the steps to cooking it in a Thermomix if you have one, if not just click on the link about to make it in your rice cooker (:

Ingredients:

350g chicken thigh, cut into small chunks

200g jasmine rice

2 chinese sausages (lup cheong), sliced thinly

2 chinese liver sausages (optional), slice thinly

8 dried shiitake mushrooms, soaked and thinly sliced

4 cloves garlic

1 small onion (60-80g)

2 inch ginger, peeled and cut into coins

20g olive oil

900g water

For the marinade:

20g sesame oil

10g tamari/soy sauce

20g oyster sauce

20g dark sauce

10g black vinegar

10g shaoxing wine

pinch of ground white pepper

2 spring onions, finely sliced

fried shallots, to serve

thick dark sauce, to serve

IMG_5918-1

Steps :

  1. In your Thermomix bowl, place the garlic, onion & ginger and chop for 5 secs/sp 5/MC on. Scrape sides and add olive oil. Saute for 3 mins/100 degrees/reverse/sp 1/MC on.

IMG_5926-1

2. Add the chinese sausage and liver sausage, if using, and sauté for 2 mins/100 degrees/reverse/sp1/MC off. Then add the shiitake mushrooms and sauté for a further 3 mins/100degrees/reverse/sp 1.

IMG_5924-1

3. Add the chicken thigh pieces as well as the marinade and stir fry for 5 mins/100 degrees/reverse/spoon.

IMG_5922-1

4. Insert steaming basket into the bowl and weigh out 200g of jasmine rice. Rinse the rice under running water then toss it into the bowl with the rest of the ingredients. Fry the mixture for 1 1/2 mins/100 degrees/reverse/spoon. Place the steaming basket on a bowl, then carefully pour the rice & meat mixture into the steaming basket.

IMG_5920-1

IMG_5919-1

5. Without rinsing the bowl, place the steaming basket into the bowl and pour the sauce back into the bowl, as well as 900g of water. Cook the rice for 25 mins/Varoma/sp4/MC on, stopped at 15 mins to give it a stir using your spatula.

IMG_9658-1

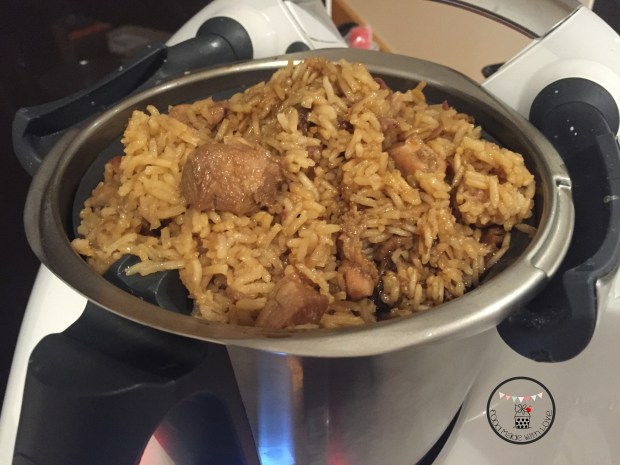
6. Once it’s done, you can pour it into your thermoserver, and top it with the sliced spring onion and fried shallots and a swirl of thick dark sauce. If you prefer the crispy bits, place the cooked rice into a claypot and cook it over high heat for 5-10 mins, keeping a close eye to make sure it doesn’t burn. Then top it with spring onion, fried shallots and thick dark sauce when serving.

IMG_5916-1

ENJOY!

{Spencer Cooks} Gula Melaka Kaya

unnamed-12-1-1

For those who follow me on Instagram (@lianneelow) you would know I have a new baby. A machine baby haha My dearest mr has got me the dream machine of my life – A thermomix! I was so so excited when I placed my order and couldn’t wait for it to arrive! I have to admit, I’ve always wanted one. But gave it a pass cos of two main reasons – 1) the cost and 2) I already have a whole range of machines in my small kitchen. But having it for the past 2 weeks, I think I can now sell my other machines (besides my kitchenaid hehe)!

Spencer

So everyone, meet Spencer! (: Don’t ask me how I came up with the name. It just came to me when I got it. So Spencer it is! I’ve not stopped using it since it arrived! And don’t you worry, I will be sharing the recipes I’ve tried (and some original recipes, hooray!) with all of you! hehe

The very first thing I’ve made is  recipe I’ve been wanting to make for ages. I kept it in my “in case I get a thermomix folder” haha Gula Melaka Kaya (Coconut jam)! YUM! Living in Singapore, our breakfast staple is hot and crispy kaya toast with a cup of hot tea/coffee, with a side of half-boiled eggs! Seriously the best start to the day! So I was really excited to make it so we could have that in Melbourne too!

Piggy currant buns with kaya

Lochlan was super lucky and loved to get some delicious soft and fluffy piggy buns from The Bakeanista (check her blog out! She makes the most amazing bread!) and I too had some with the kaya that I made! Perfect combination! Mmmmmm (:

So here is the recipe for the Gula Melaka Kaya that Spencer made!

{Spencer Cooks} Gula Melaka Kaya (Coconut Custard Jam, Recipe from Thermomix Recipe Community)

250g Gula Meleka

3 egg yolks, large

1 whole egg

250g coconut cream (I used Kara carton)

3 fresh pandan leaves, tied into a knot

Steps :

Milling the gula melaka

1) Break the gula melaka into ice-cubed sized pieces before putting them into the thermomix. Mill the gula melaka, speed 10/10secs.

Milled gula melaka

2) Add egg yolks and egg, mix speed 3 until the sugar has dissolved. Using the spatula, scrape the base to make sure all the sugar has dissolved.

Add the egg and egg yolks

3) Cook for 10 mins/90 degrees/Speed 3.

4) Add coconut cream and pandan knot into the mixture, cook for 45 minutes/100 degrees/reverse/Speed 3. Leaving the MC out allowing the steam through.

Adding coconut cream and pandan knot

5) Check the consistency of the kaya, it should be thick, glossy and smooth. If it’s not thicken, repeat step 4 for another 10 minutes. Allow it to cool then place into glass jars/jam jars and keeps well  in the fridge for 2-3 weeks!

Kaya ready!

I was surprised that it wasn’t the deep dark brown kaya I was looking for. But it was still thick, glossy and absolutely delicious! I have also collected more kaya recipes and will be trying them again soon! So stay tuned for the comparison!

Piggy currant bun

Remember to have it with some toast/bun and a cup of hot coffee/tea! (:

Have a great Hump Day everyone and remember to always cook and bake with love!

Toddler Eats : Cheesy Chicken & Veggies Meatballs

unnamed-2-1-1

Now that Lochlan has turned one (where did time go??), I’m trying to wean him from purees and introduce chunkier food, to encourage him to chew. Don’t get me wrong, he knows how to chew. But just prefers the purees cause he could finish it much quicker. haha So this marks the start to my new series of Toddler Eats! Hopefully it will be helpful to mummies out there who also want to try different foods and make them from their kitchen when time permits!

I decided to try making something I thought he might like! I mean, who doesn’t enjoy a good meatball? Especially with the addition of cheeeeese! These are quick and easy and you could have it on its own or mix it with pasta and some homemade tomato sauce and viola! Meatball pasta!

Meatball pasta

Lochlan’s Verdict : 2 1/2 meatballs (together with other food for dinner and strawberries for dessert hehe). I think thats a not too bad start!

 With the addition of cheese, you don’t even need to add salt to it. So it’s perfect even for babies from 10 months! Especially if you wanna do Baby-Led-Weaning. hehe Perfect finger food! These are not just for your little ones at home, the mr and I enjoyed it too!

So here’s the recipe, do give it a shot and let me know what u or your kiddos think!

Cheesy Chicken & Veggies Meatballs (A Food Made With Love Original Recipe)

Ingredients : Makes 24-26 meatballs

250g mince chicken (or meat of your choice)

2 stalks of spring onions, finely sliced

1 small carrot, grated

1/4 apple, grated

2 cloves of garlic, finely chopped

1/2 zucchini, grated

2-3 florets of broccoli, finely chopped

50g cheddar cheese, grated

1 egg

Ground black pepper, to season

Ingredients

(I’ve got a double yolk! Lucky me! hehe)

Steps :

1) Preheat your oven to 170 degrees celcius. Spray/Oil a baking tray/ casserole dish and set it one side.

2) Mix all the ingredients in a big bowl until well combined.

Mixed till well combined

3) Using a tablespoon, roll the mixture into balls. Do note that the mixture will be a bit wet and sticky. Wetting your hands might help in the rolling process.

Rolled out

4) Place the meatballs onto the baking dish, and bake for 12-15 mins, until the meatballs are cooked through and/or slightly browned.

All baked

5) Serve as is or you could cook it in a homemade tomato sauce and toss it through some cooked pasta for a variety!

Enjoy!

P.S : You don’t have to grate the vegetables if you’re cooking for yourself or older kids and want more texture. Just finely diced them and it would be as delicious! Also you could always change the types of vegetables in the meatballs, find a combination that wins the most votes in your house! (:

Have a lovely weekend everyone! Remember to always cook and bake with love!

Till the next post, xx !

Chicken Tagine – MealDish

chickentagine-1-1

Good evening dear readers! So sorry for the hiatus! It’s been a busy few months with Baby Ho’s grandparents (both paternal and maternal) and uncle & aunty coming to visit him consecutively! So I haven’t had the chance to sit down and churn posts out! But I will be doing it whenever I can, I promise!

So a few months back, I was introduced to MealDish. A website that aims to help people eat healthier, eat fresh, whilst minimising food waste and saving them time and money. This was absolutely perfect for me, especially since I can only get down to cooking with Baby Ho is asleep!

So off I went to the website and it’s so simple to use and follow!

MealDish 1

You just have to choose what you like, the number of recipes you want and then click the number of people you’re cooking for and get a meal plan! As easy as that!

MealDish 3

If you have any particular cuisine you would like to try, or specific ingredients to exclude or you have intolerances, there are options for you to tick too! So it’s really for everyone. I did different options and there are heaps of recipes to choose from. They even suggests side dishes that would go perfectly with the recipe you decide to cook that day. Sounds good, no?

MealDish 2

So I decided to just go with the quick option and choose the type of protein I wanted to cook with – Chicken! These were the 5 options I was given, and straight away I was drawn to the chicken tagine recipe, especially cause my beautiful tagine has been sitting on the shelf ever since I made my Moroccan meatballs one and half year ago! haha So it was time to get it on the stove again.

MealDish 4

If you’re a person who loves order and likes to get everything ready before you cook, Mealdish is definitely for you. The recipe comes with ‘Preparation Steps’ so that you have everything ready to go when you start cooking, missing nothing out! This cuts your cooking time and dinner will be on the table, pipping hot, in no time!

MealDish 5

Of course, there’s ‘Cooking Steps’ which are clear and easy to follow. What’s best about this website is that they have a ‘Shopping List’ tailored to the number of people you are cooking for. So there’s no waste and you just buy what is needed!

MealDish 6

Chicken Tagine

The results were as good as I thought it would be! The Mr loved it and even though I made enough for 4 people, we only had a serve left! What’s best is, this recipe had both protein and vegetables rolled into one! So we only needed that one dish for dinner. Paired with toasted Turkish bread – Dinner was ready within an hour!

So if you are looking for inspirations to cook your family or even just yourself something delicious, and want something quick and easy, hop onto the MealDish website and you will definitely find something you fancy!

Here’s the ingredients used for this dish. The steps are as described in the ‘Cooking Steps’ above! Or you could always just head to the website and search for the recipe to get the ingredient amounts tailored to the number of people you are cooking for!

Ingredients :

(For 4 people)

3/4 Onion whole

4 Garlic cloves

1 1/4 Celery stick

3/4 can tinned tomato

200g Pumpkin

2 tsp Coriander

3/4 tsp Ground Ginger

3/4 Cinnamon Stick

1/4 Lemon

1/4 cup apricot (I used raisins)

3/4 cup Chicken stock

8 Chicken drumstick

3/4 cup couscous

2 tbs fresh coriander

Chicken Tagine

Have a great rest of the day and hope you all will have an awesome hot dinner tonight since it’s freezing here in Melbourne!

Till the next post, remember to always cook and bake with love! xx

Ratatouille & A Good Food and Wine Tickets Giveaway!

Ratatouille

I’ve always wanted to give this a try. Ever since I watched the little rat who could cook this dish perfectly in Ratatouille! The vibrant colours just catches my eye instantly, and I think it’s such a celebratory dish – A celebration of colours!

Also, it was my brother’s birthday and I just wanted to cook him something special! Of course, I didn’t only cook him one dish, I made 4! haha This dish pairs perfectly with seafood, so I made some white wine and cream mussels, homemade garlic bread and mushroom risotto! Mmmm!

kors birthday

mushroom risotto

Don’t you love just cooking for people you love? It’s seriously something I love to do. And seeing their reaction when they take the first bite, it’s worth all the time and effort!

Ratatouille

Making the ratatouille was so much fun! One reason was that I got to play with the mandolin. Slicing those vegetables into the same thickness couldn’t be any easier! Fastest prep ever! haha So if you would like to impress your guest the next time u cook for them, I highly recommend making them ratatouille! My family loved how it looked, and enjoyed every single bite!

Ratatouille

Ratatouille (Adapted from The Walsh Cookbook)

Ingredients : 

1 medium green zucchini

1 medium yellow zucchini

1 eggplant (preferably the thin ones)

1 red capsicum

1 yellow/green capsicum

3 tomatoes

1 red onion, diced

2 cloves of garlic, finely chopped

1 can of tomato puree

1 tsp red chilli flakes

1 tsp italian herbs/ mixed herbs

1 tsp salt

2 tbs olive oil

Parmesan cheese

Steps :

1) Preheat oven to 170 degrees celcius. Try to get the vegetables around the same size, so that they would look neater in your dish! Slice all the vegetables using a mandolin and set aside.

2) Heat a cast iron pot (or any pot that can be used in an oven) over a medium-high flame. Add the olive oil, garlic and onion and sauté till fragrant, careful not to burn them, as they will have a bitter after taste. Add in the tomato puree, salt, herbs & chilli flakes, and allow it to simmer for 5 mins.

3) Carefully arrange the vegetables, alternating the slices of zucchini, eggplant, capsicum and tomato. Continue laying them till you fill your dish and cover with a baking paper to allow it to steam and cook, keeping all the juices in. Bake for 45 mins.

Covered with baking paper

4) Remove the baking paper and sprinkle the parmesan cheese over the top and serve!

How easy is that? And I can promise you that everyone will definitely enjoy this! So definitely give it a try when you can!

~~~~~~~~~~~~~~~~~~~~~~~~~~~~~~~~~~~~~~~~~~~

Okie. So now… time for the GIVEAWAY!

GFWS Citi_Logo 2015-02

So everyone knows the one event I look forward to every year is no doubt the Melbourne Good Food and Wine Show. Endless food & wine, beautiful produce and you get to meet your favourite chefs!

Good Food Theatre

This year, I am lucky enough to be given 2 double passes to giveaway to my readers! Whoopeedoo! What’s more exciting is that this year, Ainsley Harriott will be there for all 4 days of the show (5-8 June), along with Miguel Maestre & Alastair McLeod! So you definitely don’t want to miss the show this year! I can still remember when the Mr bought me tickets to a Private Dining session with Manu Feildel 3 years ago! Definitely a dream come true and an experience I will never forget!

How do you win those tickets? Easy!

  • Leave a comment and share with me the favourite dish you love to cook for your loved ones for a special occasion!
  • This giveaway is only open to Australian residents! (Sorry international readers!)
  • Please join me on my journey! Follow me on FacebookInstagram and Twitter! Let me know once you have followed me!
  • You may re-enter daily! One entry a day! (Oh yeah!)
  • Winners will be announced on the 29th of April, 10pm.
  • Winners will be picked via random.org and notified on this blog post and via email.

So what are you waiting for? Let’s go!

~~~~~~~~~~~~~~~~~~~~~~~~~~~~~~~~~~~~~~~~~~~~~~~

WINNERS!

Congratulations to Good Food Good Karma and Ross! Here’s what they said :


Comment Number 8 Winner 1 - Number 8

Comment number 6 Winner 2 - Number 6

Salmon and roast! Two delicious things I too would cook for loved ones at a special occasion! Congrats again and I will be in contact with you soon, through email! Thanks everyone for participating!

Disclaimer : The tickets were given in compliments of Red Agency and I wasn’t paid to run this giveaway. 

BBQ Made Easy with Heat Beads® Chimney Booster

Heat Beads(r)

I love BBQs. It’s just something that could bring everyone together, around the fire, and enjoy the love for food. To me, BBQs are perfect all year round. In the Summer, with a beer or cider in one hand, and a pair of tongs on the other. In Winter, it will act as a heater or a camp fire, keeping us warm and toasty! hehe

Setting up a BBQ can be tricky and time consuming, depending on the weather conditions. So when KeepLeft PR contacted me and asked if I would like to try the the Heat Beads® BBQ Chimney & Chimney Booster for a quick and easy BBQ experience, I couldn’t say no! I couldn’t be more thankful for the generosity of Heat Beads® as they didn’t only give me the Heat Beads® briquettes, firelighters, the Heat Beads® BBQ Chimney & Chimney Booster, they gave me my dream BBQ as well – The Weber! I was over the moon when the packages arrived!

The Weber BBQ

Heat Beads® BBQ Chimney & Chimney Booster

Instead of the usual hour or more taken to get the briquettes ready for some action, with the Heat Beads® BBQ Chimney & Chimney Booster, you can get your briquettes hot enough for the BBQ in 12 minutes (with a few minutes more if it’s cold and windy)! How amazing is that?? And it’s so easy to use as well! I was a little worried at first, as the Mr is in the USA doing a seminar tour. So I had no help, plus he’s always usually the one setting it up!

Setting up the BBQ Chimney & Chimney Booster

But trust me, it could all be done in a few quick steps!

Put the Heat Beads® briquettes in the Heat Beads® BBQ Chimney, place the Heat Beads® firelighters on the firelighter plate of the Heat Beads® Chimney Booster, light the firelighters using a match or gas lighter, place your Heat Beads® BBQ Chimney on top of the Chimney Booster and turn on the switch!

Lighting the firelighters on the firelighter plate

Now all you gotta do is wait for 12 minutes! I decided to put the Booster to the test, and BBQed on a super windy and cold night. It took 14 minutes for the briquettes to be hot enough to be placed in the BBQ. 14 minutes! AMAZING!

Using the BBQ Chimney & Chimney Booster

By the 12th minute, the briquettes were close to being ready. And how do you know when their ready? The briquettes become ash over, turning a light grey colour. That’s when it’s ready to be popped into your BBQ!

14 minutes, Briquettes were ashed over and ready to go!

With the setting up time reduced to a mere 12-14 minutes, I’ve got more time to cook my meats now! I decided to do a comparison of cooking methods: low & slow vs quick & fast. Heat Beads® is perfect for both! The low & slow would be perfect for days when you have a little more time to spare. The quick & fast would be perfect for busy bees who are working, or have little time to get food time on the table. Trust me, cause now with bubba, all I have is under an hour to get our meals prepared and cooked! So what did I decide to cook? Smoked BBQ baby back ribs (low & slow) and Jamaican Jerk Smoked chicken wings (quick & fast)! Salivating yet? hehe I definitely was, smelling the aromas coming out of the Weber!

Ribs & Wings

All done within 1 1/2 hours, inclusive of prep time! I thought it was pretty impressive, don’t you? You must be thinking, how can it be? Well, I used the 14 minutes taken for the briquettes to be ready to season my meats! A win-win situation if you asked me!

Smoked Bbq Baby Back Ribs

Smoked BBQ Baby Back Ribs (Recipe from Weber’s Time to Grill™ by Jamie Purviance)

Dry Rub :

1 tbs sea salt

2 tsp granulated garlic

2 tsp paprika

2 tsp dried thyme

1/2 tsp freshly ground black pepper

1 racks of baby back ribs, about 1kg

1/2 cup BBQ sauce

Handful of Hickory Wood Chips

Steps : 

1) Soak your wood chips in water for at least 30 mins and drain. Set aside.

2) In a small bowl, mix the ingredients for the dry rub together. Remove the membrane of the ribs and cut them into half to create two smaller racks.

Dry rub - Ribs

3) Season each rack evenly with the dry rub and place the ribs on a piece of foil, wrapping them up well. Double wrap them, making sure there are no holes.

Seasoned and ready to go

4) Place the packet of ribs on the clean grill and cook for 1 hour, with the lid closed, and turning the packets occasionally, making sure not to pierce the foil. At this point, you could go do other things! Go hang the laundry and just put your feet up and have a cuppa (:

Ribs on the bbq

5) Remove the packets from the grill and let rest for about 10 mins. Carefully open the packets, remove the ribs and discard the rendered fat and oil.

6) Place the wood chips onto the charcoal and a a tray of water under the grill. Close the lid and when the wood chips start to smoke, return the ribs onto the grill (above the water) bone side down. Grill and smoke, the the lid closed, for about 10-12 minutes, basting with the bbq sauce, until they are sizzling and lightly charred. Remove from grill and let it rest for 5 minutes before serving with the remaining bbq sauce.

Jamaican Jerk Smoked Chicken Wings

2 tsp Jamaican Jerk Rub (For a quick marinade, I used the one from The Spice Mill)

2 tsp sea salt flakes

10-12 chicken wings

Steps : 

1) Marinade the chicken wings with the Jamaican Jerk spice rub and sea salt and allow it to marinade while the ribs are cooking on the grill.

Seasoning the chicken wings

2) When the ribs are 10 minutes from getting done, I put the chicken wings on the grill and turned it occasionally to make sure it doesn’t burn.

3) When the ribs are smoking, leave the chicken wings on the grill to be smoked as well (for the same 10-12 minutes). It brings the chicken wings to a whole new level of deliciousness! Golden brown and lightly charred. PERFECT!

Grilling the chicken wings

Jamaican Jerk Smoked chicken wings

Have them with some baked sweet potatoes (you can throw them on the grill when you start cooking your ribs) and a side of salad! Dinner is served! (:

Smoked BBQ Baby back ribs

My parents and I were really impressed by how delicious the ribs and wings were! I had so much fun trying out the Heat Beads® BBQ Chimney & Chimney booster and couldn’t be happier with how the meats turned out. I’m sure by now you’re wondering where to get the Heat Beads® BBQ Chimney & Chimney Booster from? Or you want to read more about the Heat Beads® products? Do pop over to Heat Beads® to find out more!

Have a great weekend ahead and always remember to cook and bake with love!

Disclaimer : Lianne@Food Made With Love received the Weber BBQ & Heat Beads® products as a gift from Heat Beads® & KeepLeft PR. Thank you so much for this fantastic opportunity! 

Salted Caramel Creme Brûlée

photo 4-1-1

Whenever I’m deciding what to cook or bake, my inspiration always comes from my loved ones and what they like to have, or what their favourite cuisine or flavours are. Of late, I have to admit that I cook according to what Baby Ho (& I) crave for and thankfully the Mr and sister-in-law are really easy and wouldn’t mind having what I’m craving for! PHEW! So so blessed! But last week, I decided to make something inspired by what the Mr loves and with a twist, using his favourite dessert & flavour – creme brûlée & salted caramel!

salted caramel creme brûlée

I have to say I was really nervous making creme brûlée again, cause the last time I made was a long time ago and usually they kinda curdle a little, and never comes out as smooth as I wish they would. But I decided to give it another go, and waited with my fingers and toes crossed while they were baking in the oven! hehe

I couldn’t be happier with how it turned out! Smooth, luscious and with a good kick of the salt! Not overly sweet too! The Mr was all smiles and because I didn’t wanna have too much sugar, he had his and half of mine! hehe Of cos, the best bit was so hear the crack of the burnt sugar on the top!

So here’s the recipe and I hope you all enjoy it as much as we did!

Salted Caramel Creme Brûlée

600ml thickened cream

6 egg yolks

1 egg

1 vanilla pod

120g caster sugar, plus extra for the brûlée

1 tsp fleur de sel (or sea salt if that’s what you have)

Steps :

1) Preheat over to 115 degrees celcius.

2) In a small pot, pour the thickened cream in. Split the vanilla pod into half, lengthwise, and scrape the vanilla bean into the cream. Throw the pod into the pot as well and bring it to a slow boil. Allow the mixture to simmer for 10 minutes so that the vanilla pod and beans would infuse into the cream.

3) In another pot, heat the sugar on medium-high heat, swirling it to incorporate the rest of the sugar. Watch closely so that the caramel doesn’t burn. Once the caramel is a beautiful amber colour, take it off the heat and pour the cream into the pot. Do be very careful as the mixture will still bubbling! Whisk continuously to make sure the caramel and cream is well combined. Add the fleur de sel and give it a good stir to ensure the salt combines with the caramel cream mixture.

4) In a large glass bowl, crack the egg and add the egg yolks. Whisk well and slowly pour the salted caramel cream in a slow and steady stream. Make sure it’s not added too quickly, as it will scramble the eggs. Whisk continuously as you add the caramel cream  and strain into a measuring jug.

5) Pour the mixture into small mason jars (my mixture was enough to fill the 1/2 way mark of 6 jars) and place the jars in a roasting tray.

salted caramel creme brûlée

6) Fill the tray with hot water until it reaches 1/2 of the jars and slowly place it into the oven. Bake the creme brûlée for 45 minutes or until it’s just set but still wobbly in the middle. Take the jars out of the water bath and allow them to cool completely before placing them in the fridge for at least 3 hours or overnight.

7) To serve, sprinkle some caster sugar on top of the creme brûlée and using a blow torch, burn the sugar till it caramelises and is a dark brown colour.

salted caramel creme brûlée

ENJOY!

Have a great night everyone and remember to always cook and bake with love! xx

My Mr The Chef : Chicken Money Bag

IMG_4260-1-1

I am truly a lucky woman. I married a man who can seriously cook some delicious food! Although he’s really busy, he still takes time to cook something once in a while, which I am super thankful for! If you’ve followed me for a while now, you would have seen some of his creations : Hainanese chicken riceroasted beef ribshomemade bacon and polenta chips!

Ready to be served

I’m  not sure if you remember seeing this dish on Masterchef last year, but this was a dish by the ever so talented – Maggie Beer! The Mr wanted to make it the moment he saw it and boy am I glad he did. It was absolutely delicious! Tedious to prep, but all the hard work definitely paid off! Just imagine golden crispy chicken skin (like yum!) and the meat is just succulent and full of flavour on the inside! Together with the tomato chutney, it’s just the perfect pair!

Skinning the chicken

The trickiest part of the dish is probably skinning the whole chicken and keeping the skin whole, making sure there are no holes! The Mr did such a good job! He got it out in one go! Don’t think I would be able to do it. haha

So here’s the recipe from Maggie Beer! Give it a try, the hard work is definitely worth every delicious bite!

Chicken Money Bag with Preserved Lemon and Tomato Chutney (Recipe closely adapted from Maggie Beer, Serves 3)

For the chicken :

50g unsalted butter, plus extra for greasing

2 tbs olive oil

3 shallots, finely chopped

225g white button mushrooms, sliced

1 tbs lemon thyme leaves, chopped

1/3 cup white wine (I didn’t have Verjuice)

1.8kg whole chicken

100g chicken fat, finely chopped

1 1/2 tbs preserved lemon rind, chopped

1 1/4 tbs tarragon, chopped

15g sea salt flakes

1 egg

For the Preserved Lemon & Tomato Chutney : 

1 1/2 tbs Olive oil

1 onion, diced

2 cloves of garlic, chopped

2 sprigs of rosemary, finely chopped

1/4 cup white wine (Use Verjuice if you have it!)

800g tomato, roughly chopped

100g preserved lemon, rinsed and chopped

110ml Red wine vinegar

90g caster sugar

Steps :

1) Preheat oven to 200 degrees celcius.

2) Place a heavy based pan over medium-high heat, add butter and heat until it has turned nutty brown. Add olive oil, shallots and mushrooms and cook for 5 minutes. Add thyme, toss to combine, and season with salt.

3) Deglaze the pan with white wine and cook until it is sticky and reduced. Place mushroom mixture in a large bowl, and set aside to cool.

4) Skin chicken and place in a bowl. Remove chicken marylands, roughly chop leg and thigh meat, then pulse in a food processor to a coarse paste. Add chicken fat and pulse to combine. Remove breasts and cut into two centimeters dice.

Prepping the chicken and mushroom mixture

5) Finely chop mushroom mixture, then add the preserved lemon rind and tarragon to cooled mushroom mixture and mix until well combined. Add chicken leg mixture, diced chicken breast, sea salt flakes and egg to the bowl and slap the mixture against the side of the bowl until combined.

Prepping the ingredients

Chicken mixture

6) Cut chicken skin into three even triangular shaped pieces.

7) Over a 6cm springform baking tin, place a sheet of cling wrap, then spread skin over. 

Making the money bags

8) Add chicken mixture, bring each end of the skin together to create a pouch, then place in the fridge for ten minutes to allow the skin to set.

Adding the chicken mixture

Bringing the skin together to create a pouch

9) Invert baking tins onto a baking tray and carefully lift tins to remove. The skin should remain neatly tucked underneath, holding the parcel together as it cooks.

All ready to be baked!

10) Place baking tray into oven, and cook for 25-30 minutes or until the skin is golden brown. If you have a meat thermometer, check to see that the internal temperature has reached 62 degrees celcius.

Baked till golden brown

11) Remove from the oven and allow it to rest for 15 minutes.

12) For the chutney : Heat olive oil in a saucepan over medium heat. Add onion and cook for five minutes until softened and translucent. Add garlic and rosemary, and cook for two minutes.

13) Deglaze the pan with white wine then add the rest of the ingredients. Bring to the boil, then reduce to a rapid simmer and cook until the mixture is reduced to about two cups and a chutney-like consistency. Remove from heat, and place into a bowl to cool. Season to taste with salt.

14) To serve : Slice the chicken money bags and serve on the tomato chutney. Enjoy! (:

chicken money bag sliced

Enjoy the coming weekend everyone! (: Hope this has inspired you to cook something special for your loved ones this weekend! Remember to always cook and bake with love!

Till the next post, xx

HUON Smoked Salmon Bouquet Quiche

IMG_9891-2-2

I’m late, I’m late, I’m late! That was the only thing on my mind when I was trying to come up with something to make for the HUON Blogging Challenge as the post is due tomorrow! I have to admit, I was a bit hesitant to take up the challenge as we had to use smoke salmon and the only way I could have it is cooking it!

HUON smoked salmon banquet rolls

While looking at the HUON Reserve Selection range and deciding on what I should get, I was drawn to the banquet rolls immediately! If only I could have them as is, cos I would love to have man a roulette out of it! Oh wells! haha Have to concentrate on what I can have!

ingredients used

So I did what I usually do to get inspirations for the dish I want to make – walk down the aisles of the supermarket! It’s seriously the best place to come up with ideas for what to cook! Absolutely love doing it. hehe So I decided to make a quiche, for the first time! I know, what’s so exciting about a quiche? Well, I decided to make it look very different from a usual quiche, turning the salmon rolls into bouquet of flowers!

Smoked salmon bouquet quiche

I was super nervous making it because I’ve never made a quiche before, and I didn’t know if the shapes were going to last through the baking process! Thank goodness, the flowers were still “blooming” when I took it out of the oven. HOORAY! It worked! hehe The mr and sister-in-law really enjoyed it too! That’s always a plus! (: So here’s the recipe! Hope you will enjoy it as much as we did!

Smoked Salmon Bouquet Quiche (Serves 4-6 people)

For the sour cream short crust pastry : (Recipe from Maggie Beer)

125ml sour cream

250g plain flour, extra for dusting

200g butter

For the filling : 

200g HUON Reserve Selection banquet rolls

1 leek (white part, halved lengthwise and thinly sliced)

8 mushroom cups, sliced

10g chives, finely chopped

6-8 sundried tomatoes, finely chopped

1 tbs olive oil

10g unsalted butter

salt and black pepper, to season

200ml thickened cream

150g shredded cheddar

4 eggs

Steps :

Kneading the dough into a ball

1) For the short crust pastry : Preheat the oven to 200 degrees celcius. Dice the butter then pulse it in a food processor with the plain flour till it resembles bread crumbs. Add the sour cream and pulse it further till it resembles a dough.

Rolling out and dough and blind baking

2) On a clean surface, dust a bit of plain flour and knead the dough into a ball. Wrap the dough in cling wrap and allow it to rest in the fridge for 20 minutes. Roll the pastry out to 3-5mm thickness and roll it over 24cm quiche baking tin that has been oiled. Blind bake the pastry for 10-15 minutes, or until it’s lightly golden. Allow it to cool while preparing the other ingredients.

Lining the tin with the pastry

2)  For the filling : Heat a large heavy-based pan on high and add the olive oil. Fry the leek till soft and fragrant, then add the mushrooms. Season with salt and pepper and allow the mushrooms to fry till slightly caramelised. Add the butter and fold in the mushroom mixture. Set it aside and allow it to cool before placing it in the pastry case. Sprinkle the chives and sundries tomatoes evenly around the pastry case.

Frying the leek and mushroom mixture

3) Cut each banquet rolled salmon into half and place them in a shape of a flower. ( I did 3 large flowers, and 3 small flowers. But you can do as many as you like! Bring out your artistic side! )

4) Combine the thickened cream and eggs in a bowl and mix them till well combined. Pour it slowly into the case and around the smoked salmon, careful not to get any on.

eggs and cream mixture

5) Top the quiche with shredded cheddar, once again avoiding the smoked salmon.

6) Reduce the oven to 190 degrees celcius and bake the quiche for 35-40 minutes, or until the egg mixture is set and the top is golden brown.

Smoked salmon bouquet quiche

7) Serve with a side of salad with your favourite dressing and with extra sour cream to go with the quiche! Indulgence! ENJOY!

Quiche with a side of salad

I have to say I really enjoyed making those flowers out of the smoke salmon rolls! To make it look more like flowers, I piped stalks and leaves using the sour cream and fill the leaves with chopped chives! hehe I’m no artist, but I think this is the best I could do!

Hope you enjoyed the recipe, and do give it a try! I didn’t get to eat the smoked salmon on it’s own (before cooking), but the mr and sister-in-law said it was delicious and not as salty as the others they’ve had! Which is always a plus! Have a great weekend everyone!

Remember to always cook and bake with love! Till the next post, xx

Osso Bucco in A Rich Tomato Red Wine Sauce & Creamy Parmesan Polenta

IMG_9684-1-1

Being pregnant, I cook according to what I crave these days, or some might like to say, according to what the baby wants! hehe To be honest, most of the things I cook are food I miss from home, but currently, my daily cravings are anything tomatoey and cheesy! Mmmmm (: How can that go wrong?

Taylors Estate Pinot Noir

It is the time of the month again when I’m so lucky to receive a couple of bottles of Taylors Wines! I know, I know. Please do not worry, I’m not drinking! I also make sure that I cook it long enough to get all the alcohol content out of the dish, leaving just the intense flavour of the wine. hehe So you can take a deep breath! hehe I decided to ask for Taylors Estate 2012 Adelaide Hills Pinot Noir. This medium bodied wine has flavours of ripe cherry and the freshness of berries. It’s soft on your palate and has tones of subtle spiciness. I knew immediately what it would be great for – Osso Bucco!

Tomato and red wine cooked osso bucco with creamy parmesan polenta

This was one perfect dish for satisfying my pregnancy cravings! Melt-in-the-mouth beef pieces cooked in a thick, luscious tomato and red wine sauce and served on a creamy parmesan polenta! I’m not a huge fan of marrow, but the mr is, so it was also a winner with him! hehe

So here’s the recipe, hope you will enjoy it as much as I did! (:

Osso Bucco in a Rich Tomato & Red Wine Sauce with Creamy Parmesan Polenta (serves 6-8)

For Osso Bucco :

8 pieces of osso bucco

salt & pepper, to season and to taste

hot paprika, to season

plain flour, to season

4 tbs olive oil

2 red onions, finely chopped

2 carrots, peeled and sliced into rounds

2 stalks of celery, finely sliced

3 cloves of garlic, finely chopped

2 large chilles, deseeded and thinly sliced

2 anchovy fillets

1 tin of chopped tomatoes (400g)

1 cup passata

1 cup Pinot Noir

1 cup beef stock

aromatics chopped up

For creamy parmesan polenta :

4 cups chicken stock

1 cup yellow cornmeal

1 cup finely grated Parmesan

2 tbs unsalted butter

1/4 cup thickened cream

Salt & ground black pepper, to season

For Anchovy Gremolata (optional)

4 tbs flat leaf parsley, finely chopped

9 anchovy fillets, finely chopped

Steps :

1) For the osso bucco : In a heavy based frying pan, add the olive oil and heat it on medium heat. Season the osso bucco pieces with salt, black pepper, hot paprika and flour on both sides. Fry and seal the osso bucco and place it on the plate, set it aside while preparing the sauce.

Season the osso bucco

Sealing the osso bucco

sealed osso buccos

2) Add the red onion, carrots, celery, chilli and garlic into the pan and fry till soft and fragrant.

Frying the ingredients till fragrant

3)  Add the red wine and allow that to reduce till 1/4 left.

adding the red wine

4) Once the red wine is reduced, add the tinned chopped tomatoes, passata, anchovies and beef stock. Allow the mixture to come to a boil then carefully add the osso bucco.

Slow cooking the osso bucco

5) Cover and allow it simmer on low heat for 2-31/2 hours. The meat should separate from the bone.  Give the pan a shake every 30 mins, to make sure it’s not stuck /burnt at the bottom.

6) For the polenta : In a medium sized pot, bring the chicken stock to a boil. Reduce to medium heat, and slowly add the cornmeal, whisking continuously with a whisk to prevent lumps. Switch to a wooden spoon and continue stirring until the mixture thickens (about 10 mins), season with salt and black pepper. Make sure you scrape the bottom to make sure nothing burns or stick. Take it off the heat and add the parmesan, butter and thickened cream.

7) For the anchovy gremolata : Mix the chopped parsley and anchovy until well combined.

8) To serve : Place the osso bucco on top of a bed of creamy parmesan polenta and top with more tomato and red wine sauce. Scatter the anchovy gremolata on the osso bucco and ENJOY! (:

Osso bucco served

Thank you Taylors Wines once again for the beautiful Pinot Noir, and although I can’t have a glass (or two), I’m so happy I’m still able to have them in my food! hehe Have a great mid week everyone! Remember to always cook and bake with love! Till the next post, xx