The Coconutty Baked Brownie Bites

unnamed-8-1-1

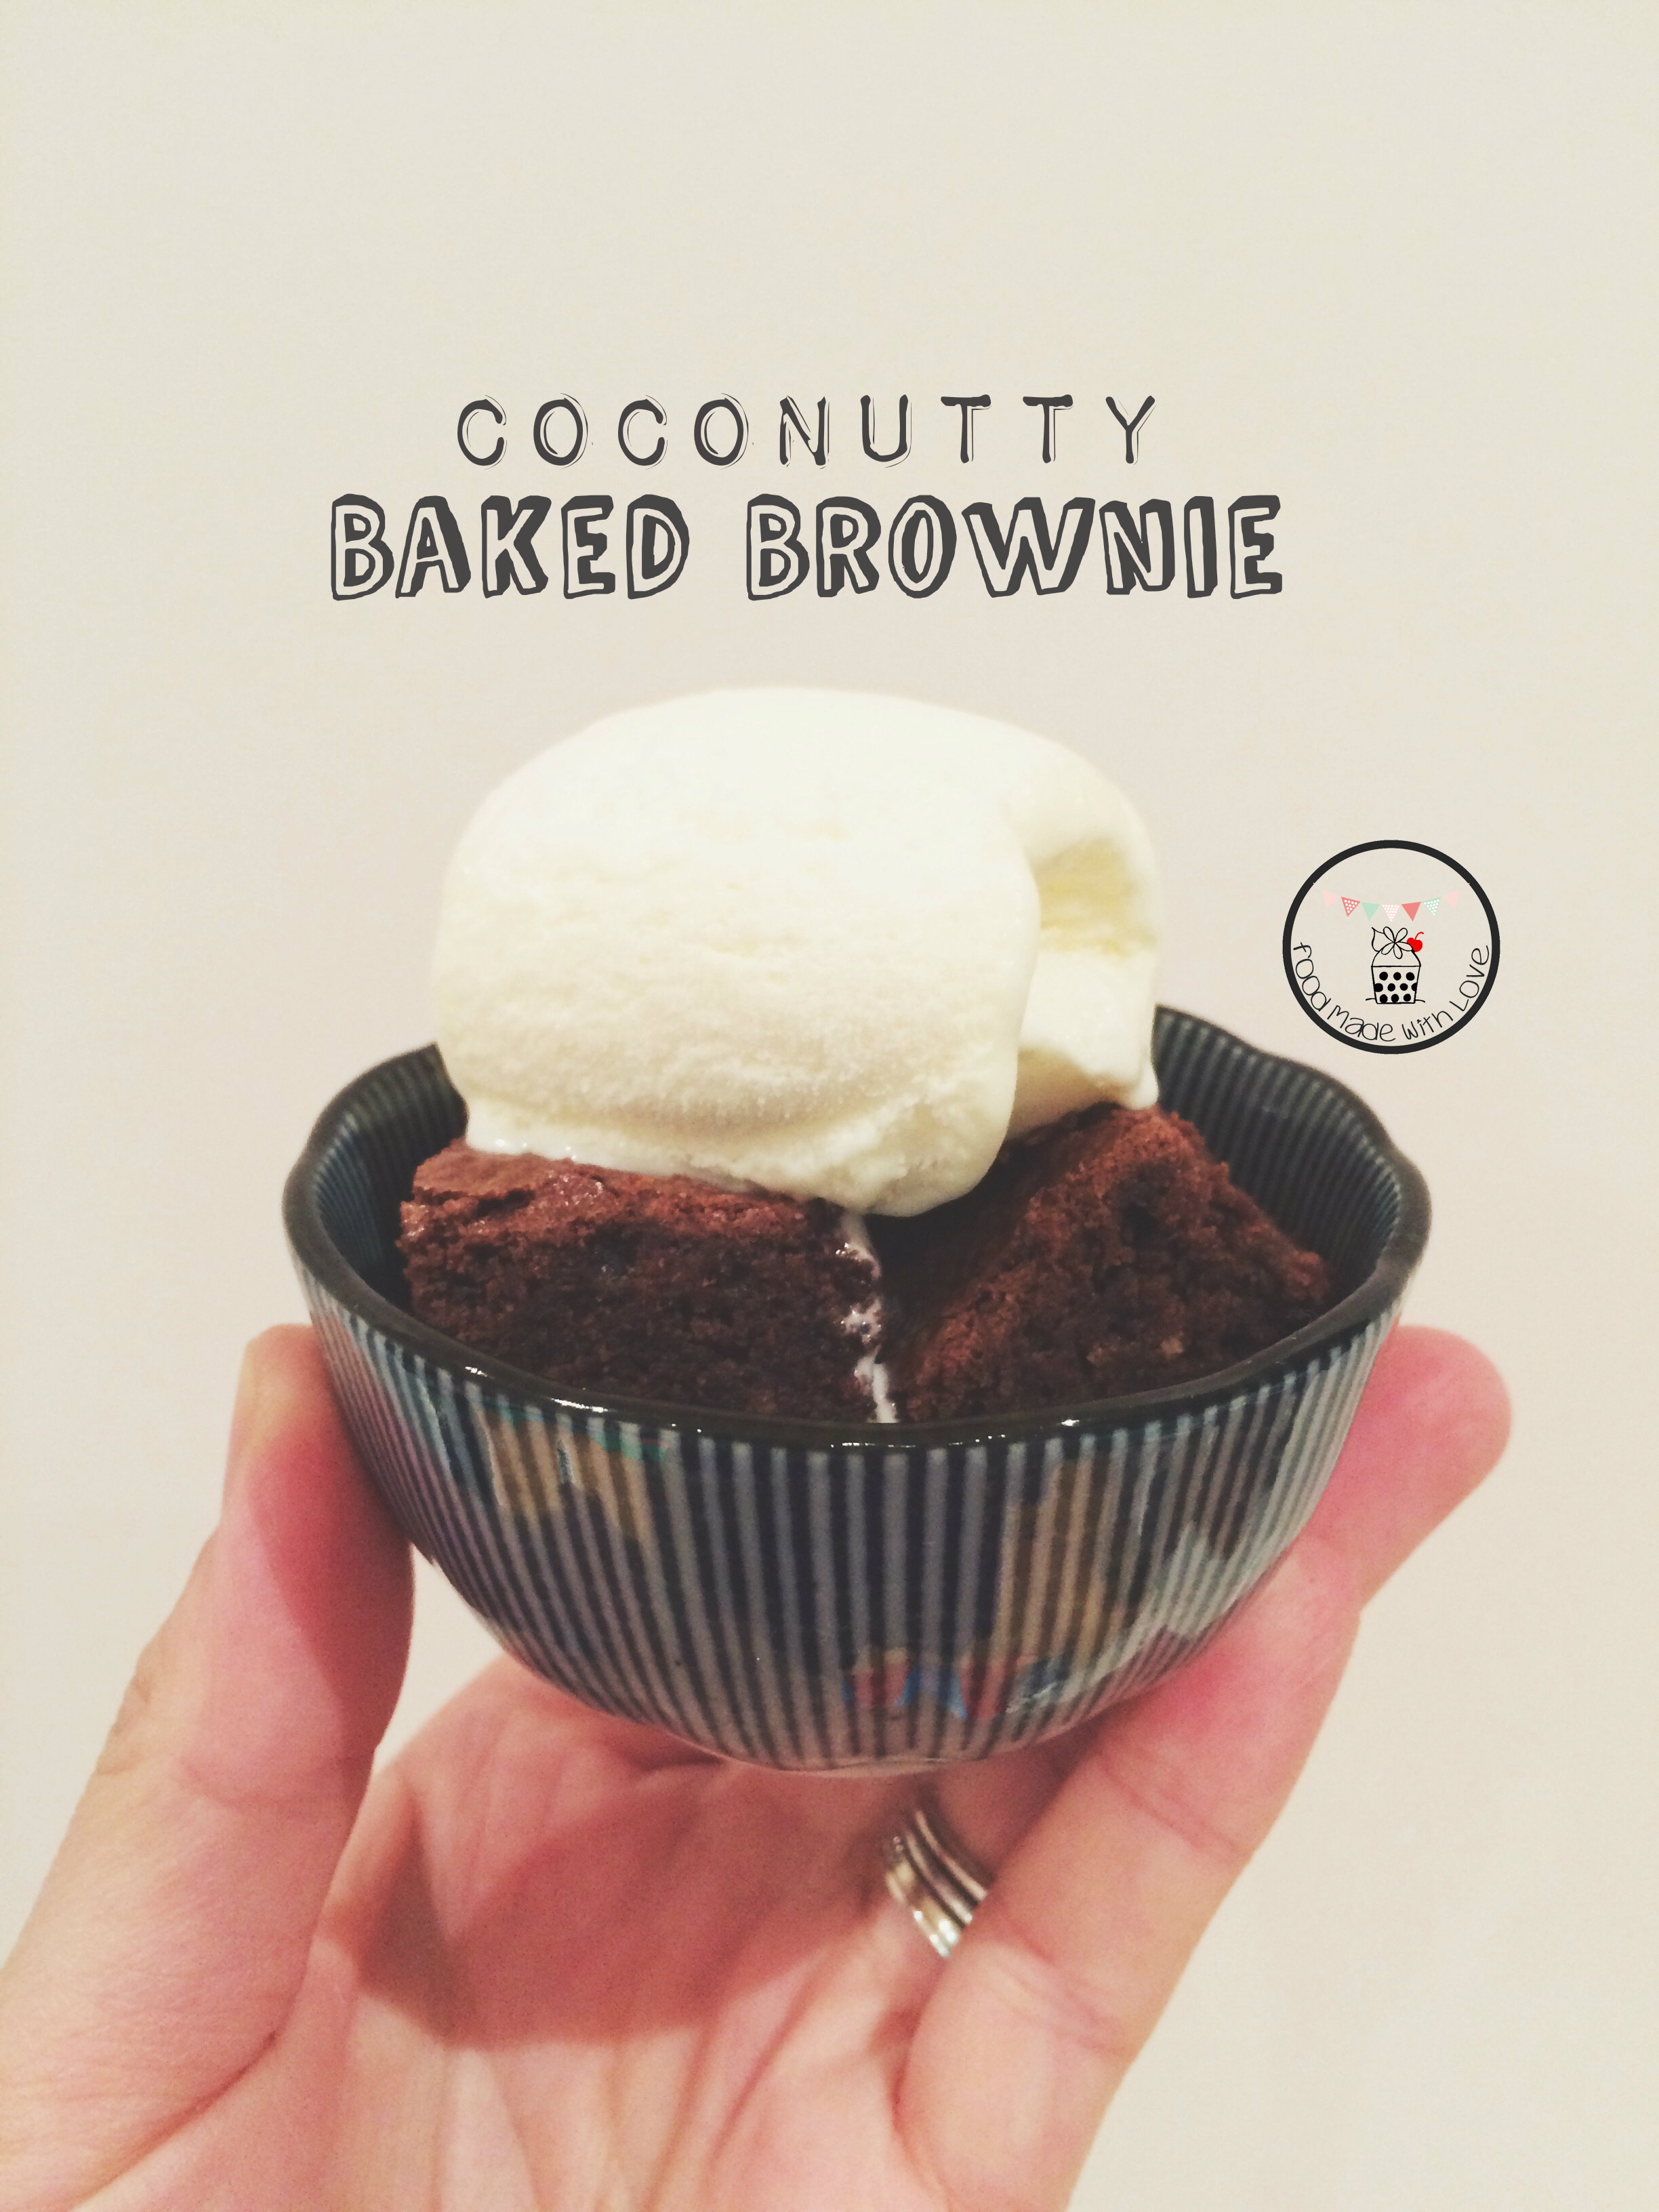
Brownie. Who doesn’t love them? If you don’t, I’m not sure we can be friends. haha Kidding! But brownie is always something I cannot resist. When I see it, I have to have it – warmed, with a scoop of vanilla ice cream. PERFECTO!

There are many different type of brownies, but the ones I love most is crispy on the outside, and fudgey in the middle, and I think I found the perfect recipe!

All baked and cut

Just seeing how the top bit cracks, puts a smile on my face! And being a tad bit OCD and one who is trying to (but failing) lose the baby weight, I decided to cut them into bite size, so that I don’t feel too guilty when having one, or two. hehe

I’m in a coconutty phase, so I decided to add some fine desiccated coconut through the batter before baking and the flavour wasn’t too overpowering. Chocolate was still the major flavour with a tinge of coconut! Mmmm. Plus this wasn’t too sweet. Just the right level of sweetness!

So if you do like your brownie, I urge you to try this recipe, if you haven’t already heard of The Baked Brownie! My dad was here when I made these and he actually said, “How come the brownie from outside doesn’t taste like that?” haha That was one big compliment for me! hehe

The Coconutty Baked Brownie with Vanilla Ice Cream

Coconutty Baked Brownie Bites (Adapted from Pretty Simple Sweet)

 155g plain flour

1 tsp salt

2 tbs desiccated coconut

2 tbs cocoa powder

310g dark chocolate, cut into smaller pieces

230g unsalted butter

1 tsp instant espresso powder

100g caster sugar

100g packed light brown sugar

1 tsp vanilla bean paste

5 eggs, room temperature

Steps :

1) Preheat oven to 180 degrees celcius. Line the baking tin (I used a 9×13 inch rectangular baking tray) with baking paper, leaving some extra hanging off the sides for easy removal of the brownie.

2) In a medium bowl, mix the plain flour, salt, cocoa powder and desiccated coconut together. Set it aside.

3) Put the chocolate, butter, and instant espresso powder in a large bowl and set it over a small pot of simmering water, stirring occasionally, until the chocolate and butter are completely melted and smooth. Turn off the heat, but keep the bowl over the water and add the sugars. Whisk until completely combined, then remove the bowl from the pan. Allow the mixture to cool till room temperature.

4) Add 3 eggs to the chocolate mixture and whisk until combined. Add the remaining 2 eggs and whisk just until combined. Add the vanilla bean paste and stir until combined. Don’t overmix at this stage or your brownies will be cakey.

5) Add the flour mixture to the chocolate mixture and fold until just a bit of the flour mixture is visible.

6) Pour the batter into the prepared pan and smooth the top. Bake in the center of the oven for 30 minutes, rotating the pan halfway through the baking time, until a toothpick inserted into the center of the brownies comes out with a few moist crumbs sticking to it. Let the brownies cool completely, then lift them out of the pan using the parchment paper.

Baked and ready to be cut

Cut into bite sized squares

7) Cut them into bite sized squares and serve them warm with a scoop of ice cream!

Hope you all had a great weekend! Make these and have them today so that you can chase away any Monday blues and have a fantastic week ahead!

Remember to always cook and bake with love! Till the next post, xx.

PS: There will be a give-away in the next post, so stay tuned! (:

Japanese Sponge Strawberry Swissroll

Japanese sponge strawberry swissroll

Good morning dear readers! Firstly I would like to apologise for the long hiatus. It’s been an exciting and eventful coupe of months as we warmly welcome the newest addition to our Ho family (: That’s right! Lochlan Ho was born on the 8th of August and he has been an absolutely blessing and gem to every one around him!

10678647_10152244040387757_6479934814849348223_n-1

Having this precious boy in our lives is the best thing that has happened to us (: We can’t love him enough!

But I’m slowly coming back with posts from months back and I hope you can be patient with me as I try and get my routine back in place. Thank you all so much for your constant support, even though I haven’t been posting! It’s very encouraging and makes me wanna get back to it as soon as possible!

Japanese sponge strawberry swissroll

 So to celebrate my return, I decided to share one of my favourite recipes that I’ve baked a few times before bubba arrived! One that was shared by my cousin-in-law and enjoyed by everyone!

I have an obsession with swissrolls and just love making them! Of course, needless to say, I love to eat them too! hehe To date, I’ve made a matcha swissroll with azuki cream, chocolate with cream and fresh raspberries and this has to be my favourite, japanese sponge with fresh strawberries! A light and fluffy sponge that is not too sweet, paired perfectly with fresh strawberries and freshly whipped vanilla bean cream! NOMS! So if you’re a fan of swissrolls, do give this recipe a shot! I’m very sure you will enjoy it as much as I did!

Japanese Sponge Strawberry Swissroll 

3 egg yolks

35g castor sugar

50ml water, room temperature

40ml olive oil

80g cake flour

3 egg whites

30g castor sugar

1 tsp corn flour

200ml whipping cream

1 tsp vanilla bean paste

2 tbs icing sugar

8-10 fresh strawberries, cut into small cubes

fresh strawberries

Steps : 

1) Preheat oven to 160 degrees Celcius. Line the bottom of a 27×27 baking tray with greaseproof paper. Do not line the sides.

2) In a standing mixing bowl, cream the yolks and 35g of sugar until pale. Combine the water and olive oil into a cup and pour into the yolk mixture. Sift the cake flour into the mixture and continue mixing till combined. Set aside.

3) In another clean mixing bowl, whisk egg whites till foamy and add 30g sugar. Add corn flour and continue whisking till firm peaks form.

Stiff peaks

4) Add the whisked egg whites into the yolk batter in 3 portions. Spread the batter into the baking tray. Bake the cake for 14 minutes, turning the cake at the half way mark to ensure even baking.

Combining the egg whites with the egg yolks

 5) Take the cake out of the oven and drop it a few times to reduce the shrinkage. Remove the cake for the baking tray and place it on a flat surface. Cover it with another baking tray to make sure it doesn’t dry out. Allow it to cool completely before filling it.

Japanese sponge cake - baked

6) Whip the cream till stiff peaks form and add the vanilla bean paste. Gently stir the vanilla bean paste till well combined.

7) Release the edges of the baking paper of the cake. Cover the cake with another sheet of baking paper, and flip it over. Slowy and gently remove the baking paper from the bottom of the cake. Place the paper on the bottom again and flip it back, in the upright position. Using a serrated knife, cute of the short edge furthest away from you with a diagonal cut.

8) Place the whipped vanilla bean cream onto the cake and using a spatula spread it out evenly, having a slightly thicker amount on the side closer to you. Add the strawberries evenly onto the cream. Fold the edge of the cake, pushing the paper forward, rolling the cake. Once rolled, wrap the cake with the clean sheet of baking paper, making sure it’s tightly wrapped. Cover with a plastic wrap and allow it to cool in the fridge.

9) To serve, unwrap the cake and place it on a long plate. Sift some icing sugar on top of the cake and slice it to the thickness of your liking. ENJOY!

 japanese sponge strawberry swissroll

Japanese Layered Sponge with Fresh Fruits

If you want to make a layered sponge cake instead of a swissroll, after releasing the cake from the tray, cut it into three even pieces, and layer the first two layers with freshly whipped vanilla bean cream and fresh fruits of your choice! To be honest, I did this only because my sponge kinda broke when I tried to roll it. haha So don’t stress if that happens!

Layered japanese sponge cake

I used fresh strawberries and blueberries! The only thing about the strawberries is that you gotta cut it into similar sizes so the cake will be flat enough for the next layer!

Strawberry layer

How pretty is the colour of the strawberries in contrast with the sponge? I love it! hehe So do give this recipe a try! It’s seriously one of my favourite recipes and a crowd pleaser!

PS : Thanks Liyun for sharing the recipe with me and giving me tips! (:

Remember to always cook and bake with love! Till the next post, xx

Cocoa, Coffee & Walnut Swirl Cake

photo 1-2-1-1

I’m in a butter cake phase. I just can’t get enough of it. I think it might be a pregnancy craving. hehe But then, it isn’t a bad craving to have, is it? What could be better than soft and buttery cake? Absolutely nothing! Especially with a hot cuppa – perfect afternoon tea!

Nespresso SG Fortissio Lungo

I was lucky enough to be sent a tube of the new Nespresso flavour – Fortissio Lungo. It’s the first in the Lungo range with a strong intensity (8) and has a richer taste with fuller body. With notes of cereal, the beans are from Central-South America combined with the precious full Arabica Monsoon Malabar from India. I really wanted to make something with this new flavour, and all I can think of is in a form of a butter cake!

Cocoa, coffee & walnut swirl cake

And I love swirls in my cake! hehe It’s fun making them and also so pretty before and after being baked! So I decided a swirled butter came with cocoa, coffee and walnut! Mmmm (:

Cocoa, Coffee & Walnut Swirl Cake

250g self-raising flour, sifted

250g butter, room temperature

100g caster sugar

1 tsp vanilla bean paste

3-4 tsp espresso, cooled to room temperature (I used the Fortissio Lungo)

5 whole eggs, room temperature

1 tbs cocoa powder

140g walnut, roughly chopped and toasted

Ingredients

Steps :

1) Preheat oven to 170 degrees celcius. Butter and line the base of a square baking tin and set aside.

2) In a standing mixing bowl, add the butter and sugar, cream till light and fluffy. Add the vanilla bean paste then add the eggs, one at a time, and beat till well combined.

3) Add the espresso and slowly add the flour and chopped walnuts. Mix till all the flour is well combined, but careful not to over mix it.

4) Take half the mixture and place in a bowl. Sift in the cocoa powder in and mix till well combined.

5) Alternately place the coffee mixture and the cocoa mixture into the baking tin.

Cocoa, coffee and walnut mixture

6) Using a knife, run through the mixture from left to right, then do the same after turning it 90 degrees clockwise. You should get beautiful swirls!

Swirled cake

7) Bake the cake for 40-45 minutes, or until a skewer comes out clean after being inserted to the middle of the cake. Allow the cake to cool in the pan for 10 minutes before inverting onto a cooling rack. Make sure the cake is totally cooled before cutting, or it will crumble!

Cocoa, coffee and walnut swirled cake

This was a big hit in my family and the addition of the walnut made it yummier in my opinion! hehe (: Have a go and let me know what you think!

Remember to always cook and bake with love. Till the next post, xx

Zebra Cake

photo 2-1-1

Home. I am back in the comfort of my home in Singapore getting ready for the arrival of our little bub, Baby Ho! (: But regardless of which island I’m on, I still always have the itch to bake! Lucky for me, I’m still able to do what I love with the big bump in front of me hehe

SCS Baker's Starter Kit

Also I was fortunately enough to be sent a baker’s starter kit from SCS Butter which was filled with boing essentials that I could use! So off I went to get some SCS butter from the local supermarket and planned what I wanted to make.

Zebra cake

I’ve been wanting to bake a zebra cake for ages, but never got down to making it. Since it’s a butter cake, I thought this would be a perfect time to try it! hehe I was a little nervous as you won’t know how to will actually turn out till you cut it open, almost like a surprise cake! haha So you would be able to see the relieve on my face when I got the first slice out of the bundt! Even though there aren’t as many stripes as I hoped for, I was glad there were at least some! hehe

I absolutely love the texture of the cake baked in a bundt tin – it had a nice crunchy crumb on the outside, soft and fluffy on the inside, not to mention how buttery it was! And to resemble more of the black stripes, I found extra dark chocolate cocoa which turned out almost black!

Extra dark cocoa powder

I actually got quite a shock seeing how dark it was, but it worked out well! hehe

So here’s the recipe and how I made the zebra stripes!

Zebra Cake (adapted from Ambrosia)

340g unsalted butter (I used SCS butter)

453g cake flour

200g caster sugar

4 eggs

1 tsp vanilla bean paste

1/2 tsp salt

1 cup buttermilk

1/2 cup dark cocoa powder

6 tbs water

Steps :

1) Preheat oven to 170 degrees Celcius. Butter/Oil and flour a bundt baking tray well.

2) In a standing mixing bowl, cream the butter and sugar until it’s light and fluffy. Add the eggs one at a time, making sure that each addition is well combined into the mixture. Scrape the sides and the bottom of the mixing bowl when needed.

Adding buttermilk & flour

3) Add the salt and vanillin bean paste and beat for another 30 seconds or so. On low speed, alternate the cake flour and buttermilk until both are very well incorporated. Make sure you start and end with the cake flour. Beat until the mixture is smooth, but careful not to over mix the batter.

Mixing the batter to the cocoa

4) In a medium size bowl, mix the cocoa powder and water. Make sure there’s no lumps. Add 1 generous cup of the cake batter into the bowl and mix till well combined.

Getting ready to make the zebra cake

5) To make the zebra effect, add two heaps spoonful of vanilla batter in the bundt pan, then 1 heap spoonful of the chocolate batter. Continue to alternate the vanilla and chocolate batters until all the batters are used up and the bundt pan is filled. Tap the bundt pan to help in spreading the batters and be more equally distributed.

Steps to making the zebra patterns

Cake ready to be baked!

6) Bake the cake in the middle rack of your oven for 45-50 minutes. The crust will be golden brown and the cake should spring back when lightly touched. To check if the cake is done, stick a toothpick into the cake and it should come out clean. Allow the cake to cool for 10 mins in the bundt pan, then invert it out into a cooling rack. Allow it to cool completely.

Zebra cake

You can dust it with icing sugar, I wish I did, but I ran out of it! ENJOY!

Remember to always cook and bake with love! Thanks SCS for the starter kit once again! Till the next post, xx

Baby Ho’s Gender Reveal

photo 2-2-1-1

It’s time! I’ve been waiting all week for this (: Since it was the holidays, I gave myself a little project to do which involves my two favourite things : baking and surprises!

I started going onto Pinterest looking for ideas on how to reveal my bub’s gender and there were so many I wanted to do! One of which was a piñata cake! But it wasn’t easy finding blue sweets, I had to buy packets and packets of lollies and sieve them out. haha Which wasn’t too ideal, cos I’m not huge on lollies, and they will go to waste!

Inside of the cake

So I decided to make an inside surprise cake instead! The first time I made an inside surprise cake was for my dearest mother on Mother’s Day 4 years ago and it was one of the biggest projects I’ve ever done but also the coolest! It was a hidden heart in the middle of a cake! Since it was so long ago, I thought it would be perfect for the revealing of Baby Ho’s gender! Also inspired by I Am Baker, I decided that the inside of the cake would spell the gender of our dearest bub!

Chocolate cake

I used a chocolate cake recipe for letters inside the cake, and just like making a cake pop, I made my favourite cream cheese frosting to combine them together!

Cake toppers

I also tried to look for cake toppers that would be perfect for the purpose of the cake and found heaps of printable ones! Cut them out and stuck them onto lollipop sticks! hehe I have to say, I went a little crazy with the cake toppers haha So addictive to make them!

photo-6

Then I placed the letters into a white cake batter and baked it in a loaf before frosting it with just a basic buttercream frosting! I do apologise for the messiness of the coloured frostings. I wasn’t too sure how I wanted to do it, but decided to go around piping different sized pink & blue frosting around the cake. I tried to bring out the artistic side of me. Free form. haha

Pink or blue?

To make the coloured frosting, I took two heap tablespoon of frosting and place them in separate bowls (I heap tablespoon in each bowl) and added food gel colouring to create the pink (for girl) and blue (for boy) frosting. I have to say, I love how so many people commented on Instagram that I might be having twins! hehe But nope, one heartbeat! One bub! hehe

So here comes the BIG REVEAL! Is Baby Ho a girl or a boy? *drumroll*

He's a BOY!

I am proud to announce that we are having a boy! (: Cutting through the cake to reveal the letters was really scary to be honest! I wasn’t sure if the letters would stay the way they were moulded or they would become one big mess! Thankfully, they could still be deciphered! PHEW! But yes! We are having a boy and we cannot be more excited! The mr already has plans to bring him to the gym and lift some weights! haha

We are having a boy!

Thank you everyone for the constant care, love and support through the past 23 weeks and I cannot be more blessed to be surrounded by you guys! Just slightly shorter than 3 months to go and we can’t wait to see our baby boy and hold him in our arms!

Thank you for being so patient with me this week! Remember to always bake and cook with love!

Till the next post, xx

My Biggest Project : Rainbow Cake

Processed with VSCOcam with t1 preset

Layer cakes were never a specialty of mine, but when the opportunity came up to make something special for a first birthday, I just couldn’t resist! If you follow me on instagram (@lianneelow) I’m sure you’ve seen endless photos of Paige who turned one last year. I love her like she’s my own, so I wanted to do something special for her as well!

Stacking the layers

Rainbow was the theme of her party, so inevitably, the only cake I could think of was rainbow cake! Being ambitious, I also wanted to make all 7 layers out of natural colouring and flavouring. So after much research, I came up with the flavours and decided to give it a try. As much as I wanted natural colouring, the colours of the fruits just didn’t stand out as much as I wanted to after being baked, so for the actual cake, I decided to put a drop or two of colouring paste just to make it pop!

Cupcake pops

On a side note (just cause the word pop reminded me haha), I also made some cupcake pops for the party! Though it was time consuming to make them, I enjoyed every single moment – from molding them into their shapes, dipping them into melted chocolate (like yummeh!) and to sprinkling them with 100’s and 1000’s! Could totally imagine a kid doing it as a fun activity too! Hehe

plan drawn

So here’s a draw up of my plan: 7 flavours and all stacked and iced with my favourite cream cheese frosting! Mmmmm!

I wasn’t too worried about baking the 7 individual layers, I was more worried about constructing it and how high it would actually be! It was definitely the highest cake I’ve made in my life!  The only thing I was really worried about was transporting the cake to the party as I was going to be driving alone! I think my life was shortened about 10 years in that 10 minutes of driving! Haha

It was all worth it though, to see the faces lit up at the party and hearing all the compliments from the guests! Definitely made my day! The next thing that made my heart beat really quickly was the cutting of the cake and revealing to see if there were 7 distinct layers. And….

Revealing the layers inside

TADAH!!! (: I couldn’t be happier with how it turned out! I’m sure I let out a loud sigh of relief the moment I took the first slice of cake out and served it! A happy dance was definitely in order! Hehe  I have to admit, there were some layers that I was probably a bit too heavy with the colouring towards the end (was going colour happy haha), cause I really wanted the colours to stand out. But please know that you can always cut that down to your own preference, or you can just cut that out too!

Rainbow Cake 

Ingredients : (20 cm round baking tin, repeat 7 times)

120g plain flour

80g caster sugar

40g unsalted butter, room temperature

120ml milk

1 tsp baking powder

1 tsp vanilla paste

1 egg

Wilton icing food gels (I used a toothpick to add the colours)

For the different layers : (add food gel colouring till desired colour or leave it out if you wish)

Red – 3/4 cup fresh raspberry, mashed + red food gel

Pink – 3/4 cup fresh strawberries, mashed

Purple – 3/4 cup blackberries, mashed + purple food gel

Blue – 3/4 cup blueberries, mashed + blue food gel

Green – Zest of 2 limes, 3 tbs juice + green food gel

 Yellow – Zest of 2 lemons, 3 tbs juice + yellow food gel

Orange – Zest of 1 naval orange, 3 tbs juice + orange food gel

Steps : 

1) For each layer of cake : Grease and line the baking tin with baking paper. Preheat oven to 165 degrees celcius.

2) In a medium bowl, combine the plain flour and baking powder. In a mixing bowl, add the butter, sugar, egg and vanilla paste and mix till pale and fluffy. Alternate the flour mixture with milk (flour,milk,flour) until well combined.

3) Fold in the flavouring and colouring for each layer. Careful not to over mix.

the red layer - raspberry

4) Pour the batter into the prepared baking tin and tap it on the counter to allow all the air bubbles to come to the surface. Bake for 18 mins or until the skewer comes out clean. Allow the layers of cake to cool completely before assembling.

The yellow layer - lemon

Cream Cheese Icing (From the Hummingbird Bakery Cookbook)

900g icing sugar

375g cream cheese

150g unsalted butter, softened

Steps :

1) Beat the icing sugar and butter in a mixing bowl until well combined.

2) Add the cream cheese in one go and beat until completely incorporated. Turn the mixer up to medium high, and beat until it’s light and fluffy (about 5 minutes). Do not over beat as it will turn runny.

Cream cheese icing

3) To assemble : Place the red cake layer at the bottom, place 2 heap tbs of cream cheese icing on the cake and spread it out uniformly using a palette knife. Place the orange layer on top and repeat the process. Once you reach the top layer (pink), frost the top and side of the cake till it’s smooth and even.

Rainbow cake success!

Enjoy! (: I love how I could actually taste the fruits in every single layer, and they actually do work well together although it’s impossible to fit all 7 layers in one bite! haha

Paige eating the cake

It was such an honour that my cake is the first cake Paige has eaten (:  How pretty is her dress!

Happy 1st birthday Paige

It is many months after the actual birthday, but happy 1st birthday Paige! Can’t believe how quick it has been and she’s such a big girl now! (:

Paige and Us

I can’t wait till I am able to make my own bub’s cake and I will definitely be more than happy to make this cake again!

Have a good mid week everyone! (:

Remember to always bake and cook with love! Till the next post, xx

Hazelnut Olive Oil Cake

Hazelnut Olive Oil Cake

Hooray! It’s the weekend so let’s celebrate with cake! What better way yes? heh I don’t think anyone can really resist cake, even more so when it’s a gluten free and (almost) healthy one!

Is there a particular cake that you will never get tired of and would always go-to cause you know it will not fail you? I definitely do! This is one cake that I know that would definitely be a crowd pleaser! The chocolate olive oil cake by Nigella Lawson is simple, delicious and did I say delicious? Whenever I need to make a birthday cake for a close friend, I always turn to this recipe, top them with fresh raspberries and dust with icing sugar and viola! All ready to be consumed and put smiles on people’s faces!

All along, I’ve made it using almond meal, but I few weeks back when I needed to bake a cake for a close friend’s 21st, I had a eureka moment. Why not use hazelnut meal? It would be like a fudgey and moist… nutella cake! How good does that sound? I was so so excited to give it a try!

And it came out just the way I envisioned it to be. Soft, really chocolatey, and so fudgey and moist! OOhhh la-la! It can definitely make one of the sexiest and most decadent chocolate dessert that I’ve ever made! The hazelnut meal elevated it to a whole new level! Definitely gonna stick to using hazelnut meal now. hehe One slice is never enough!

So give this a shot if you love nutella. You will definitely be hooked! It’s gluten free and if you are on a paleo diet, just change the sugar to 1/3-1/2 cup honey and you’re good to go!

Hazelnut Chocolate Olive Oil Cake (adapted from Nigella Lawson)

150 ml regular olive oil (plus more for greasing)

50 grams cocoa powder (good quality, sifted)

125 ml boiling water

1 tsp vanilla bean paste

150 grams hazelnut meal

½ tsp bicarbonate of soda

pinch of salt

170 grams caster sugar (or 1/3-1/2 cup of honey if you want it to be paleo)

3 eggs, room temperature

1 small punnet of fresh raspberries (to top the cake)

Icing sugar, to finish

Steps :

1. Preheat your oven to 170°C/gas mark 3. Grease your springform tin with a little oil and line the base with baking parchment. Measure and sift the cocoa powder into a bowl or jug and whisk in the boiling water until you have a smooth, chocolatey, still runny (but only just) paste. Whisk in the vanilla extract, then set aside to cool a little.

2. In another smallish bowl, combine the hazelnut meal with the bicarbonate of soda and a pinch of salt.

3. Put the sugar (or honey), olive oil and eggs into the bowl of a freestanding mixer with the paddle attachment and beat together vigorously for about 3 minutes until you have a pale-primrose, aerated and thickened cream. Turn the speed down a little and pour in the cocoa mixture, beating as you go, and when all is scraped in you can slowly tip in the hazelnut meal mixture.

4. Pour this dark, liquid batter into the prepared tin. Bake for 40-45 minutes or until the sides are set and the very centre, on top, still looks slightly damp. A cake tester should come up mainly clean but with a few sticky chocolate crumbs clinging to it.

5. Let it cool for 10 minutes on a wire rack, still in its tin, and then ease the sides of the cake with a small metal spatula and spring it out of the tin. Leave to cool completely and place the whole punnet of fresh raspberries neatly on the cake and dust with icing sugar. Serve with a side of freshly whipped cream or a scoop of your favourite ice cream!

Have a chocolatey and hazelnutty weekend everyone! (: Be warned that you won’t be able to stop at a slice for this one! hehe

Remember to always cook and bake with love! Till the next post, xx !

Being Bold – A Recipe & Hudsons Giveaway ! {Winners Announced}

Be Bold

Good afternoon my dear readers! Happy weekend! (: Hope it’s going well and you have lots of fun and yummy things planned ahead of you! Since it’s the start of Spring, I thought it would be a good time to make some new goals!

“Freedom lies in being bold” – Robert Frost

Being bold is about making each day count (be it today, weekly or even for the year), so why not step out of your comfort zone and express your boldness to the world right? hehe The first BOLD thing I’ve decided to do is trying my hardest to make a change in my life – Being healthier and fitter ! My goal couldn’t come in a better time, as Hudsons Coffee also decided to BE BOLD with their launch of a new Barista’s  Choice Blend – A rich and intense flavour with caramel undertones. YUM!

Hudsons Coffee Barista's Choice Blend

I was lucky to receive a a pre-ground take home bag of the new blend and I couldn’t wait to try it! Ever since my brunch at Three Bags Full, I have started a liking to french press coffee! This one wasn’t overly strong on the palette and not too sharp or acidic either! Smooth and a subtle taste of caramel, which the mr loved!

Barista's choice

While enjoying my glass of coffee, I had a eureka moment! I really wanted to use it to bake! One particular ingredient came to mind – Banana! So I decided to combine the banana cake with some espresso, and to add some texture to the cake by adding a pecan streusel on top! I have made lots of banana cakes in the past, but never one with a coffee kick! This is me BEING BOLD (number 2) cause I don’t usually bake coffee cakes! So was really excited about this.

Banana Espresso Pecan Streusel Cake

While making the streusel, I couldn’t stop sneaking teaspoons of it, cause it was so addictive! The combination of pecan and oats were just delish! hehe It could easily be turned into a mixture for granola too!

close up

Although I am trying to get healthier and fitter, I still deserve the occasional treats yes? hehe So I added some dark chocolate chips in the cake to make it more indulgent! Anyway, dark chocolate is suppose to be good for you. I’m pretty sure there’s some scientific findings to back me up on this. haha

Slice of banana espresso pecan streusel cake

This cake was moist, full of flavour, and I just love having the bursts of chocolate and the crunch of the streusel top! Definitely one cake I would bake over and over again! You don’t need a very big piece to enjoy it, as it is quite rich. A small piece with a cup of tea or coffee is perfect!

Banana Espresso Pecan Streusel Cake (A Food Made With Love Original Recipe)

For the streusel :

1/2 cup + 2 tbs plain flour

1/2 cup rolled oats

1/2 cup brown sugar

1 tsp salt

85g unsalted butter

3/4 pecans, roughly chopped

Steps :

1) Mix the flour, rolled oats, brown sugar and salt in a medium bowl.

Adding the dry ingredients to make the streusel

2) Add the butter and rub with your finger tips intul the mixture holds together (my favourite thing to do actually, find it very therapeutic! haha).

3) Add the chopped pecans, mix and set aside in the fridge.

Pecan streusel topping

For the cake :

200g unsalted butter

170g castor sugar

4 eggs

1 tsp vanilla bean paste

4 tbs milk

5-6 tbs espresso (I used the Barista’s Choice Blend from Hudsons Coffee)

2 cups + 3 tbs plain flour

1 tsp bicarbonate soda

1 tsp baking powder

3-4 bananas, mashed

3/4 – 1 cup dark chocolate chips

Steps :

1) Preheat oven to 160 degrees C. Prepare a 26cm by 26cm square tin by lining the bottom and greasing the sides. Set aside.

2) In a mixing bowl, cream the butter and sugar until light and fluffy.

3) Add the eggs, one at a time, and mix until well combined. Add the vanilla bean paste and the mashed bananas. Mix till it is evenly mixed.

4) Mix the espresso and milk in a measuring cup and add it alternately with the plain flour (dry-wet-dry-wet-dry sequence). Careful not to over mix.

5) Pour the mixture into the prepared tin and tap it a few times on the bench to make the top even. Sprinkle the streusel and bake for 1 hour or until the top is golden and the toothpick comes out clean. Cover the cake with foil after 30 mins if it browns too quickly.

Ready to go into the oven

6) All it to cool in the tin for 10 minutes and remove it from the tin to rest it on the cooling rack.

all baked and cooled, ready to be sliced and enjoyed

Enjoy! (: It was my very first cake I was confident enough to bring to work and share with my colleagues, and they loved it! (: I brought it in during recess and it was gone by lunch! The feedback was that the cake was really moist and they really liked the surprise of the chocolate chips! Yippee!

So here comes the exciting bit! Tell me how you are going to BE BOLD and take that first step of making a positive change in your life! I’ve taken two, the first one will be on-going and the second one is completed, so I would love to hear your side of the story!

Hudsons Gift Package

Hudsons Coffee and Keep Left PR has been so generous to provide me with two packs of goodies to give away. Similar to what I received, each pack includes : 2 packets (50g each) of pre-ground Barista’s choice beans, 1 (12 oz) Hudsons Keep Cup and a  $10 voucher to enjoy a hot cuppa when you’re around a Hudsons store! So how do you win this awesome pack?

To enter this giveaway :

  • All you have to do is leave a comment letting me know : What kind of BOLD change(s) you want to make in your life. Remember it can be a daily, weekly or even a year long goal! Come on and let’s #BEBOLD together!
  • This giveaway is only open to Australian residents! (Sorry international readers!)
  • Follow me on Facebook, Instagram & Twitter, and let me know when you’ve done it!
  • Follow Hudsons Coffee on Facebook,  Instagram & Twitter as well!
  • Winners will be drawn on the 22nd of September 2013, Sunday at 8pm!
  • You may re-enter daily, one entry a day (Woohoo!)
  • Winners will be picked via random.org and notified on this blog post and via email.

Good luck and have a great weekend ahead! (:

Remember to always cook and bake with love!

Disclaimer : This post is sponsored by Hudsons Coffee & Keep Left PR. I tasted the Barista’s Blend coffee with compliments of both sponsors, however, the review, opinions are honest and based on my personal taste and preference. The recipe is a Food Made With Love original.

~~~~~~~~~~~~~~~~~~~~~~~~~~~~~~~~~~~~~~~~~~~~~~~~~~~~~~~~~~~~~~~~~~~~~~~~~~~~~~~~~

And the winners are…..

Iron Chef Shellie & Bonnie-Kate !! Congratulations!!!! I will be contacting you through email soon! x

Winner number 21

winner number 21 -  Comment

Winner number 18

Winner number 18 - Comment

Congrats again you two and hope you both enjoy your packages! Thank you everyone for your comments again and till the next post, x

Milo Brownie Pound Cake

Milo Brownie Pound Cake

MILO. Just the thought of it brings me back to my childhood. Milo was something I grew up drinking. A cup everyday and even when I was older, I would still love drinking it. And yes, eating it by spoonfuls too! Don’t be shocked! I’m sure lots of you do it! heh I remember when we had to do the yearly cross country run (more walk than run to be honest haha), the one thing that we all look forward to was the milo van at the finishing line!

milo brownie pound cake

These days, what I would sometimes crave for when I’m back home in the heat is some ice milo or even milo dinosaur, which is pretty much ice milo with a whole heap of milo powder on top. Can you say YUM?!! Can’t get enough!

Milo brownie pound cake

So when I came across this recipe of a milo cake on Pencil Kitchen, I couldn’t wait to start baking to taste it! I have to admit though, I probably overbaked mine cause it didn’t come out as gooey and light like hers, but after warming it up before eating it, it was still pretty delicious! Definitely tasted like having a warm cup of milo! So definitely gonna make this again, but cutting down my baking time!

milo brownie pound cake

Milo Brownie Pound Cake ( Recipe closely adapted from Pencil Kitchen )

175g butter, room temperature

150g caster sugar

3 eggs

1 tsp vanilla bean paste

200 ml milk

200g milo powder, extra 50g for dusting

a pinch coffee granules

40g cocoa powder

200g all purpose flour

1 tsp baking powder

2 pinch salt

1 tbs salted butter, melted

Steps : 

1) Preheat oven to 175 degrees celcius.  Prepare a 9×9 inch springform baking tin by lining the bottom with grease proof paper and lightly coating the interior with olive oil.

2) Dissolve 100g of milo powder and coffee granules in milk. Heat it a little to allow it to dissolve quicker. Set it aside and allow it to cool completely.

3) In a large bowl, sift the flour, 100g of milo powder, cocoa powder, baking powder and salt. Set aside.

4) In another bowl, cream the butter and sugar until light and fluffy. Beat in the eggs, one at a time, and beat till just combined. Stir in the vanilla bean paste.

5) Add the flour mixture and milo milk alternately, starting with the flour mixture.

Before going into the oven

6) Pour the mixture into the prepared baking tin and spread it out to make sure it’s evenly spread. Bake the cake for 30-40 mins (nothing more as it will overcook!) and allow it to cool in the tin for 10 mins.

all baked and ready to cool

7) Carefully release the spring and invert the cake onto a cooling rack. Brush the top with the melted salted butter and dust with 50g of milo powder.

milo brownie pound cake

Slice and enjoy it as it is, or zap it in the microwave to have it warm with a scoop of your favourite ice cream! (:

So dear readers, what is your favourite childhood drink? Would love to know!

Till then, remember to always cook and bake with love! xx

Purple Carrot Cake & Sweet High Tea

Purple carrot cake

Good Sunday afternoon dear readers! I hope you’ve had a great weekend so far! (: I’m about to head to the airport to embark on my adventure to Europe! But before I do, I wanted to share a Sweet High Tea organised by Miss D, at her place, a few weeks ago! We each had to bring a thing or two to share. Oh boy were there heaps of delicious yummies, bother sweet and savoury!

Here’s a quick glimpse of the spread we had!

Freshly baked scones and Momofuku's Bagel Bomb

First up : Daisy’s Country Women’s scones and Julie’s Momofuku Milk Bar bagel bombs! Before I go into details, how cute is the bag? It keeps the yummies warm too! So need to get one. hehe Anyway, back to the food! The scones were freshly baked and so so good with cream and homemade strawberry and fig jam! hehe Julie’s bagel bombs were TO DIE FOR. Omgness. Biting into the bagel bomb was just heavenly. It’s filled with cream cheese, bacon (YES BACON) and spring onion.

The inside of the bagel bomb

How good does that look? I wanted more! hehe

Smoked salmon sandwiches

Next up : Smoked salmon sandwiches with cream cheese and capers. These were made by Ling and the smoked salmon were so so good and fresh! She also made some caramel slice! A good match of savoury and sweet! hehe

caramel slice

Broccoli and cheese muffins

Last of the savoury : My broccoli and cheese muffins! I haven’t made this for ages and I’m so glad there was an occasion to make them! Mums who want their children to have veggies should make these! Cheesy goodness and you can barely taste the broccoli! hehe So glad the girls liked them too! hehe

Kuehs by Cltyw

Then came the sweets! hehe My eyes were fixated on these the moment it came through the door! Liz made my two favourite kuehs : kueh dadar and kueh sarlat! Kueh dadar is a thin pandan crepe that is filled with a mixture of gula meleka and coconut! If I haven’t already said this, I am OBSESSED with gula melaka! haha Love it more than normal sugar. hehe If I could flavour everything with it, I would! Kueh sarlat consists of two layers : the bottom is glutinous rice, and the top is a thick pandan custard! It was perfect! I wanted to steal the whole plate back! hehe

Peanut butter cupcakes

In true Sweet Queen fashion, Daisy made something sweet of course! hehe Peanut butter cupcakes with a surprise mini Reese’s peanut butter cup at the bottom! hehe Nothing could be better than the combination of chocolate and peanut butter. It was delish! hehe

Guinness ginger bread

Michele came with two beautiful sweets : a guinness ginger bread that’s so so moist and soft! hehe The ginger taste was subtle and just went perfectly with a cuppa tea! hehe

Eton Mess Cake

She also made a pretty eton mess cake! hehe It’s topped with strawberries and merigue nests and of course, we had it with a dollop (or two) of double cream. Mmmmmm (: That’s the sound we were all making when we had it. haha

Purple carrot cake

Last but not least, it’s my humble purple carrot cake! hehe I love love love carrot cake but I probably haven’t made one in almost close to 5 years now. haha I have to say I’m really brave by baking cakes that I’ve not done in a while. I was soooo relieved when it was moist and crumbly. Instead of the usual orange carrots, I decided to give it a small twist by using purple carrots! hehe The colour turned out purplish blue! To top it, I decided to use the Hummingbird Bakery’s cream cheese icing. It’s one of the best ones I’ve had! Creamy and not too heavy. hehe I have to say I was really happy with it! 🙂

So I just want to share the recipe with you! Do give it a try if you love carrot cake like I do! (I know it seems I love everything, but I really do. haha)

Purple carrot cake

Purple Carrot Cake (adapted from The Cake Mistress)

2-3 large purple carrots, finely grated

I cup packed brown sugar

1 cup olive oil

3 large eggs

pinch of salt

1/2 tsp bicarb soda

2 cups self-raising flour

1/2 cup chopped walnuts, extra to garnish

1/2 cup raisins

1 tsp ground cinnamon

1 tsp ground nutmeg

Cream Cheese Frosting (From the Hummingbird Bakery Cookbook)

300g icing sugar

125g cream cheese

50g unsalted butter, soften

finely grated purple carrot

Steps : 

1) Preheat oven to 180 degrees celcius.

2) Beat brown sugar and olive oil until it gets to a thicker consistency. Add the eggs, one at a time, and beat until well combined.

3) Add salt, bicarb soda, carrots, flour, walnuts, raisins and spices. Mix it on slow speed until everything is well combined.

all scooped and ready to go into the oven

4) Put batter into a well greased baking tray (I used a 12-square loaf tin) and bake for 15-20 minutes, or until its lightly golden and the toothpick comes out clean after inserting it into the middle.

All baked

5) For the frosting : Beat the icing sugar and butter in a mixing bowl until well combined. Add the cream cheese in one go and beat until completely incorporated. Turn the mixer up to medium high, and beat until it’s light and fluffy (about 5 minutes). Do not over beat as it will turn runny. Pipe onto the cakes (when they are cooled) and top with a small piece of walnut.

ENJOY! (:

Purple Carrot Cake

Hope you’ll give this a try and do let me know what you think when you do! hehe Have a good week ahead everyone! Just letting you know I will be away for the next 3 weeks as I will be in the UK! But I will come back with lots of good food and pictures to share, I promise! So till then, remember to always cook and bake with love! xx