Thai Fish Cakes & Red Nam Jim

Thai fish cake with red nam jim

Thai food. I absolutely adore it. It’s just a cuisine that makes the tongue do a dance after every bite/ mouthful! Sweet, sour, salty, spicy, tangy! All rolled into one! Absolutely mouth-watering! However, I have to admit, thai is the one cuisine that I seldom cook at home. I usually head out to the restaurants and leave it to the pros! Especially with the balancing of the flavours!

thai fish cakes

But I decided to be adventurous one Friday afternoon after getting off work early. I saw Wince (The Hungry Excavator) post a photo of him making some Thai Fish Cake earlier in the week, and I knew instantly I had to make some! So I looked for a recipe during my lunch time, and off I went to Springvale to grab the ingredients after work!

Thai fish cakes close up

It actually wasn’t too difficult to make! In fact, the only time consuming thing was cutting the long snake beans thinly. Besides that, everything is whizzed in the food processor and viola! You’ve got some delicious fish cakes for dinner! hehe So give these a shot. They are perfect party food, and are also great as starters. hehe Oh yes! Let’s not forget the spicy and tangy red nam jim sauce to go with the fish cakes! SO GOOD! The mr couldn’t get enough!

Thai Fish Cakes with Red Nam Jim (adapted from SBS, a Teage Ezard recipe)

600g fish paste

70g red curry paste

1 egg

1 tbs fish sauce

1 tsp sugar

4 fresh kaffir lime leaves, finely shredded

10 snake beans (or green beans), thinly slices

Vegetable oil for shallow frying

Steps :

1) In a food processor, place the fish paste, red curry paste, egg, fish sauce and sugar and blend till mixture is smooth and well combined.

Blending the ingredients in the food processor

2) Scoop the mixture into a large mixing metal bowl and add the finely shredded kaffir lime leaves and snake beans.

Adding the snake beans and kaffir lime leaves

3) Mix them together till everything is well combined.

All well combined

4) In a non-stick pan, heat some vegetable oil on medium heat, enough for shallow frying. Roll the mixture into balls and flatten them with your palm. Mine was about 5 cm in diameter and about 1 cm in thickness. Fry them until both sides are brown and crispy.

Frying them

frying both sides till brown and crispy

5) Drain them on some paper towel and serve them with the homemade red nam jim sauce (to follow).

cross section

Red Nam Jim Sauce

2 red birdseye chilli, seeded and roughly chopped

4 long red chillies, seeded and roughly chopped

2 cloves of garlic, peeled

Handful of coriander leaves and roots

2 tbs shaved palm sugar, add more if needed to balance flavour

125ml lime juice

1 1/2 tbs fish sauce

Steps :

1) In a mortar and pestle, add the chillies, garlic and coriander and pound till it forms a paste. Do be patient, as this might take a while!

Pounding the ingredients

2) Add the palm sugar and combine. Add the lime juice, a little at a time, until the mixture is well combined then add the fish sauce to balance the taste. It should be a little like a wetter version of a salsa. Remember to taste and add more of the flavourings to balance the sweet, sour and tang!

Thai fish cakes and red nam jim

ENJOY!

Remember to always bake and cook with love! xx

Vogue Australia High Tea

IMG_8302-1-1

The Spring races are here! And the best way of celebrating this designer fashionista event is to dine in style! hehe The Langham Hotel has collaborated with Vogue Australia to come up with this beautiful designer Vogue High Tea! To me, high tea is a time to get together with your girlfriends to have tea, coffee, champagne and a spread of savouries and sweets! Of course, not forgetting the girly gossipy session to go with! haha Due to all the different work commitments, it’s really hard to arrange a meal, let alone to have High Tea. Fortunately for me, I had a date with the Sweet Queen (Miss D) herself at the Aria Bar & Lounge, The Langham Hotel, for the Vogue High Tea! I was so excited as it’s been a long long time since I had High Tea. Such a treat!

Upon arrival, we were greeted by the warmest and friendliest staff, who brought us to our comfortable sofa seats and served us a flute of Domain Chandon NV Brut! I felt so classy and bubbly for the afternoon! Such a silly billy I am. But it doesn’t take much to make me happy, as you can tell. hehe

Paris tea

Of course, you can’t have a High Tea without having tea, can you? There was an extensive list of tea, but Miss D highly recommended the Paris tea. hehe It’s a blend of black teas with the hints of vanilla, fruit and lemony bergamot. We were told that this was a hot favourite with many customers!

Paris tea

I knew why after my first sip. It was nice and fruity, and and a very subtle taste of vanilla. Not overly tart or sharp. Perfect for the afternoon of treats! How pretty is the colour of the tea?

Hot chocolate

Daisy ordered a hot chocolate to start off, then an earl grey tea after! The hot chocolate was a tad bit too milky, and would be better if it was more chocolatey!

3 tiered displayed

Then the three tiered stand arrived. My eyes inevitably lit up and a wide grin on my face appeared! hehe How pretty is the stand?? I couldn’t wait to dig in!

sandwiches

We started from the bottom of savouries and worked our way to the top. There were 5 types of finger sandwiches : smoked salmon pin wheel, free range chicken, cucumber and cress, egg & mayonnaise, cream cheese & chive! My favourite was the smoked salmon and the chicken! Mmmm (: Thankfully I had a light lunch before, or else I wouldn’t have space for what’s to come! hehe

scones!

The second layer was my favourite of the layers! Freshly baked scones with clotted cream, butter and jam. The scones were absolutely divine! Crumbly outside and fluffy & moist on the inside! Just everything you would love in a scone. I think there is only one thing that goes perfectly well with scones and thats thick and luscious clotted cream! Ooh la la! At this point, there’s this phrase that just keeps ringing in my head “Once it’s on your lips, goes straight to your hips!” haha Well, who cares! It’s scones! Mmmm!

Scones

Now with scones, do you have the jam first or the cream first? To me, it has always been jam first then cream, but just for that day, I decided to try the other way around. To be perfectly honest, either way is still as delicious!!! haha But do you have a preference? hehe

Sweets

The top tier offers a range of beautiful sweets! Definitely was spoilt for choice and we didn’t know where to begin! We decided to start with the chocolate macarons, which were a tad bit too crispy for me. But the chocolate ganache was delish! Then we made our way through the Vogue strawberry eclair, lamington bonbons, lace cookies, very vanilla cupcakes and ended the afternoon with the salted caramel popcorn tarts that were YUMMILICIOUS!

top view of our sweets tier

I apologise for the yellow tinge of my photos! The yellow light was just right above the tier! hehe but this is a top view of our sweets spread. The lace cookie was so pretty! hehe

So dress up, and plan a day with your girlfriends! Head down to the Vogue high tea and enjoy a whole afternoon of indulgence and pampering in style! The high tea is held at the Aria Bar & Lounge in the Langham, from now till the 8th of November, from 10:30am to 4:30pm at $65 per head.

Book soon cause not long to go! (: We all deserve an afternoon like that for sure!

Disclaimer : I was invited by Daisy of Never Too Sweet and Langham to have the Vogue High Tea at the Aria Bar & Lounge, Langham. All thoughts and opinions are based on my experience at the time of the visit. Thanks so much for this opportunity and afternoon treat! 

For A Berry Pink Cause – Ski Yogurt & A Giveaway ! {Winner announced}

Lemon & Berry yogurt mini loaf with cream cheese and yogurt icing

Paying it forward. I always feel that we should always count our blessings and do what we can for people around us. As many of you know, October is Breast Cancer Awareness Month, and I was approached by Keep Left PR to be involved in it. Without any hesitation, I agreed!

Ski Yogurt turning pink

If you’ve walked the yoghurt aisle in the supermarkets, you’ve realised that Ski yoghurt has turned pink! In fact, they have pledged a three-year commitment to the McGrath Foundation and have promised a $350,000 donation to fund a McGrath Foundation Breast Care Nurse in the community. How amazing is that? I’m so honoured to be ask to be part of this Pink event!

lemon & berry mini loaves

Yoghurt has become part of my daily breakfast and morning tea routine, so I was really glad that I was asked to come up with a recipe that incorporates Ski yogurt!

So as I stood in front of the different flavours in the supermarket, my ideas were just popping up!

Close up

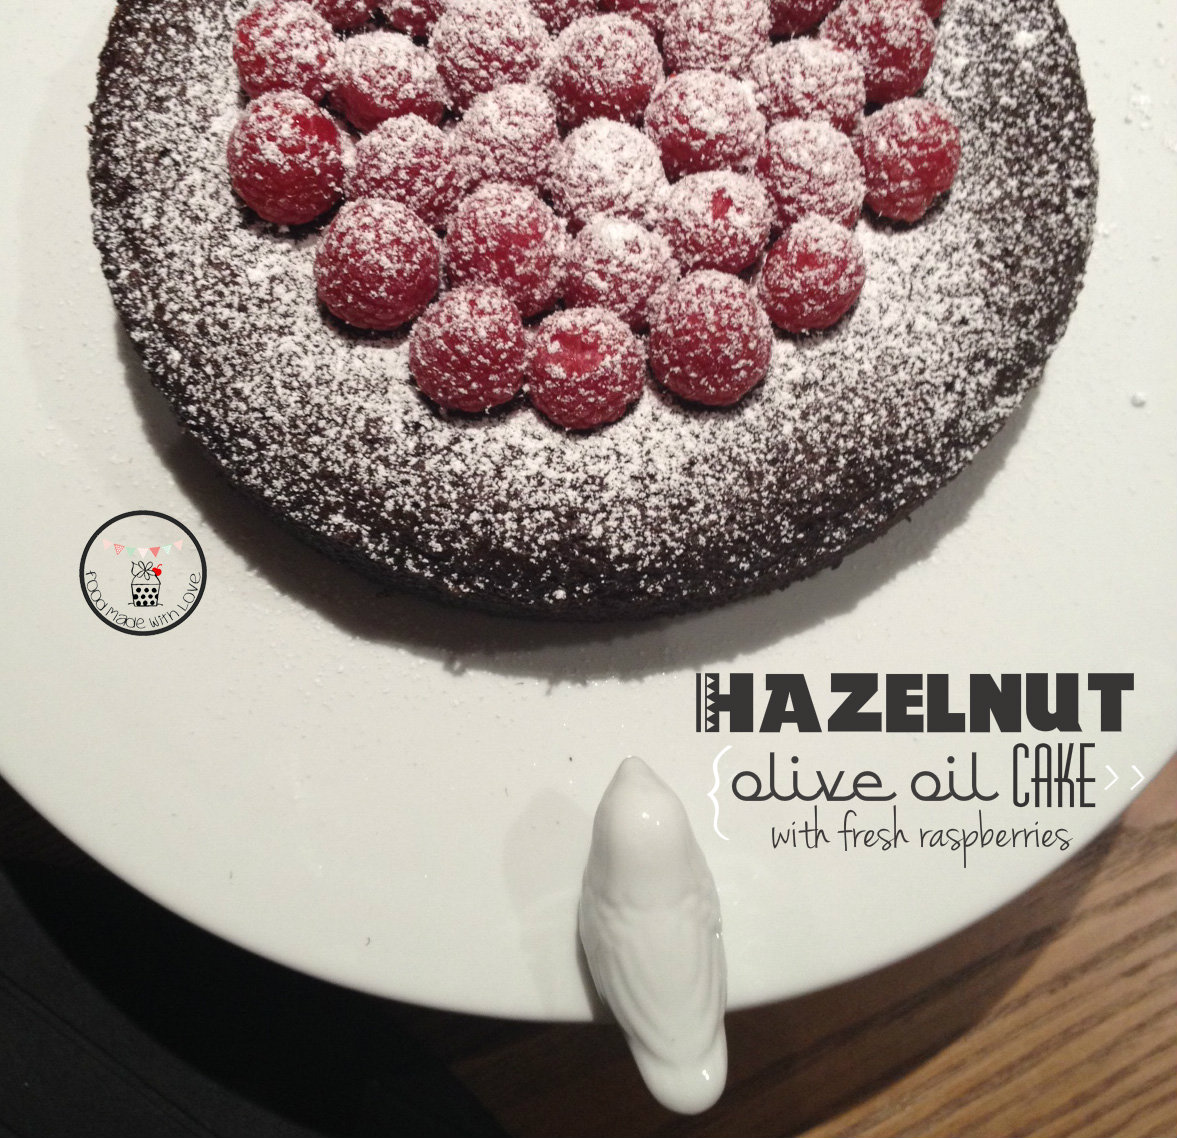
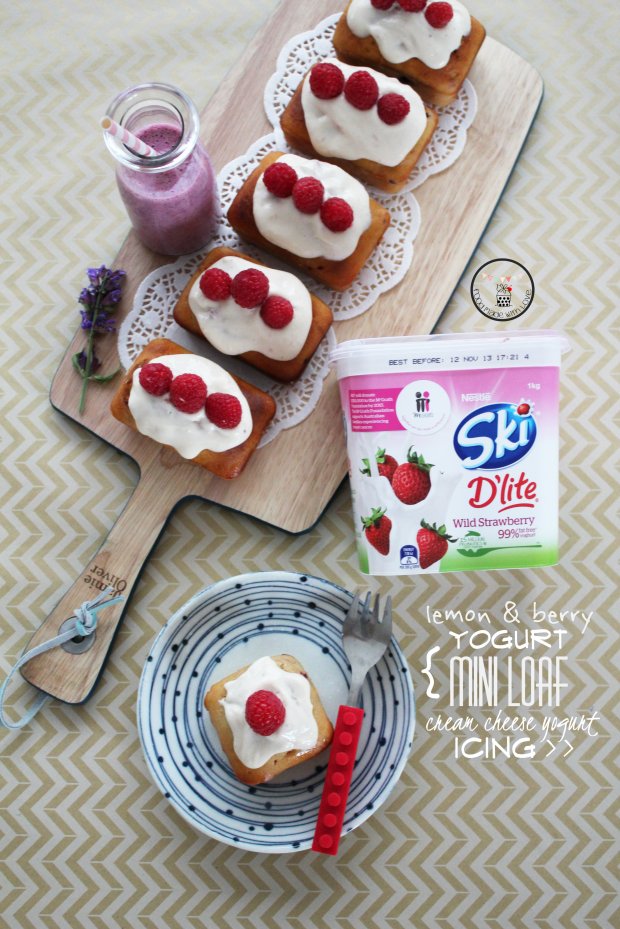
As I got a new mini loaf tin, I decided to make some yogurt mini loaves! Just too cute! But to give it a little bit of ZING, I added lemon zest to it! Mmmm.. berries and lemon do make a really good match! The best thing about incorporating yogurt in your cake is that it makes it really moist!

Lemon & berry yogurt mini loaf with a cream cheese yogurt icing

In all honesty, the icing didn’t quite turn out the texture I wanted. I wanted to be able to pipe rows. hehe I tested it out, but it went everywhere! haha So i decided to go with the flow (literally) and let it have some free form! It worked out well, don’t you think so? hehe The addition of the fresh raspberries just made everything pop, giving a subtle tinge of pink reflection on the icing. Without trying to over do the self-praise, I have to be honest and say that this was one of my best cakes I’ve made to date!

mini loaves - light reflection

So here’s the recipe and my humble contribution to the Breast Cancer Awareness Month! (: Hope you all enjoy!

Lemon & Berry Yogurt Mini Loaf with Cream Cheese Yogurt Icing (an original recipe of Food Made With Love)

Lemon & Berry Yogurt Loaf :

1 1/2 cups plain flour

2 tsp baking powder

1/2 tsp salt

300g Ski Wild Strawberry yogurt

1/2 cup castor sugar (plus 1/4 cup for syrup)

3 large eggs

Lemon zest  of 2 lemons

1 tsp vanilla bean paste

1/2 cup olive oil

1/4 cup lemon juice

1/2 cup frozen mixed berries

10 mint/basil leaves, washed and pat dry

Steps :

1) Preheat oven to 170 degrees celcius. In a clean bowl, sift the flour, baking powder and salt. Set aside.

yogurt, sugar and lemon zest

2) In a mixing bowl, combine the yogurt, 1/2 cup of sugar, lemon zest and vanilla bean paste. Mix till well combine then add the eggs, one at a time, making sure each one is well incorporated before adding the next.

3) Add the dry ingredients slowly, 1/2 cup at a time, and make sure it is well combined. Be careful not to over mix.

4) Pour the olive oil into the mixture, and using a spatula, slowly fold it in until everything is combined. Add the frozen berries and fold them in. Don’t worry if they start to “bleed”, just gives the batter a nice swirl of pink/purple!

5) Coat the mini loaf tin with olive oil (I used the olive oil spray) and dust with plain flour. Carefully fill the tin 3/4 way up. Drop them a few times on the bench to even the top and place them in the oven. Bake them for 25 mins, turning them half way to that they are evenly coloured.

6) While the cakes are baking, pour the lemon juice and add the 1/4 cup sugar into a small saucepan. Add the basil/mint leaves into the pot and allow it to come to a boil. Lower the heat and simmer for about 5 mins. Take it off the heat and allow it to cool slightly.

Pouring the lemon mint/basil syrup on the cakes

MIni loaves cooling and soaking up the lemon syrup

7) Once the cakes are done, allow them to cool in the baking tin for 10 mins. Slowly and carefully pour the lemon syrup on the cakes and allow them to absorb completely. Let it cool in the tin completely before taking them out.

Cream Cheese and Yogurt Icing 

1 block of Philadelphia cream cheese, cold

2/3 cup Ski Wild Strawberry yogurt

1-1 1/2 cup pure icing sugar

1 tsp lemon juice

Fresh raspberries, to garnish

Steps :

1) In a mixing bowl, whip up the cream cheese till smooth, then add the yogurt and mix till they come together. Don’t worry if it looks clumpy. Add the icing sugar, 1/2 cup at a time, and taste as you go (YUM!). Stop adding when you feel the sweetness is right! Add the lemon juice and mix until smooth.

2) Using a tablespoon, drop the icing in the middle of the loaf and allow it to flow down. You could use the back of your spoon to help shape it the way you like. Garnish the loaves with fresh raspberries. ENJOY!

Finished product

I had mine with a small glass of intense berry smoothie! hehe and I thought I would share with you my favourite smoothie recipe since it also uses yoghurt! (: So bear with me. The giveaway is up next!

Intense berry smoothie

Intense Berry Smoothie

150g Ski Wild Strawberry Yogurt

150g coconut water

100g frozen mixed berries

Step :

Place all the ingredients in a blender and whizz it up! Easy peasy!

GIVEAWAY TIME!

And now for the part you all have been waiting for! So sorry for the super long post and thank you for being so patient! Keep Left PR has very kindly offered a giveaway! It’s a set of super pretty and cute pink silicone Scullery kitchen utensils worth $47.73! How can you resist?

giveaway

Giveaway

Yes! All 7 items! How awesome is that? I love the striking shade of pink! Ladies, start commenting. Men, start commenting too so you could win these for your loved ones! hehe

How do you get these you ask? Easy!

  • Leave a comment and share with me your favourite way of having yogurt, and what part of the day do you usually have it?
  • This giveaway is only open to Australian residents! (Sorry international readers!)
  • Please join me on my journey! Follow me on Facebook, Instagram and Twitter!
  • You may re-enter daily! One entry a day! (Oh yeah!)
  • Winners will be announced on the 31st of October, Thursday at 8pm!
  • Winners will be picked via random.org and notified on this blog post and via email.

Disclaimer : This post is sponsored by Ski Yoghurt & Keep Left PR. I tasted the Ski’s D’lite Wild Strawberry yoghurt  with compliments of both sponsors, however, the review, opinions are honest and based on my personal taste and preference. The recipe is a Food Made With Love original.

Ski Pink

Remember to always bake and cook with love ! Till the next post, xx

~~~~~~~~~~~~~~~~~~~~~~~~~~~~~~~~~~~~~~~~~~~~~~~~~~~~~~~~~~~~~~~~~
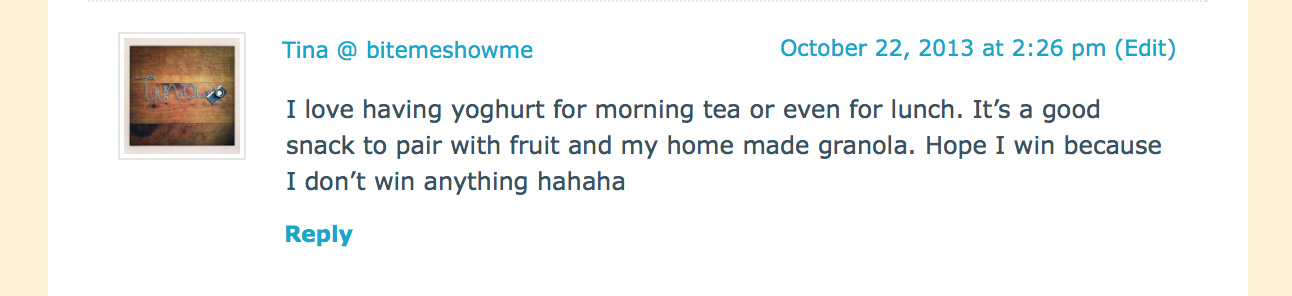
The winner is…..

TINA! Congrats dearie! (: I will be contacting shortly through email!

winner- random org

Winner

Hope you like your pink kitchen utensils!!! xx

Hazelnut Olive Oil Cake

Hazelnut Olive Oil Cake

Hooray! It’s the weekend so let’s celebrate with cake! What better way yes? heh I don’t think anyone can really resist cake, even more so when it’s a gluten free and (almost) healthy one!

Is there a particular cake that you will never get tired of and would always go-to cause you know it will not fail you? I definitely do! This is one cake that I know that would definitely be a crowd pleaser! The chocolate olive oil cake by Nigella Lawson is simple, delicious and did I say delicious? Whenever I need to make a birthday cake for a close friend, I always turn to this recipe, top them with fresh raspberries and dust with icing sugar and viola! All ready to be consumed and put smiles on people’s faces!

All along, I’ve made it using almond meal, but I few weeks back when I needed to bake a cake for a close friend’s 21st, I had a eureka moment. Why not use hazelnut meal? It would be like a fudgey and moist… nutella cake! How good does that sound? I was so so excited to give it a try!

And it came out just the way I envisioned it to be. Soft, really chocolatey, and so fudgey and moist! OOhhh la-la! It can definitely make one of the sexiest and most decadent chocolate dessert that I’ve ever made! The hazelnut meal elevated it to a whole new level! Definitely gonna stick to using hazelnut meal now. hehe One slice is never enough!

So give this a shot if you love nutella. You will definitely be hooked! It’s gluten free and if you are on a paleo diet, just change the sugar to 1/3-1/2 cup honey and you’re good to go!

Hazelnut Chocolate Olive Oil Cake (adapted from Nigella Lawson)

150 ml regular olive oil (plus more for greasing)

50 grams cocoa powder (good quality, sifted)

125 ml boiling water

1 tsp vanilla bean paste

150 grams hazelnut meal

½ tsp bicarbonate of soda

pinch of salt

170 grams caster sugar (or 1/3-1/2 cup of honey if you want it to be paleo)

3 eggs, room temperature

1 small punnet of fresh raspberries (to top the cake)

Icing sugar, to finish

Steps :

1. Preheat your oven to 170°C/gas mark 3. Grease your springform tin with a little oil and line the base with baking parchment. Measure and sift the cocoa powder into a bowl or jug and whisk in the boiling water until you have a smooth, chocolatey, still runny (but only just) paste. Whisk in the vanilla extract, then set aside to cool a little.

2. In another smallish bowl, combine the hazelnut meal with the bicarbonate of soda and a pinch of salt.

3. Put the sugar (or honey), olive oil and eggs into the bowl of a freestanding mixer with the paddle attachment and beat together vigorously for about 3 minutes until you have a pale-primrose, aerated and thickened cream. Turn the speed down a little and pour in the cocoa mixture, beating as you go, and when all is scraped in you can slowly tip in the hazelnut meal mixture.

4. Pour this dark, liquid batter into the prepared tin. Bake for 40-45 minutes or until the sides are set and the very centre, on top, still looks slightly damp. A cake tester should come up mainly clean but with a few sticky chocolate crumbs clinging to it.

5. Let it cool for 10 minutes on a wire rack, still in its tin, and then ease the sides of the cake with a small metal spatula and spring it out of the tin. Leave to cool completely and place the whole punnet of fresh raspberries neatly on the cake and dust with icing sugar. Serve with a side of freshly whipped cream or a scoop of your favourite ice cream!

Have a chocolatey and hazelnutty weekend everyone! (: Be warned that you won’t be able to stop at a slice for this one! hehe

Remember to always cook and bake with love! Till the next post, xx !

Little Tommy Tucker

interior-1-1

It’s old news how much I adore having brunch. The one reason why I look forward to weekends and holidays! I get even more excited if we are checking out a new place, and it can only get better if the new place is near home! Little Tommy Tucker fits all criteria!

Interior of LTT

The moment you step through the doors, you are warmly welcomed by everyone, with wide smiles on their faces. Just feel so cosy and at ease, and you just know breakfast/brunch is going to be awesome. And indeed, it was. We went there through the recommendation of The Hums and decided to bring Jacky (our best man), Linda and the Ho Clan there for brunch!

Prana chai

What got me even more excited was that they served my favourite fresh chai! Prana chai! It’s the same type of deliciousness that Merchants Guild serves! YIPPEEE! Always the best way to start my morning. If you haven’t tried Prana Chai, I urge you to! You would love it! The only way to have chai latte is using fresh leaves and spices. In fact I’m gonna say, it should be the ONLY way cafes serve their chai!

hot chocolate

Melissa ordered her usual hot chocolate, and it was thick and chocolatey. I know it sounds funny, but there are some hot chocolates that are a little too milky, but this isn’t one of them. Mmmm!

latte

The Mr also had his usual latte. A good balance of sharpness and acidity! Although they didn’t have a large for dine-in, they suggested for the mr to have it in a take-away cup so he could get more of his caffeine fix!

Flat white

Jacky ordered a flat white and I love how intense the colour contrast is between the shot of coffee and the milk. Always admired baristas who are able to make pretty latte art. hehe

Smoked salmon scramble

Both Melissa and Jacky ordered the smoked salmon scrambled eggs with creme fraiche and chives. How delicious does that look?? The eggs were so so creamy and rich, with the right amount of flavour from the smoked salmon.

green eggs and ham

I couldn’t resist ordering the green eggs and ham, with an additional side of butter thyme mushrooms! I have this thing for green eggs. Whenever it’s on the menu, I have an inclination to order them. haha Not sure if the Dr Seuss book had any influence but eating it reminds me of the book! haha “I do so like  green eggs and ham! Thank you! Thank you, Sam-I-am”

pulled pork roll

This caught the eye of the mr while browsing the menu : Pulled Otway pork roll with tomato relish and watercress topped with a sunny side up! How beautifully yellow is that egg yolk? Would love a little bit more sauce for the pulled pork though the pork was very tender and well seasoned!

chicken Schnitzel

This has got to be one of my favourites of the day! Please do note that it’s on the lunch menu, so head there after 12 if you wanna try this! It’s a huge piece of golden brown schnitzel that is so crunchy on the outside, juicy and tender on the inside. It matched perfectly with the crunchy and refreshing fennel & apple slaw! Such a delicious combination! Definitely a must if you love your schnitzel!

Little Tommy Tucker

There is absolutely no doubt that I will be back again, in fact, I’ve already been back once since this first visit of ours and everything was still as good, or even better! So the next time you’re around the Bentleigh area, remember to drop by and give them a try! Till the next post, xx

Happy Hump Day everyone!

Little Tommy Tucker on Urbanspoon

Famish’d : Salads and More !

Famish'd

Due to work, it’s almost impossible to have lunch anywhere besides the staff room haha. Thankfully it was the holidays when the newly opened Famish’d celebrated their opening! I couldn’t wait to head down for lunch as I’ve always wanted to try their salads! Their first store was just behind the Mr’s work place, so I used to meet him for coffees and cakes when I get to head down to the city.  So I was super excited when I received the invite!

Famish'd interior

Beautiful interior, neon signs that pop, warm and friendly staffs. Everything that you would love and look forward to for your mid day delight! And although they specialise in salads (a huge range!), they do hearty soups as well as spuds (both potatoes and sweet potato for a healthier option).

famish'd

There is definitely something for everyone! I know many of you would be thinking – how can a bowl of salad be filling? Trust me, their salads are HUGE and you definitely will be filled by the time you finish.

St Ali's coffee beans

Of course, you can’t skip having a cup of St Ali’s coffee as well while you’re there! Beautiful, robust flavours, definitely a pick-me-up when you need one!

latte

And still my favourite part of their coffee – the chocolate chip meringue!

chocolate chip meringue

It’s really quite magical. Every bite feels like you’re eating a teaspoon full of chocolate chips! Comes with every coffee, dining in or taking it away!

Salad bar

So let’s begin our salad adventure shall we? Since Daisy was there too, we decided to divide and conquer : I was going to choose the salad and she was going to choose the sweet potato spud !  You are allowed to choose the base of either a selection of fresh salad leaves, or their famish’d favourite salads that changes everyday! They also have a huge selection of ingredients to mix into your salad and you are allowed to choose up to 5 different ones!

Explaining how to design our own salads

Don’t worry if it’s your first time at Famish’d cause you would be well taken care of! Everyone working at Famish’d is friendly and is more than happy to explain to you how to design your own salads and spuds! Every one in the Famish’d family works together so well, it’s just amazing! They don’t have specific jobs, they just do anything that is presented infront of them! Like one big happy and loving family! Love it!

Making my salad

When it was my turn to design my own salad, I have to admit, I was like a kid in a lolly store. haha So many fresh and vibrant ingredients to choose from, I almost wanted more than 5!

my salad

My colourful salad! After selecting what you want, you can choose from an extensive range of home-made dressing! All the dressing is made by the owner, Georgia, herself! AMAZING!

All tossed and ready to be enjoyed

My salad had pumpkin, chickpeas, corn, artichokes and roasted capsicum! I asked what dressing is recommended and mine has a mix of dijon balsamic and mayo! They do have other dressings for the more adventurous ! I am actually regretting not trying them! Have to head back to try! hehe

My salad and Daisy's sweet potato spud

The portion was huge and I had to take away half of mine home! A slice of bread is also given to mop up any of the delicious dressing left!

Daisy's sweet potato spud

Daisy did equally well with her choices for her sweet potato spud! She had cheese (of course, a must with spuds!), mushrooms, corn, bacon, spring onion and salsa! It was so amazing! I’m definitely gonna have this in my next visit!

Sweet potato spud

Hidden under all the delicious ingredients is a roasted sweet potato spud! So tender and super sweet! Not sure about you, but I prefer sweet potatoes to potatoes anytime! hehe Somehow, it feels healthier! hehe

Sweets by Sweet By Nature

Next to the salad bar sits a beautiful array of cakes and slices! It’s supplied by Sweet By Nature and how good does everything look? After being good and having a healthy lunch, it’s surely okay to have something naughty (and delicious) for dessert right? hehe DEFINITELY! Miss D will agree with me for sure! And of course, we got to try one of each they have!

Sweets

When this board arrived infront of us, wide smiles appeared on our faces almost naturally. haha How good does that look? Don’t you just want to dive into it and just take a bite of everything? We did. haha

Dessert

The orange poppyseed cake is still my favourite! And the rocky road was really rich and decadent! Only needed a small bite to make you feel happy and contented!

By no means am I a healthy eater, but I do enjoy having a healthy meal once in a while. This is definitely a place to come to if you are on a health fix too! You can create your own salads and spuds to your liking and I can vouch that you will love every mouthful of it! So if you’re around the city or you work in the city, head down to Famish’d for lunch and I’m sure you won’t regret it! Have a sweet (or two) while you’re there too! hehe

Famish'd Salads & Stuff on Urbanspoon

Disclaimer : I was invited by Famish’d as guests to have lunch. All thoughts and opinions are based on my experience at the time of the visit. 

Matcha Mania

Matcha Swiss Roll with Azuki Cream

Good evening dear readers. Sorry for the long pause again. It’s the holidays and I try and take this opportunity to spend a bit more time with the Mr and explore a little more of Melbourne. So watch this space to see what I’ve been up to in the post to come! (:

I’m not sure about you guys, but I do go through flavour phases and one of which is matcha! So much so that we even held a matcha party to celebrate the endless uses of this brilliant ingredient that is so full of antioxidant! What could be better yes? Here is a recap of the spread we had that day! Be warn, you might crave for some dessert after this!

Matchamisu

This was a beautiful bowl of matchamisu by Winston. Layers of matcha sponge with azuki beans, delicious!

Matcha panna cotta

This smooth and velvety panna cotta by Duy and Andrew with matcha shortbread! Hungry yet? hehe

Matcha Chiffon

The talented Thanh made matcha chiffon cake! (: I’ve yet to have the courage to make my first chiffon. Hopefully soon!

Matcha macarons

These my dear readers are the perfect matcha macarons by Eat Play Shop!! Look at how amazing they look? Spot on with the feet, texture and flavours! She’s definitely the macaron master! hehe STUNNING!

lemon lime macarons

I know these are not matcha, but I think it’s too pretty not to put it up! Lemon lime macarons! Mmmmm! A work of art I tell you!

Matcha cream puffs

As if 2 macarons weren’t enough work, she also made some matcha cream puffs which I was addicted to! Couldn’t stop at one!

Matcha kitkat

When I saw these, I had to remain calm and composed haha matcha kitkat by Agnes!! OMG. They were so so good!!! It’s so difficult to get hold of the commercial packed ones, I was lucky enough to try one cause Daisy gave me some and totally addicted to them! I sneaked some home too! hehe

Matcha madeleines

Talking about Daisy, the sweet queen made two matcha cakes! These are matcha madeleines and she also made matcha brownies that were so gooey in the middle and an intense matcha flavour! SO SO YUM!

Matcha brownies

Matcha opera cake

This was a hot favourite of the day, made by the ever so talented Ms Ihua, and you can see why. How pretty is this gateau??? Every layer just went perfectly with each other and the base was my favourite! Matcha-pistachio feuilletine white chocolate base, how can anyone not like that? Gorgeous!

Fruit platter by Zeboy

This is what I call edible art! The artistic Zeboy’s interpretation of a fruit salad is just amazing! Sous vide and bruleed pineapple, watermelon, smoked cream with matcha and sour plum powder! He plated it on the spot and every one just went ooh-and-aah! These two lovebirds are seriously the dynamic duo! Super talented!

Matcha swirl pound cake

Matcha swirl pound cake

I too made two matcha cakes, this is the matcha swirl pound cake which was really buttery! I actually made this as a back-up in case my matcha swiss roll didn’t work out well. hehe But I decided to bring it to the party as well, or else I would be gobbling it all up on my own and that wouldn’t be very good for my waist line! haha Share the calories I say, sharing is caring right? hehe

Matcha swiss roll

And here’s presenting my first ever swiss roll! hehe Matcha swiss roll with azuki beans cream! I have to say, I was super worried with how this would turn out cause you won’t know till you unwrap it the day after and slice it to see the inside! Although the cream wasn’t evenly spread, but I let out a sigh of relieve after I sliced it and it stayed in shape!

swiss roll with azuki bean cream

I have to admit though, I totally wrecked my first try, so I had to make it again and thankfully they turned out alright! (: So don’t ever give up ; always try and try again! It is definitely worth it! hehe

Matcha Swiss Roll with Azuki Cream (adapted from Cooking With Dog)

Ingredients :

4 Egg Whites
40g Sugar
4 Egg Yolks
40g Sugar
40g Cake Flour
1 tbsp Matcha powder
120ml Whipping Cream
120g Azuki Bean Paste with whole beans
Powdered Sugar, for garnish

Steps :

1) Preheat the oven to 170 degrees celcius. Cover a baking tray with baking paper and set aside.

Matcha powder and cake flour

Sifting the flour and matcha powder 3 times

2) Mix the cake flour and matcha powder together and sift it three times. Do not skip this step as this will ensure no air pockets, clumps and keep the cake light.

stiff peaks

3) In a clean and dry bowl, beat the egg whites until bubbles form. Slowly add half of the sugar and beat it. Add the rest of the sugar and beat until stiff peaks form.

Glossy and thick mixture

4) In a separate bowl, beat the egg yolks with the sugar until thick and creamy. Then add the sifted flour into the bowl. Using a balloon whisk, mix until the flour is completely moistened. Add 1/3 of the meringue into the bowl and beat the mixture with the whisk and drop it into the bowl. When combined, add the rest of the meringue in two steps. Mix the mixture carefully, not to break the foam. The batter will get glossy and smooth. Be patient!

Batter in the baking tray

5) Pour the batter into the prepared baking tray and using a spatula, spread the batter evenly throughout the tray and to all four corners. Bake the cake in the oven for 18 -20 mins, turning the cake after the 10 mins mark so that it is baked evenly.

6) Take the cake out of the oven and drop it a few times to reduce the shrinkage. Remove the cake for the baking tray and place it on a flat surface. Cover it with another baking tray to make sure it doesn’t dry out. Allow it to cool completely before filling it with the azuki bean cream.

7) To make the azuki bean cream : Whip the cream till stiff peaks and add the azuki cream paste. Mix it evenly to make azuki bean cream.

8) Release the edges of the baking paper of the cake. Cover the cake with another sheet of baking paper, and flip it over. Slowy and gently remove the baking paper from the bottom of the cake. Place the paper on the bottom again and flip it back, in the upright position. Using a serrated knife, cute of the short edge furthest away from you with a diagonal cut.

Azuki bean cream spread evenly onto cake

All ready to be rolled

9) Place the azuki cream onto the cake and using a spatula spread it out evenly, having a slightly thicker amount on the side closer to you. Fold the edge of the cake, pushing the paper forward, rolling the cake. Once rolled, wrap the cake with the clean sheet of baking paper, making sure it’s tightly wrapped. Cover with a plastic wrap and allow it to cool in the fridge.

Ready to be cut

10) To serve, unwrap the cake and place it on a long plate. Sift some icing sugar on top of the cake and slice it to the thickness of your liking. ENJOY!

sliced and ready to be eaten!

I know it seems a little complicated to roll it, but do click on the link above (next to the title) to watch the video and it would be much clearer after!

Remember to always cook and bake with love!  xx