New Found Gem : Mr. Brightside

Mr. Brightside

Brunch. Something I truly truly adore and look forward to on weekends! It was the long weekend last week, and the Mr and I were looking for a place nearby to have brunch. We usually head to our usuals favourites in Bentleigh (Merchants Guild & Little Tommy Tucker), but we really wanted to find something different, and still close by!

Thank goodness for Eat Fresh Eat Local (twitter: @FreshBestLocal) l who introduced me to The Homemaker Report, I found a place that was just 10 minutes away from our place – Mr Brightside !

Mr Brightside

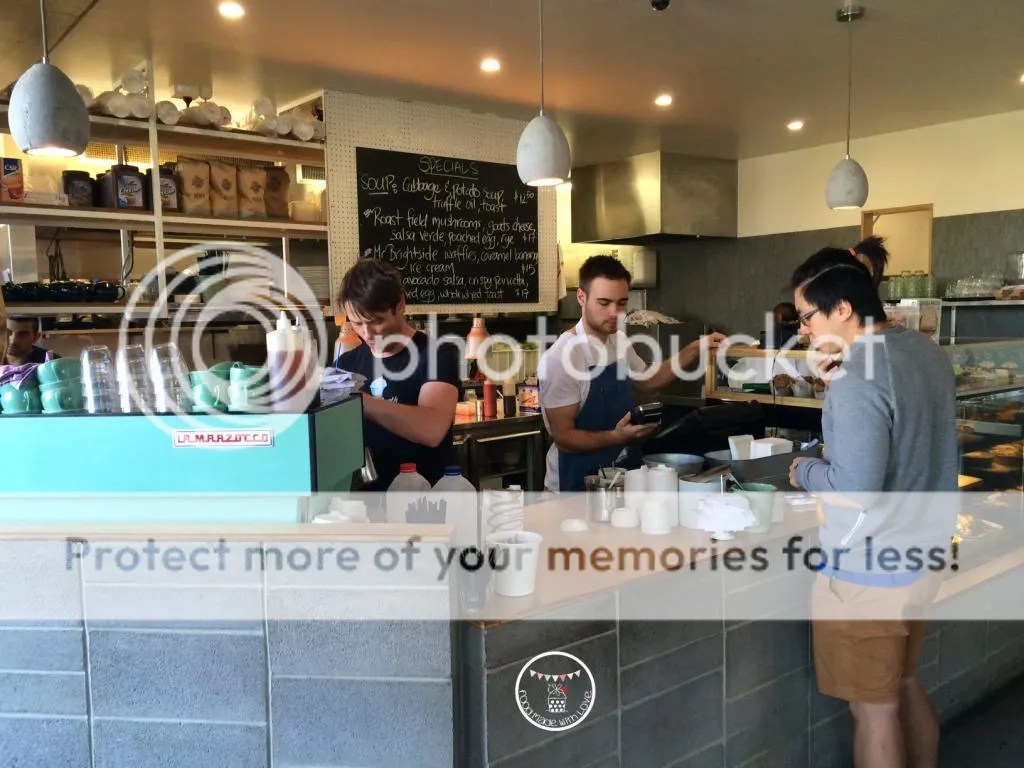
A cosy cafe tucked in the corner, it was just filled with locals who knew one another. We were greeted with warm smiles by the staff and as it was pretty packed, we sat outside. But no fear, there were heaters right above us to keep us warm and toasty!

Our usual drinks

We also ordered our usual drinks to keep our tummies warm! The mr had a latte, I had Calmer Sutra soy chai latte and Melissa had her favourite hot chocolate! I pretty much knew what I wanted to have when I saw the menu online before heading there, but I knew they had specials for the day too, and asked the Mr to help me check the board. One of the staff (wish I got his name!) joked with the Mr and said now we aren’t able to hear him say it in his special voice! haha Too funny! He came out shortly after to explain what the specials were. SO FRIENDLY! Seriously love the service at Mr. Brightside! Made brunch a lot more enjoyable!

Challah French Toast

I still decided on the challah french toes with maple syrup and mascarpone! There’s an option of adding bacon, and how could I not?? Maple syrup and bacon is the best combination! This was my kind of heaven. The challah toast was crispy on the outside and still soft in the middle. Together with the mascarpone, absolutely delish!!! If you want a good french toast, this is it!

Potato hash brown

Whenever there is a potato hash on the menu, the mr would definitely order it, and this was no different! He loves his hash, and this hash he absolutely loved! In fact, he said he might have found the best hash he’s had! Super golden and crispy, with a moist and tender centre! Can’t get better can it? It is served with beef brisket and he added a side of mushrooms!

Perfectly poached eggs

When the Mr cut into the poached egg, liquid gold was spilling out! I have to admit, poached egg is one thing I do miss to have for breakfast!

Big Breakfast

Melissa ordered the Big Breakfast and boy, they weren’t joking about it being big! 2 sausages, bacon, roasted tomatoes, scrambled eggs, potato hash and toasts! She could hardly finish it and was filled all the way till dinner!

Mr. Brightside

We were all so happy to find Mr. Brightside, with delicious food and super friendly staff, there’s no doubt that we will be back again and very very soon! I bet you want to head down for that plate of french toast now! hehe

Happy weekend everyone! x

Mr Brightside on Urbanspoon

Baby Ho’s Gender Reveal

photo 2-2-1-1

It’s time! I’ve been waiting all week for this (: Since it was the holidays, I gave myself a little project to do which involves my two favourite things : baking and surprises!

I started going onto Pinterest looking for ideas on how to reveal my bub’s gender and there were so many I wanted to do! One of which was a piñata cake! But it wasn’t easy finding blue sweets, I had to buy packets and packets of lollies and sieve them out. haha Which wasn’t too ideal, cos I’m not huge on lollies, and they will go to waste!

Inside of the cake

So I decided to make an inside surprise cake instead! The first time I made an inside surprise cake was for my dearest mother on Mother’s Day 4 years ago and it was one of the biggest projects I’ve ever done but also the coolest! It was a hidden heart in the middle of a cake! Since it was so long ago, I thought it would be perfect for the revealing of Baby Ho’s gender! Also inspired by I Am Baker, I decided that the inside of the cake would spell the gender of our dearest bub!

Chocolate cake

I used a chocolate cake recipe for letters inside the cake, and just like making a cake pop, I made my favourite cream cheese frosting to combine them together!

Cake toppers

I also tried to look for cake toppers that would be perfect for the purpose of the cake and found heaps of printable ones! Cut them out and stuck them onto lollipop sticks! hehe I have to say, I went a little crazy with the cake toppers haha So addictive to make them!

photo-6

Then I placed the letters into a white cake batter and baked it in a loaf before frosting it with just a basic buttercream frosting! I do apologise for the messiness of the coloured frostings. I wasn’t too sure how I wanted to do it, but decided to go around piping different sized pink & blue frosting around the cake. I tried to bring out the artistic side of me. Free form. haha

Pink or blue?

To make the coloured frosting, I took two heap tablespoon of frosting and place them in separate bowls (I heap tablespoon in each bowl) and added food gel colouring to create the pink (for girl) and blue (for boy) frosting. I have to say, I love how so many people commented on Instagram that I might be having twins! hehe But nope, one heartbeat! One bub! hehe

So here comes the BIG REVEAL! Is Baby Ho a girl or a boy? *drumroll*

He's a BOY!

I am proud to announce that we are having a boy! (: Cutting through the cake to reveal the letters was really scary to be honest! I wasn’t sure if the letters would stay the way they were moulded or they would become one big mess! Thankfully, they could still be deciphered! PHEW! But yes! We are having a boy and we cannot be more excited! The mr already has plans to bring him to the gym and lift some weights! haha

We are having a boy!

Thank you everyone for the constant care, love and support through the past 23 weeks and I cannot be more blessed to be surrounded by you guys! Just slightly shorter than 3 months to go and we can’t wait to see our baby boy and hold him in our arms!

Thank you for being so patient with me this week! Remember to always bake and cook with love!

Till the next post, xx

HUON Smoked Salmon Bouquet Quiche

IMG_9891-2-2

I’m late, I’m late, I’m late! That was the only thing on my mind when I was trying to come up with something to make for the HUON Blogging Challenge as the post is due tomorrow! I have to admit, I was a bit hesitant to take up the challenge as we had to use smoke salmon and the only way I could have it is cooking it!

HUON smoked salmon banquet rolls

While looking at the HUON Reserve Selection range and deciding on what I should get, I was drawn to the banquet rolls immediately! If only I could have them as is, cos I would love to have man a roulette out of it! Oh wells! haha Have to concentrate on what I can have!

ingredients used

So I did what I usually do to get inspirations for the dish I want to make – walk down the aisles of the supermarket! It’s seriously the best place to come up with ideas for what to cook! Absolutely love doing it. hehe So I decided to make a quiche, for the first time! I know, what’s so exciting about a quiche? Well, I decided to make it look very different from a usual quiche, turning the salmon rolls into bouquet of flowers!

Smoked salmon bouquet quiche

I was super nervous making it because I’ve never made a quiche before, and I didn’t know if the shapes were going to last through the baking process! Thank goodness, the flowers were still “blooming” when I took it out of the oven. HOORAY! It worked! hehe The mr and sister-in-law really enjoyed it too! That’s always a plus! (: So here’s the recipe! Hope you will enjoy it as much as we did!

Smoked Salmon Bouquet Quiche (Serves 4-6 people)

For the sour cream short crust pastry : (Recipe from Maggie Beer)

125ml sour cream

250g plain flour, extra for dusting

200g butter

For the filling : 

200g HUON Reserve Selection banquet rolls

1 leek (white part, halved lengthwise and thinly sliced)

8 mushroom cups, sliced

10g chives, finely chopped

6-8 sundried tomatoes, finely chopped

1 tbs olive oil

10g unsalted butter

salt and black pepper, to season

200ml thickened cream

150g shredded cheddar

4 eggs

Steps :

Kneading the dough into a ball

1) For the short crust pastry : Preheat the oven to 200 degrees celcius. Dice the butter then pulse it in a food processor with the plain flour till it resembles bread crumbs. Add the sour cream and pulse it further till it resembles a dough.

Rolling out and dough and blind baking

2) On a clean surface, dust a bit of plain flour and knead the dough into a ball. Wrap the dough in cling wrap and allow it to rest in the fridge for 20 minutes. Roll the pastry out to 3-5mm thickness and roll it over 24cm quiche baking tin that has been oiled. Blind bake the pastry for 10-15 minutes, or until it’s lightly golden. Allow it to cool while preparing the other ingredients.

Lining the tin with the pastry

2)  For the filling : Heat a large heavy-based pan on high and add the olive oil. Fry the leek till soft and fragrant, then add the mushrooms. Season with salt and pepper and allow the mushrooms to fry till slightly caramelised. Add the butter and fold in the mushroom mixture. Set it aside and allow it to cool before placing it in the pastry case. Sprinkle the chives and sundries tomatoes evenly around the pastry case.

Frying the leek and mushroom mixture

3) Cut each banquet rolled salmon into half and place them in a shape of a flower. ( I did 3 large flowers, and 3 small flowers. But you can do as many as you like! Bring out your artistic side! )

4) Combine the thickened cream and eggs in a bowl and mix them till well combined. Pour it slowly into the case and around the smoked salmon, careful not to get any on.

eggs and cream mixture

5) Top the quiche with shredded cheddar, once again avoiding the smoked salmon.

6) Reduce the oven to 190 degrees celcius and bake the quiche for 35-40 minutes, or until the egg mixture is set and the top is golden brown.

Smoked salmon bouquet quiche

7) Serve with a side of salad with your favourite dressing and with extra sour cream to go with the quiche! Indulgence! ENJOY!

Quiche with a side of salad

I have to say I really enjoyed making those flowers out of the smoke salmon rolls! To make it look more like flowers, I piped stalks and leaves using the sour cream and fill the leaves with chopped chives! hehe I’m no artist, but I think this is the best I could do!

Hope you enjoyed the recipe, and do give it a try! I didn’t get to eat the smoked salmon on it’s own (before cooking), but the mr and sister-in-law said it was delicious and not as salty as the others they’ve had! Which is always a plus! Have a great weekend everyone!

Remember to always cook and bake with love! Till the next post, xx

My Biggest Project : Rainbow Cake

Processed with VSCOcam with t1 preset

Layer cakes were never a specialty of mine, but when the opportunity came up to make something special for a first birthday, I just couldn’t resist! If you follow me on instagram (@lianneelow) I’m sure you’ve seen endless photos of Paige who turned one last year. I love her like she’s my own, so I wanted to do something special for her as well!

Stacking the layers

Rainbow was the theme of her party, so inevitably, the only cake I could think of was rainbow cake! Being ambitious, I also wanted to make all 7 layers out of natural colouring and flavouring. So after much research, I came up with the flavours and decided to give it a try. As much as I wanted natural colouring, the colours of the fruits just didn’t stand out as much as I wanted to after being baked, so for the actual cake, I decided to put a drop or two of colouring paste just to make it pop!

Cupcake pops

On a side note (just cause the word pop reminded me haha), I also made some cupcake pops for the party! Though it was time consuming to make them, I enjoyed every single moment – from molding them into their shapes, dipping them into melted chocolate (like yummeh!) and to sprinkling them with 100’s and 1000’s! Could totally imagine a kid doing it as a fun activity too! Hehe

plan drawn

So here’s a draw up of my plan: 7 flavours and all stacked and iced with my favourite cream cheese frosting! Mmmmm!

I wasn’t too worried about baking the 7 individual layers, I was more worried about constructing it and how high it would actually be! It was definitely the highest cake I’ve made in my life!  The only thing I was really worried about was transporting the cake to the party as I was going to be driving alone! I think my life was shortened about 10 years in that 10 minutes of driving! Haha

It was all worth it though, to see the faces lit up at the party and hearing all the compliments from the guests! Definitely made my day! The next thing that made my heart beat really quickly was the cutting of the cake and revealing to see if there were 7 distinct layers. And….

Revealing the layers inside

TADAH!!! (: I couldn’t be happier with how it turned out! I’m sure I let out a loud sigh of relief the moment I took the first slice of cake out and served it! A happy dance was definitely in order! Hehe  I have to admit, there were some layers that I was probably a bit too heavy with the colouring towards the end (was going colour happy haha), cause I really wanted the colours to stand out. But please know that you can always cut that down to your own preference, or you can just cut that out too!

Rainbow Cake 

Ingredients : (20 cm round baking tin, repeat 7 times)

120g plain flour

80g caster sugar

40g unsalted butter, room temperature

120ml milk

1 tsp baking powder

1 tsp vanilla paste

1 egg

Wilton icing food gels (I used a toothpick to add the colours)

For the different layers : (add food gel colouring till desired colour or leave it out if you wish)

Red – 3/4 cup fresh raspberry, mashed + red food gel

Pink – 3/4 cup fresh strawberries, mashed

Purple – 3/4 cup blackberries, mashed + purple food gel

Blue – 3/4 cup blueberries, mashed + blue food gel

Green – Zest of 2 limes, 3 tbs juice + green food gel

 Yellow – Zest of 2 lemons, 3 tbs juice + yellow food gel

Orange – Zest of 1 naval orange, 3 tbs juice + orange food gel

Steps : 

1) For each layer of cake : Grease and line the baking tin with baking paper. Preheat oven to 165 degrees celcius.

2) In a medium bowl, combine the plain flour and baking powder. In a mixing bowl, add the butter, sugar, egg and vanilla paste and mix till pale and fluffy. Alternate the flour mixture with milk (flour,milk,flour) until well combined.

3) Fold in the flavouring and colouring for each layer. Careful not to over mix.

the red layer - raspberry

4) Pour the batter into the prepared baking tin and tap it on the counter to allow all the air bubbles to come to the surface. Bake for 18 mins or until the skewer comes out clean. Allow the layers of cake to cool completely before assembling.

The yellow layer - lemon

Cream Cheese Icing (From the Hummingbird Bakery Cookbook)

900g icing sugar

375g cream cheese

150g unsalted butter, softened

Steps :

1) Beat the icing sugar and butter in a mixing bowl until well combined.

2) Add the cream cheese in one go and beat until completely incorporated. Turn the mixer up to medium high, and beat until it’s light and fluffy (about 5 minutes). Do not over beat as it will turn runny.

Cream cheese icing

3) To assemble : Place the red cake layer at the bottom, place 2 heap tbs of cream cheese icing on the cake and spread it out uniformly using a palette knife. Place the orange layer on top and repeat the process. Once you reach the top layer (pink), frost the top and side of the cake till it’s smooth and even.

Rainbow cake success!

Enjoy! (: I love how I could actually taste the fruits in every single layer, and they actually do work well together although it’s impossible to fit all 7 layers in one bite! haha

Paige eating the cake

It was such an honour that my cake is the first cake Paige has eaten (:  How pretty is her dress!

Happy 1st birthday Paige

It is many months after the actual birthday, but happy 1st birthday Paige! Can’t believe how quick it has been and she’s such a big girl now! (:

Paige and Us

I can’t wait till I am able to make my own bub’s cake and I will definitely be more than happy to make this cake again!

Have a good mid week everyone! (:

Remember to always bake and cook with love! Till the next post, xx