{Paperless Post} Lochlan & Laurel’s Birthday Invitations

It’s one of the busiest time of the year for me as I try and plan the combine birthday party of my two cheeky monkeys! This year I decided to go with one of their favourite cartoons/ movies of all time: Toy Story! Yes, they’ve watched all 4 of them and yes, they will be dressed in one of the characters in the movie!

Any guesses which characters Laurel will be? Lochlan? Stay tuned for their birthday post in about 3 weeks time!

So I was really lucky to be approached by Paperless Post a month ago asking if I would like to do a collaboration with them. PERFECT! I use to spend ages just coming up with a birthday invitation (I’m not the most creative haha) so I would take any help I can get! Plus, just having less of a carbon footprint by sending invitations online. I think it’s a win-win!

I absolutely loved how easy it was to come up with my invitation to my guests! There was pretty much an invitation for ANY occasion you were celebrating/hosting! I’ve spotted a few that I will be using in the near future

How cute are these??? There are so much more to choose from as well! These are just a few of my favourites, and what caught my eye!

All you have to do is choose which you like, and personalise it with your own words and details! Choose the font you like, size, and VIOLA! It even comes with a virtual envelope and guests are able to RSVP as well, so you get your final numbers easily.

So here’s the invitation I picked for the kid’s combine birthday party, which I feel is SPOT ON!

Lester&Laurel Birthday Invitation

How cute is this?!?! It combines the two favourite characters of my kiddos! hehe So I am over the moon that there was the perfect one! I didn’t have to stare at the computer for days/nights, I pretty much got the invitations completed and sent out in a day! WOOHOO!

So do you have a birthday/ wedding/ baby shower or just a party to plan for? I highly recommend trying out Paperless Post! You won’t regret it!

IMG_20190615_104254.jpg


I can’t wait to see their faces at the party! Party post to come soon after!

Thanks Paperless Post for the collaboration! I can’t wait to plan more parties!

{Spencer Makes} Peach Cream Cheese Muffins with Mixed Berry Swirl

peach cream cheese mixed berry swirl muffins 1

This is one of my favourite muffin recipes and one I’ve always make when guests come to visit, cause it’s so versatile and super quick to make! Not to mention how yummy it is! The original recipe is just the peach & cream cheese but I decided to add the mixed berry swirl for extra taste (also I just made a jar of mixed berry chia seed jam, so FRESH FRESH FRESH!) and to be honest, how pretty does it look? Loved how it turned out!

Just like the pumpkin, feta & kale mini loaves, these are great as a quick breakfast, grab one (or two) and you are ready to go! These are also a treat in your kid’s lunch boxes.

unnamed-8-1

I did make my own mixed berry jam, but of course you could use anything you have in the fridge!

Peach Cream Cheese Muffins with Mixed Berry Swirl (Makes 18 muffins)

Ingredients :

125g unsalted butter

250g cream cheese, room temperature

200g caster sugar

4 eggs

1 tsp vanilla bean paste

2 cups self-raising flour (265g)

Pinch of salt

380g peach (canned peaches, drained), cut into small chunks

9 tsp (or more) mixed berry jam (you could use any jam you have on hand)

Thermomix Steps :

1. Preheat the oven to 1800C and line the muffin pans with paper case. Place the cream cheese and butter in the TM bowl and mix for 10 secs/ Sp 5 until pale and fluffy.

2. Add the sugar and mix for 20 secs/ Sp 4.

unnamed-9-1

3. Add the vanilla bean paste and eggs and mix for 15 secs/ Sp 3. Scrape the sides and bottom of the bowl.

unnamed-11-1

4. Add the flour & a pinch of salt and mix for 30 secs/ Sp 4 until well combined. Scrape and mix for a further 10 secs/ Sp 4.

5. Add the small chunks of peaches and using the spatula, mix gently till well combined.

6. Scoop the batter into the lined muffin pan and put 1/2 tsp of mixed berry jam on the top, using a toothpick to swirl it into the batter.

unnamed-1-1

7. Bake for 20-25 minutes or until golden brown. Allow it to cool for 10 mins in the muffin pan then cool completely on the cooling rack.

Non-thermomix Steps :

1. Preheat the oven to 1800C and line 12 jumbo muffin pans with paper case

2. Place the butter, cream cheese and caster sugar in the bowl of an electrical beater and beat till fluffy and pale.

3. Add the eggs, one at a time, and beat after every addition until incorporated.

4. Add the vanilla bean paste and fold in the flour (1/2 a cup at a time) and a pinch of salt.

5. Add in the peaches and mix well.

6. Spoon into the muffin cases, and top with 1/2 tsp of mixed berry jam, swirling with a toothpick.

unnamed-7-1

7. Bake for 20-25mins or until golden brown. Remove from the oven and allow them to cool for 10 mins in the muffin pan then cool completely on the cooling rack.

Tip : You could use strawberries as well, dust the sliced strawberries with a bit more flour before stirring in. You could also make it sweeter by mixing the strawberry with icing sugar before combining it together with the flour mixture.

    ENJOY!

Remember to always cook and bake with love!

xx

Pumpkin, Feta & Kale Mini Loaves

Pumpkin Feta Kale Mini Loaves

Ever had ingredients in your fridge that you just want to use up and not waste? I definitely did and wanted to make sure they don’t go into the bin! I’ve been meaning to make these for the longest time and what great timing when I was clearing the fridge and these ingredients popped up!

ingredients

This is such an easy recipe too! It is great for a quick breakfast, or even one on the go. These are also perfect for your school lunch boxes and sneaking more veggies into your children’s diet!

So don’t wait any longer, give these a go and let me know what you think!

Pumpkin, Feta & Kale Mini Loaves (An original Food Made With Love recipe)

300g self-raising flour

260g full cream milk

90g olive oil

2 eggs

1 tsp salt

80g kale leaves, chopped into small pieces

120g feta cheese, crumbled

120g butternut pumpkin, grated

pumpkin seeds, to sprinkle before baking

Steps :

  1. Spray the mini loaves baking tin (or line the muffin tins if you prefer) with olive oil and set aside. Preheat the oven to 180 degrees C.

2. In a large bowl, mix the self-raising flour, milk, olive oil, eggs and salt with a wooden spoon until its well combined. Add the kale leaves, feta cheese and butternut pumpkin and mix till they are incorporated in the batter.

before baking

3. Place the batter into the baking tin until 2/3 full. Sprinkle some pumpkin seeds and place in the oven for 20 minutes or until golden brown and toothpick comes out clean.

baked

4. Allow it the cool in the baking tin for 10 minutes before removing and cooling it completely on a cooling rack. Keep in a air tight container and in the fridge for up to 4 days.

THERMOMIX METHOD:

Preheat the oven to 180 degrees C. Spray the mini loaves baking pan with the olive oil spray and set aside.

Place the pumpkin pieces (skin on) into the TM bowl and grate for 3 seconds/ Speed 5. Remove from the bowl and set aside.

Place the self-raising flour, milk, oil, salt and eggs into the TM bowl. Mix the batter for 20 seconds/ Speed 4/ MC on.

Add the grated pumpkin, kale and feta cheese and mix for another 20 seconds/ Speed 4/ Counter-clockwise operation/ MC on or until well combined.

Place the mixture into the baking tin until 2/3 full, sprinkle with some pumpkin seeds. Bake in the oven for 20 minutes, till the top is golden brown. Allow it to cool in the baking tin before removing and cooling it completely on a cooling rack.

buttered up

Enjoy it warmed and with some unsalted butter!

Remember to always cook and bake with love!

xx


{Spencer Cooks} Vegetarian Mushroom Bao

IMG_6620-1-1

I love baos (steamed buns) of all sorts! It’s the one thing I would order when I’m at yumcha. So when I got saw a recipe to make these mushroom looking vegetable buns, I leaped at it!

Before having Spencer, I would never think about making the dough for the steamed buns. But it was just easy peasy and I loved how it turned out! Soft and fluffy, and these are perfect if you’re a vegetarian! I might or might not have stopped at one. haha

IMG_6616-1

How cute do they look? hehe You would not believe what is the ingredient that the buns are dipped into before steaming them. Any guesses?? COCOA POWDER! I was a bit hesitant to do it, as I wasn’t sure if that would turn the buns sweet. But they didn’t! I couldn’t really taste the chocolate at all. Magical! I was totally amazed!

So here’s the recipe. I hope you’ll try them and let me know what you think!

Vegetarian Mushroom Buns (Recipe by Janice Tung)

Ingredients :

For the filling:

15g vegetable/olive oil

2-3 pieces dried shiitake mushrooms, soaked and diced (marinated with 2 tsp of sesame oil, 1 tsp light soy sauce, 1 tsp oyster sauce and 1 tsp sugar)

30g carrots

1 pc seasoned tofu, diced

80g turnip

30g chives, diced and marinated with 2 tsp of oil & a pinch of salt)

1/2 tbs dark soy sauce

salt and pepper, to taste

For the buns :

130g water

20g oil

20 caster sugar

1 tsp instant yeast

250g pau flour (you can get them from asian supermarkets)

pinch of salt

 2-3 tbs cocoa powder

IMG_6592-1

Method :

  1. To make the filling: In the Thermomix bowl, add the carrots, turnips and chives and chop for 4 seconds/sp 5/ MC on.
  2. Add the rest of the ingredients of the filling and cook for 5 mins/ 120C/ Reverse Spoon/ MC on. Set aside. Wash and dry the bowl. IMG_6589-1
  3. To make the buns : Add the water, oil, caster sugar and instant yeast into the bowl. Mix for 1 min/ 37C/ Sp 2/ MC on. Add the pau flour and knead for 2 mins.
  4. Transfer the dough onto a Thermomat/ a lightly floured surface. Divide the dough into 16 pieces and form into round shapes. Roll into flat pieces. Place 1 heaped teaspoon of filling into each piece and pinch sides together.Wrapping the vegetable bao-1
  5. Have a bowl of water on the side. Dip the bun into the water and then into the cocoa powder. Using a sharp knife, lightly cut a cross (X). Place the buns into the Varoma dish and tray. Allow to proof for 30 minutes. IMG_6600-1
  6. Place 600g of water into the TM bowl, stack the Varoma into position and steam for 18 mins/ Varoma/ Sp 1.

Enjoy it immediately while it’s hot! If you are freezing these, just resteam them for 10 minutes and enjoy them for breakfast or tea!

Follow me on Thermolove to get more inspiration!

Remember to always cook and bake with love!  

Summer Salad In A Jar

img_1793-1-1

It’s Summer and we are in 2017! Happy New Year everyone! I hope 2016 has been good for you, but I hope even more that 2017 will be an amazing year with lots of opportunities for you to strive on, lots of love, happiness and that everyone will be in the best of health!

To start the year on the right note, I decided to change the way we eat, and steer it towards eating as healthy as possible! So when Croud Australia contacted me to send me a WW Freshbox that’s completely vegetarian by the Aussie Farmers Direct, I couldn’t say no!

fullsizerender-2-1

 It’s a box filled with fresh vegetables and beautiful produce! What’s great about each box is they come with recipes that you could follow too! How easy is that? I love the convenience!

When I saw what I had in my box ( 3 meals for 2 people, $64) a few ingredients jumped out at me and I really wanted to make a vibrant salad that we would be able to even have it on the go and with a salad “dressing” that would be exciting for the taste buds too.

img_1774-1

So I decided to make a kale & basil toasted walnut pesto and it absolutely binds all the ingredients together! The perfect dressing (and healthy too with a superfood in it!) for the salad and if you have people you’re making for that loves and needs meat (like the mr), you could easily grill some meat and pop it on as well! It’s a really versatile recipe, and you can add your favourite ingredients too!

FullSizeRender-3-1.jpg

Don’t you just love the colour? It tastes absolutely amazing too!

So here’s the recipe for the perfect Summer salad!

img_1791-1

Summer Salad in A Jar (An original Food Made With Love recipe)

For the kale & toasted walnut pesto:

40g toasted walnut

80g kale leaves, stem removed

35g basil leaves

2 large garlic cloves

80g grated parmesan

1 tsp salt

150ml olive oil

Steps:

  1. Add the kale, basil, garlic cloves and salt in a food processor and pulse for 10 to 12 times, till you get a fine chop.
  2. With the motor running, slowly pour the olive oil into the bowl. Scrap the sides of the bowl.
  3. Add the walnuts, garlic cloves & parmesan, continue to pulse until the mixture is well combined. Set aside.

Note: I used this as a dressing for my salad, but you could use this in your pastas, or coat it with some grilled chicken!

For the salad:

350g butternut pumpkin, cut into cubes

1 red capsicum, sliced length-wise

1 can of chickpeas, drained

1 large handful of rocket leaves

1 large handful of baby spinach leaves

30g Greek style feta, crumbled

3 tsp smoked paprika

1 tsp ground cumin

2 tsp ground coriander

1 tsp salt, and extra for seasoning

ground black pepper

2 tbs olive oil

Steps :

  1. Preheat the oven to 180 degrees Celcius. Line the baking tray with some aluminium foil, drizzle with 1 tbs of olive oil, and place the butternut pumpkin and red capsicum onto the tray. Season the butternut pumpkin with the smoked paprika and season with some salt. Bake for 20 mins or until the pumpkin is tender. Set aside to let it cool down.img_1784-1
  2. In a small nonstick pan, heat 1 tbs of oil over medium heat. Add ground coriander, cumin & salt, and cook for a minute. Remember to keep stirring, so that it doesn’t burn. Add the drained chickpeas and stir for 5 minutes or until lightly toasted and the chickpeas are well coated with the spices. Set aside.
  3. To plate : In a large jar, place the rocket and baby spinach leaves into the base. Add the butternut pumpkin and the red capsicum then sprinkle with the crumbled greek feta. Top with the spiced chickpeas and finally the kale & toasted walnut pesto.
  4. You could shake it gently to coat the contents with the pesto dressing, or if you have access to a plate, pour it out and mix it gently. Enjoy on its own or with some grilled meats!

           ENJOY!

Remember to always cook and bake with love!

xx

PS: Thank you Croud and Aussie Farmers Direct for this opportunity to try and love the Freshbox! Will be trying some of the recipes that are on the website too! Stay tuned, more recipes to come!

{Spencer Cooks} Muah Chee

img_6451-1-1

I was always someone who loved snacking. Afternoon tea times are a time of the day I look forward to as I get to sit down, have a hot cuppa and something savoury or sweet to just fill my tummy before dinner. There are lots of small snacks that is easily attainable back in Singapore. However, it is a little more difficult to find it here.

So when I chanced upon a Muah Chee recipe, I HAD TO make it! It was the perfect snack for a Sunday afternoon. Muah Chee is a snack that we usually can get from night markets or hawker stalls. Small pieces of glutinous rice balls rolled in a sugar, peanut and/ or black & white sesame mixture! Every bite satisfies both the sweet and savoury craving to be honest! Which is why I love them!

img_6452-1

I couldn’t quite believe how quick and easy it was to make this in the Thermomix. Everything was done and ready to be enjoyed in 20 mins! And I can’t really put the joys of being able to make something from scratch in the comfort of my own home in words! So I will let the pictures do the talking! hehe

img_6463-1

Little nuggets of deliciousness wrapped in a sugary peanut, white and black sesame mixture! SO SO GOOD!

Here’s the recipe for the muah chee. For those who have been craving like me, and to those who’s never tried it before. Please do give it a go! You won’t regret it!

img_6456-1

Muah Chee 

150g roasted peanut (without skin)

30g toasted white sesame

30g toasted black sesame

40g coconut sugar

120g glutinous rice flour

180g water

2 tbs olive oil

1000g water, for steaming

Steps :

In the TM bowl, add the peanuts, half the amount of white & black sesame, and sugar. Chop for 5secs/ Speed 8.

Pour the mixture into a bowl and mix the rest of the sesame seeds. Set aside.

img_6466-1

In the TM bowl, add the glutinous rice flour, water and oil and mix for 1 min/ Speed 6. You should get a smooth flour mixture.

img_6469-1img_6464-1

Pour into a shallow bowl and place the bowl into the Varoma deep tray. Place 1000g of water into the TM bowl and place the Varoma deep tray on top of the lid. Steam the mixture for 15mins/ Varoma/ Speed 3.

img_6460-1

Once steamed, use a teaspoon, scoop and cut into pieces and toss into the peanut & sesame seed mixture. Make sure the glutinous rice balls are coated well.

img_6459-1

Serve and enjoy immediately!

img_6461-1

Hope you will give this a go and let me know what you think! I am salivating just looking at the pictures! Think I will have to make it again this weekend! hehe Have an awesome weekend everyone!

Remember to always cook and bake with love!

{Spencer Cooks} Hainanese Chicken Rice

dscf5320-1-1

One thing I truly miss is the food from back home. So when I got hold of the recipe of Hainanese Chicken Rice from the Taste of Asia Thermomix cookbook, I HAD TO try making it. Of course, I also had to make the dipping sauces, or else it wouldn’t be complete.

Prior to having Spencer, I have made chicken rice before, and it turned out great. But the multilayer cooking does make it a lot easier, and I have to say, the taste definitely doesn’t lose out to cooking it in the traditional way! Plus it was a huge hit with the two boys! hehe HOORAY!

dscf5291-1

One thing I cannot do without when having chicken rice is the dipping sauces. Especially this ginger dipping sauce! I usually buy them off the shelf at an asain supermarket, but I love that I am able to make it from scratch and also to get it on the table in about 5 mins!

dscf5293-1

Of course, the chilli dipping sauce too!

dscf5323-1

This is definitely is and will continue to be the staple in our house. Succulent chicken pieces with flavourful rice, I cannot think of anything that is more comforting for dinner.

I was asked by a customer at a Varoma cooking class recently to post about how I cooked my chicken rice. Sorry it took so long, but here it is! Step-by-step! I hope you all will enjoy it as much as we do!

Hainanese Chicken Rice (Adapted from Taste of Asia)

Ginger Dipping Sauce

120g young ginger, peeled

50g eschalots, peeled

100g vegetable oil

1/2 tsp salt

Steps:

  1. Place ginger and eschalots into the bowl and chop for 5 secs/ Speed 7. Scrape the side of the bowl.dscf5285-1
  2. Add remaining ingredients and blend for 20 secs/ Speed 8.dscf5286-1
  3. Scrape down the sides of the bowl and cook for 5 mins/100 deg C/ Speed 2. Pour into bowl or mini thermoserver, and set aside to have with Hainanese chicken rice.

dscf5289-1

Note : Can be kept in a jar for 1 week or frozen for 3 months.

Chilli Dipping Sauce

100g big red chillies, cut into 3 pieces

20g ginger, peeled

50g garlic, peeled

80g white vinegar

1 tsp salt

1/2 tbs sugar

Steps:

  1. Place chilli, ginger and garlic into the bowl and chop for 5 secs/ Speed 8. Scrape the sides of the bowl, and repeat process for 2 more times.
  2. Add remaining ingredients and blend for 1 minute / Speed 6.
  3. Add salt and sugar. Pour into a serving bowl or mini thermoserver and set aside.

Hainanese Chicken Rice (Serves 4-6)

2 tsp chinese wine

2 tsp light soy sauce

2 tsp sesame oil

1 whole chicken (about 1.7kg)

4 cloves of garlic

2 spring onion, cut into half

8 slices of ginger, peeled

4 eschalots, peeled

1 tbs olive oil

300g jasmine rice, rinsed

1.5L chicken stock

2 pandan leaves

A packet of bean sprouts

Fried shallots & thinly sliced spring onion, to garnish

Steps :

  1. Mix the chinese wine, soy and sesame oil in a small bowl and rub it all over the chicken as well as inside the cavity.dscf5297-1
  2. Stuff two cloves of garlic, spring onion, and 4 slices of ginger into the cavity and place into the Varoma dish. Make sure the chicken doesn’t cover all the holes to ensure the steam can be circulated. Set aside. dscf5301-1
  3. Place the remaining garlic, ginger and eschalots and oil into the bowl and sauté for 2 mins/ Varoma temperature/ Reverse, Speed 2. Add the rice and sauté for 2 mins/ 100 deg C/ Reverse, Speed 2. Pour mixture into the steaming basket and place pandan leave in the middle and set aside.dscf5309-1dscf5312-1
  4. Place 1 L of chicken stock into the bowl. Place the steaming basket of sautéed rice into the bowl as well and set the Varoma into position. Steam for 20 mins/ Varoma temperature/ Speed 4. Remove the steaming basket from the bowl, and place the rice into the Thermoserver to keep warm while the chicken continues steaming. dscf5303-1
  5. Top up the bowl with another 500ml of chicken stock. Replace the Varoma back into position and continue cooking for another 30-45 minutes/ Varoma temperature/ Speed 4, depending on the size of your chicken. In the last 10 minutes of steaming, add the bean sprouts around the chicken to steam. dscf5313-1
  6. Mix 3 tsp light soy sauce, 2 tbs of hot water, 1/2 tsp sesame oil and 1/4 tsp of sugar in a bowl. Chop up the chicken and pour this sauce over the chicken before serving.

dscf5315-1

Garnish with fried shallots and thinly sliced spring onions. Serve with the two dipping sauces prepared and a thick black soy sauce.

dscf5321-1

Tuck in and enjoy!

Would love to hear what you think after you’ve tried this! Email me photos of your creation as I would love to see them!

Follow me on Thermolove to get more inspiration!

Remember to always cook and bake with love!  

{Spencer Makes} Salted Chunky Chocolate Cookie

salted chunky chocolate cookie

Nothing beats the smell of freshly baked cookies. NOTHING. When the mr kindly requested for me to make these salted chunky chocolate cookies, I couldn’t say no. haha

The first time I made these were for the Biggest Morning Tea last year and everyone loved it! So I decided to try making it with Spencer (my Thermomix) today, and it was so easy and quick!

13895134_895993767213158_2941545152233463400_n1

These are like chocolate chip cookies, but BETTER! Imagine biting into big chunks of semi melted chocolate chunks and each bite had a hit of salt! There’s just something about sweets with a touch of savoury that I love.

13892224_895993793879822_1240977147308032361_n1

So if you are like me and love a little savoury in your sweets, definitely give this cookie a god! It’s crunchy on the outside and chewy in the middle. SO ADDICTIVE! Can’t stop at one!

Salted Chunky Chocolate Cookie (adapted from Smitten Kitchen)

Makes 20-24 cookies

Ingredients :

113g unsalted butter, cold and cut into cubes

180g packed light brown sugar

25g raw sugar

1 egg

1 tsp vanilla bean paste

3/4 tsp  baking soda

1/2 tsp baking powder

1/4 tsp sea salt

22og plain flour

220g dark chocolate, cut into chunks

Fluer de Sel, to finish (or flaky sea salt)

13873155_895993740546494_2996270339589433075_n1

Steps :

1) Preheat the oven to 180 degrees C. Line two baking trays with baking paper and set aside.

2) Place butter, light brown sugar, raw sugar, egg and vanilla bean paste into the bowl and mix 2 mins/sp 3.

3) Add plain flour, baking soda, baking powder and sea salt and mix for 40 secs/sp 4.

13907062_895993713879830_3778816521033936200_n1

4) Add dark chocolate chunks and stir for 30 secs/ sp 2.

13891887_895993727213162_4116234321963311953_n1

5) Form dough by scooping 1 heap tablespoon and rolling the dough into a ball. Place them on the baking tray with 3cm space between each of them. Sprinkle some fluer de sel or flaky sea salt on top of the dough.

13880273_895993753879826_7034193518650481516_n1

6) Place them in the oven for 10 mins, until golden on the outside but still very gooey and soft inside. Out of the oven, let the cookies rest on baking sheet for 5 minutes before transferring a cooling rack.

13901591_895993810546487_3505350499996016882_n1

Enjoy and try to stop at one, I dare ya! hehe

Remember to always cook and bake with love! xx

{Spencer Cooks} Claypot Rice

IMG_5917-1-1

Sine I had Spencer, I’ve been trying to convert my favourite recipes into one which I could use the Thermomix to cook in. Why you ask? There is less to wash (just the bowl) and it cooks quicker, without me needing to worry about burning anything!

This is a family favourite and I’ve cooked it in a few different ways. One of the most convenient way is to cook it in the rice cooker. That is before I tried making it using Spencer. hehe Of course, the main reason why people love having claypot rice is because they love the crispy bits at the bottom of the claypot. And yes, using the Thermomix won’t give you that result, but you can easily transfer everything into a claypot after it’s cooked and cook it over the stove for another 5 mins on high heat.

img_5914-1

The flavour though is still as delicious and with all my other dishes, it’s just full of wholesome ingredients. Every mouthful has a bit of chicken, chinese sausage, rice, shiitake mushrooms, fried shallots and spring onion. What’s not to love?

So here’s the steps to cooking it in a Thermomix if you have one, if not just click on the link about to make it in your rice cooker (:

Ingredients:

350g chicken thigh, cut into small chunks

200g jasmine rice

2 chinese sausages (lup cheong), sliced thinly

2 chinese liver sausages (optional), slice thinly

8 dried shiitake mushrooms, soaked and thinly sliced

4 cloves garlic

1 small onion (60-80g)

2 inch ginger, peeled and cut into coins

20g olive oil

900g water

For the marinade:

20g sesame oil

10g tamari/soy sauce

20g oyster sauce

20g dark sauce

10g black vinegar

10g shaoxing wine

pinch of ground white pepper

2 spring onions, finely sliced

fried shallots, to serve

thick dark sauce, to serve

IMG_5918-1

Steps :

  1. In your Thermomix bowl, place the garlic, onion & ginger and chop for 5 secs/sp 5/MC on. Scrape sides and add olive oil. Saute for 3 mins/100 degrees/reverse/sp 1/MC on.

IMG_5926-1

2. Add the chinese sausage and liver sausage, if using, and sauté for 2 mins/100 degrees/reverse/sp1/MC off. Then add the shiitake mushrooms and sauté for a further 3 mins/100degrees/reverse/sp 1.

IMG_5924-1

3. Add the chicken thigh pieces as well as the marinade and stir fry for 5 mins/100 degrees/reverse/spoon.

IMG_5922-1

4. Insert steaming basket into the bowl and weigh out 200g of jasmine rice. Rinse the rice under running water then toss it into the bowl with the rest of the ingredients. Fry the mixture for 1 1/2 mins/100 degrees/reverse/spoon. Place the steaming basket on a bowl, then carefully pour the rice & meat mixture into the steaming basket.

IMG_5920-1

IMG_5919-1

5. Without rinsing the bowl, place the steaming basket into the bowl and pour the sauce back into the bowl, as well as 900g of water. Cook the rice for 25 mins/Varoma/sp4/MC on, stopped at 15 mins to give it a stir using your spatula.

IMG_9658-1

6. Once it’s done, you can pour it into your thermoserver, and top it with the sliced spring onion and fried shallots and a swirl of thick dark sauce. If you prefer the crispy bits, place the cooked rice into a claypot and cook it over high heat for 5-10 mins, keeping a close eye to make sure it doesn’t burn. Then top it with spring onion, fried shallots and thick dark sauce when serving.

IMG_5916-1

ENJOY!

Raspberry & Lemon Shortcakes

DSCF1091-1-1

Baking has always been something I love doing. Especially to bake for people I love and just being able to see the smiles on their faces after they take a bite, warms my heart. So I try to bake something whenever I have the time and especially when there are special occasions or during the festive seasons! The house always smells the best during festive seasons, right? hehe

dscf1018-1

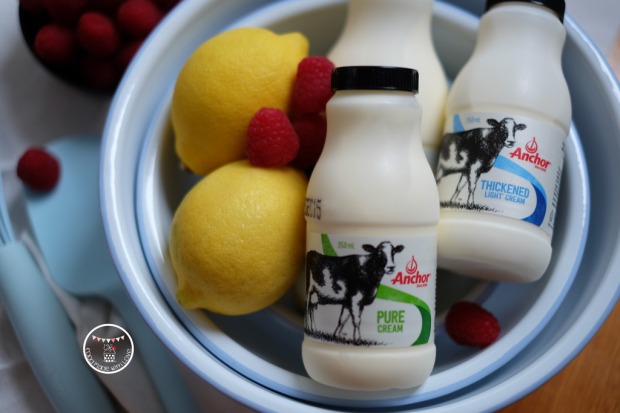
I am always excited to try new products in the market, and when I was asked to try the new Anchor Cream range, I immediately said yes! The new Anchor Cream range is made with 100% Australian dairy (only the best across 34 dairy farms across Victoria) and have a few innovative features that would be helpful when cooking.

dscf1020-1

It comes with a screw top lid which would help with easy storage and less messy drips & leaks! Also, the side of the bottle has measurement markers  that would help you with more precise pouring and easy measurements! Less wastage as you don’t have to pour into a measuring cup and also less to wash! WIN!

There’s 3 types of creams in this range which would suit every occasion of cooking or baking – thickened cream, thickened light cream and pure cream! They come in unique size bottles, with exact one cup (250ml) or 2 cups (500ml) which would help when following a recipe, hassle free!

dscf1030-1

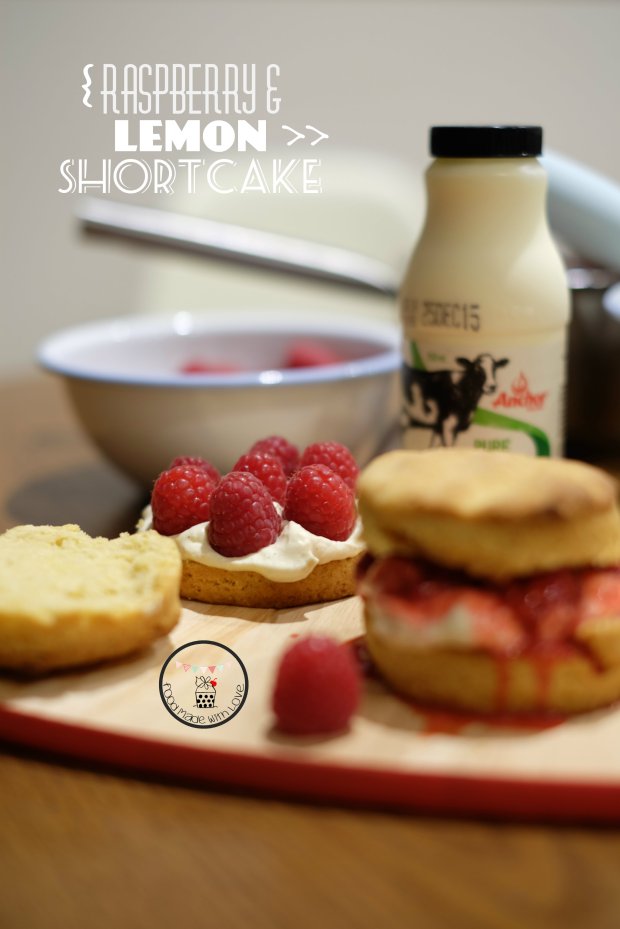
Walking the aisles of the supermarket, I was thinking about what I could make with these beautiful creams and found these huge, fresh and beautiful raspberries! So I decided to make some raspberry and lemon shortcakes!

dscf1074-1

This recipe uses the pure cream in the shortcake and also the whipped thickened cream sandwiched in the middle. So it was a perfect recipe in my books! Hope you will enjoy it too!

Raspberry & Lemon Shortcake (Adapted from Raspberri Cupcakes)

2 cups plain flour

1 tbs baking powder

2 tbs packed brown sugar

1/4 tsp salt

115g cold butter, cubed

3/4 cup pure cream

1 lemon

2 punnets of fresh raspberries

1/2 tbs packed brown sugar

1 tbs honey

1/2 cup thickened cream

1 tsp vanilla bean paste

Steps :

1) Preheat the oven to 210 degrees celcius. In a large bowl, add the flour, brown sugar, baking powder, salt and cold butter. Using the tip of your fingers, rub the butter into the flour mixture until a sandy mixture is achieved. Don’t worry if there are still a few lumps of butter.

dscf1041-1

2) Slowly add the pure cream into the mixture and using a spatula, mix the cream until the dry mixture is just moistened.

dscf1045-1

dscf1047-1

3) Zest the lemon. Turn out the dough onto a floured surface and add the lemon zest. Lightly knead the dough till it comes together.

4) Pat the dough till about 1 1/2cm thick and using a 6cm scone cutter, cut the dough into the 7/8 portions. Place them on a lined baking tray and bake for 10-12 minutes, or until the tops are browned.

dscf1052-1

dscf1058-1

5) Transfer them to a wired rack to cool.

I made the shortcakes two different ways. One with just the fresh raspberry as it is, and one with a tangy raspberry coolie almost. I liked both, but the coolie gave it a very refreshing touch and the tanginess made you go back for more! So try both, or either (whichever you prefer!) and would love to hear what you think about them!

dscf1068-1

6) To make the raspberry coolie : In a small pot, place 1 punnet of raspberries, brown sugar, juice of 1/2 lemon and honey. On a low heat, stir the mixture till the raspberries are about to break down. Remove from heat and sit it in a bowl of ice water (to cool it completely before platting). This could be done a day before, keeping it in a jar in the fridge.

dscf1065-1

7) In a medium bowl, place the thickened cream and vanilla bean paste and whisk till stiff.

dscf1075-1

8) To serve : Cut the shortcake into half and place the whipped vanilla cream onto the top and place the fresh raspberries or raspberry coolie, serving with the other half placed on top. Best served immediately!

Enjoy! (:

Have a great week ahead everyone! It’s the season to be jolly, so go grab yourself some of the Anchor Cream and make this for the festive season! hehe

dscf1078-1

Remember to always bake and cook with love! xx

PS: Do note that the Anchor Cream range is only exclusively available at Woolworths Nationwide!

PPS : Thank you KeepLeft PR for the opportunity to try out the Anchor Cream range. All thoughts and opinions are based on my own experience. Thank you again for this wonderfully opportunity!