Slow Cooked Shiraz Beef Ribs

slow cooked shiraz beef ribs

Good afternoon dear readers, I hope you’re having a great weekend so far. I definitely am! Wish I could sleep in more and how I wish we had an extra day of weekend just to anything we love. How good would that be? Any who! It’s the weekend should we should all just embrace it! hehe I’ve got some exciting news to share! Remember the Taylors Wine giveaway I did a few months back? They decided to send me a different type of wine each month to come up with a dish and share the recipe! This month, I chose their Taylors Estate 2010 Clare Valley Shiraz.

Taylors Wine Clare Valley 2010 Shiraz

Before the wines even arrived, I already had a few ideas in my head. But after reading the palate notes, there was only one dish that came to my mind : beef ribs ! The wine was really smooth and robust, with notes of plum, blackcurrant and dark cherries! Yum! I am by no means an expert on wines, but it is really easy to drink, and not too dry!

slow cooked shiraz beef ribs

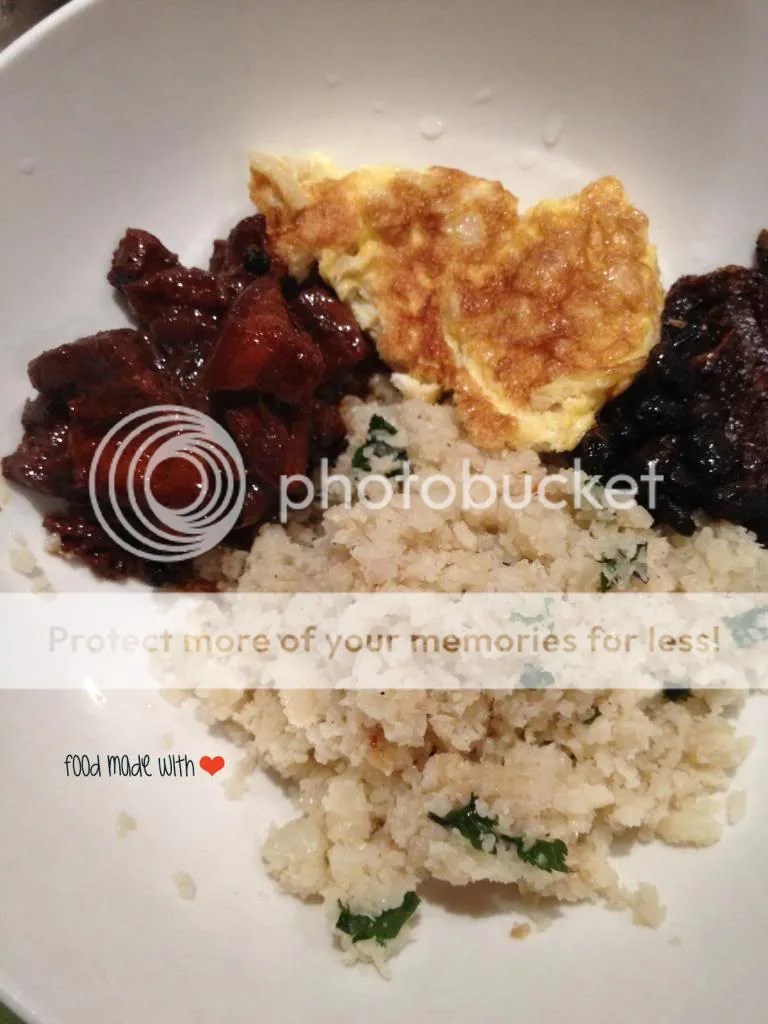
What I love is the intensity of the colour of the ribs and sauce! A deep red colour especially after it’s been cooking and reducing in the oven. And what’s better than tender, melt-in-your-mouth pieces of meat? Absolutely nothing! hehe

slow cooked shiraz beef ribs with cauliflower puree and cauliflower florets & hazelnuts

And I was debating if I should make a creamy mash to go with it, but because I’m in a current cauliflower phase (check out the cauliflower rice that I’m addicted to!), I decided to make some cauliflower puree which paired perfectly with the ribs! Plus it’s like killing two birds with one stone, cause I didn’t need to make a side of greens! hehe But just to make the dish have some kind of crunch, I sauteed some cauliflower florets with toasted hazelnuts. AMAZING!

So go get yourself a bottle of Taylors Wine Clare Valley Shiraz and give this a shot! You won’t regret it, my tummy assures you! (:

Slow Cooked Shiraz Beef Ribs (A Food Made With Love Original)

2 kg beef short ribs

500ml Shiraz

500ml beef stock

1 heap tbs tomato paste

2 tbs olive oil, extra for sealing the ribs)

2 tbs passata

1 bulb garlic, cut into half

2 large chillies, deseeded and roughly sliced

salt and ground black pepper, to season

garlic cut into half

Steps :

1) Preheat oven to 160 degrees Celcius. Season the beef ribs generously with salt and ground black pepper. Heat a heavy based pot (I used my cast iron pot) on high and add some olive oil. Seal the ribs on all sides and set aside.

beef ribs

Searing the ribs

Seared beef ribs

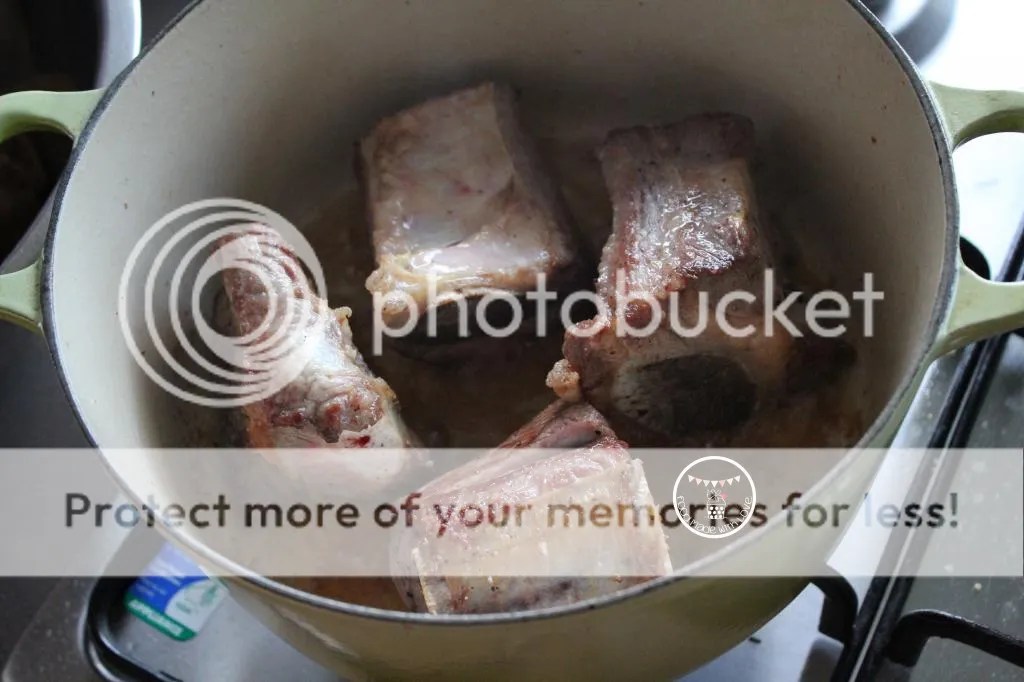
2) In the same pot, add the tomato paste, passata, garlic, chilli and the shiraz. Bring it to a boil and allow it to reduce by half.

Bringing the wine mixture to a boil and reducing it

3) Return the beef ribs into the pot and add the beef stock, making sure it covers at least 3/4 of the ribs.

After adding the beed stock

4) Bring it to a boil, then cover and place the pot into the preheated oven and allow it to cook for at least 2 hours, or until the meat falls off the bones, and the liquid has reduced to a sticky and thicker consistency. The colour of the gravy has also become an intense red!

5) To serve, place the beef ribs on the cauliflower puree (recipe to follow) or a rich and velvety smooth mash, top with the cauliflower florets and hazelnut and drizzle the thick and luscious gravy. DIG IN!

Final dish

Cauliflower Puree (recipe from Manu’s French Bistro)

500g cauliflower florets

200ml milk

50g unsalted butter

sea salt and ground black pepper

Steps : 

1) Place the cauliflower and milk in a large saucepan and bring to a boil. Simmer over medium heat for 8-10 minutes or until the cauliflower is tender, then drain and discard the milk.

cauliflower puree

2) Place the cauliflower, butter, salt & pepper in a food processor and process still you get a smooth puree. Transfer to a clean saucepan and keep warm.

Cauliflower Florets & Hazelnuts Mixture (Recipe from Manu’s French Bistro)

50g hazelnuts

200g cauliflower, cut into small florets

50g unsalted butter, cubed

Steps :

1) In a small frying pan, toast the hazelnuts until golden brown. Place them in a clean tea towel and remove the skins by giving it a rub. Place them in a plastic bag, crush them slightly, using a rolling pin. Set aside.

2) In a larger frying pan, melt the butter over medium heat. Add the cauliflower florets and cook for 5-6 minutes or until golden and tender. Add the hazelnuts and stir to combine. Transfer to a bowl and keep warm.

cauliflower florets with hazelnuts

So go grab yourself a bottle of Taylors Clare Valley Shiraz and give this a try! (: Thank you Taylors Wines once again for the beautiful bottles of wine and the opportunity to come up with a recipe with it! Have a great week ahead everyone! Remember to always cook and bake with love!

Till the next post, x

Milo Brownie Pound Cake

Milo Brownie Pound Cake

MILO. Just the thought of it brings me back to my childhood. Milo was something I grew up drinking. A cup everyday and even when I was older, I would still love drinking it. And yes, eating it by spoonfuls too! Don’t be shocked! I’m sure lots of you do it! heh I remember when we had to do the yearly cross country run (more walk than run to be honest haha), the one thing that we all look forward to was the milo van at the finishing line!

milo brownie pound cake

These days, what I would sometimes crave for when I’m back home in the heat is some ice milo or even milo dinosaur, which is pretty much ice milo with a whole heap of milo powder on top. Can you say YUM?!! Can’t get enough!

Milo brownie pound cake

So when I came across this recipe of a milo cake on Pencil Kitchen, I couldn’t wait to start baking to taste it! I have to admit though, I probably overbaked mine cause it didn’t come out as gooey and light like hers, but after warming it up before eating it, it was still pretty delicious! Definitely tasted like having a warm cup of milo! So definitely gonna make this again, but cutting down my baking time!

milo brownie pound cake

Milo Brownie Pound Cake ( Recipe closely adapted from Pencil Kitchen )

175g butter, room temperature

150g caster sugar

3 eggs

1 tsp vanilla bean paste

200 ml milk

200g milo powder, extra 50g for dusting

a pinch coffee granules

40g cocoa powder

200g all purpose flour

1 tsp baking powder

2 pinch salt

1 tbs salted butter, melted

Steps : 

1) Preheat oven to 175 degrees celcius.  Prepare a 9×9 inch springform baking tin by lining the bottom with grease proof paper and lightly coating the interior with olive oil.

2) Dissolve 100g of milo powder and coffee granules in milk. Heat it a little to allow it to dissolve quicker. Set it aside and allow it to cool completely.

3) In a large bowl, sift the flour, 100g of milo powder, cocoa powder, baking powder and salt. Set aside.

4) In another bowl, cream the butter and sugar until light and fluffy. Beat in the eggs, one at a time, and beat till just combined. Stir in the vanilla bean paste.

5) Add the flour mixture and milo milk alternately, starting with the flour mixture.

Before going into the oven

6) Pour the mixture into the prepared baking tin and spread it out to make sure it’s evenly spread. Bake the cake for 30-40 mins (nothing more as it will overcook!) and allow it to cool in the tin for 10 mins.

all baked and ready to cool

7) Carefully release the spring and invert the cake onto a cooling rack. Brush the top with the melted salted butter and dust with 50g of milo powder.

milo brownie pound cake

Slice and enjoy it as it is, or zap it in the microwave to have it warm with a scoop of your favourite ice cream! (:

So dear readers, what is your favourite childhood drink? Would love to know!

Till then, remember to always cook and bake with love! xx

Gingery & Coconutty Granola

Gingery & coconutty granola

You and I both know I absolutely love brunch. But during the week, it’s impossible to have brunch due to work and more often than not, I end up having a slice of toast with either peanut butter or vegemite and out of the door I went! But I really wanted to have something healthy and good in the morning to keep me full for most of the morning before lunch so I decided to make my own granola to go with yogurt! Mmmm (:

Granola with greek yogurt

I also wanted to try using something I’ve never used before, but has been on my mind for a while now – Molasses. A dark and viscous by-product of the refining of sugar cane. The health benefit of molasses is its high mineral content. It’s wheat, dairy, lactose, gluten and yeast free! It smells and tastes quite similar to gula melaka hehe I like it!

Molasses

It’s not as sweet as honey, but still makes the granola yummy! (: Had to take that risk, but so glad I did. hehe I tried baking a cake with it, but I think I probably used too much and the taste over took the whole cake, so I’m sticking to sugar for my cakes. haha Or honey! But for granola, it was perfect! hehe

IMG_6373-1

The best thing about this recipe? You could pretty much add what you love and it will still work! hehe I ransacked my whole pantry and took out everything I wanted and tossed it in the mix!  There were a few things I really wanted in my granola this time : toasted coconut and crystalised ginger! It was a combination I came across at the awesome Borough Market in London during my recent trip! hehe So here we go! (:

Gingery & Coconutty Granola (A Food Made With Love original recipe)

1 cup shredded coconut (toasted till brown, set aside)

3 cups rolled oats

1 cup slivered almonds

1 cup roughly chopped walnuts

1/2 cup pine nuts

1/2 pistachios, roughly chopped

1/2 cup unsalted cashews, roughly chopped

1 tsp ground cinnamon

3 tbs olive oil

3 tbs molasses

1 cup raisins

1 cup goji berries

shredded coconut (before toasting)

Toasted shredded coconut

Steps :

1) Preheat the oven to 150 degrees celcius. In a large bowl, place the rolled oats, mixed nuts and cinnamon. Give it a good toss to so that they are well combined.

2) In a small pot, heat the olive oil and molasses on low heat till smooth. Drizzle over the oats mixture and mix till well combined.

3) Pour the mixture on a line tray and bake for about 35-40 mins, stirring every 10 minutes.

4) Remove from the oven and allow it to cool slightly. Pour it back into the large bowl, and mix in the raisins and goji berries. Once the mixture is completely cooled, stir in the toasted coconut.

Gingery & coconutty granola

Enjoy on its own (it makes a great snack!) or with your favourite yogurt! (:

Food Made With Love Watermark 3 Black

PS: Did you notice the new logo for Food Made With Love? hehe Hope you guys like it and I just want to thank you for your continuous support and love for my posts! I won’t be here if not for you all, so thank you heaps! x

Have a great week ahead! Till the next post, remember to always cook and bake with love! 

Dry Mee Siam

Dry Mee Siam

Good evening dear readers. I hope you’re having a great weekend so far! Mine has been really relaxing, trying out new recipes and cooking up a storm in the kitchen. It definitely felt good cooking and baking again after quite a long time! One of the things I tried is dry mee siam. hehe If you don’t know what mee siam is, it is a malaysian dish and is similar to fried rice vermicelli with lots of aromatics to make it flavourful and delicious! It’s usually comes with a gravy, but I do prefer the dry version. Every mouthful makes me nostalgic!

Dry mee siam

As my sister-in-law says, it brings the taste of home (有家的味道) ! I was quite worried about how it would turn out, but it was pretty good for a first timer! hehe And quite simple as well! Just blend all the aromatics together, fry, add stock, rice vermicelli, viola! Definitely something you can consider making during parties! I topped mine with prawns, fried beancurd, chinese chives and crispy fried shallots! But you can top it with anything you like, for meat lovers, you could shred some chicken in as well! heh So what are you waiting for? Give it a try!

Dry Mee Siam (adapted from Valee Belly & To Food With Luv)

1 packet of rice vermicelli (about 400-500g)

300g bean shoots

300g prawns, shelled and deveined

100g fried beancurd/ firm toufu, sliced and fried till golden brown

3 hard boiled eggs, cut into halves

10 stalks chinese chives, finely chopped, extra for garnish

2 tbs vegetable oil

2 cups chicken stock

2 tbs fish sauce

2 tbs tamarind paste

2 tsp brown sugar

ground white pepper

fried shallots

1 lime, cut into wedges

Aromatics / Spice blend : 

5 cloves of garlic

10 shallots

20g belachan

55g dried shrimps, soaked and drained

3 heap tbs sambal chilli

2 tbs fermented yellow beans/taucheo (I used crushed salted soya beans)

Blending the aromatics

Steps :

1) In a blender, place the garlic, shallots, belachan, dried shrimps, sambal chilli and fermented yellow beans. Blend till it becomes a fine paste.

Blended aromatics

2) In a heavy based frying pan or wok if you have one, heat the vegetable oil on high heat. Add the prawns and fry till its cooked through. Set it aside. Fry the blended aromatics for about 8-10 minutes, till fragrant. Remember to keep stirring it so that they do not burn.

3) Add the chicken stock, fish sauce, brown sugar and tamarind paste and bring the mixture to a boil, lowering the heat and allow it to simmer for 5 minutes.

4) Add the rice vermicelli and bean sprouts and mix well till well combined. Toss it well to make sure the rice vermicelli is well coated and the liquid is absorbed and almost dry. Add the chives and give it another good toss.

5) To plate, place some dry mee siam on the plate/bowl, top it with hard boiled eggs, fried beancurd, prawns, more chives, fried shallots and a wedge of lime. Remember the lime as it gives the dish a sourish and refreshing kick!

Dry Mee Siam

Now it’s time to sit down and enjoy! (: Hopefully you’ll love it as much as we did! Brought us straight back to Singapore hehe

Remember to always cook and bake with love! 

Going Healthy : Cauliflower Rice Salad

Cauliflower rice salad

Hola dear readers! Obviously I still wish I am back in Barcelona. hehe Have you ever felt the need to cut down on food and eat better? After all the good food (and don’t get me started on the amounts haha) that I’ve eaten in Europe, I decided to try and eat a little healthier when we got back. The thing that has been going around alot these days is the Paleo diet. Don’t worry, I’m not on it! haha I, for one, cannot go through a diet for the life of me. Plus my dearest husband will never allow me to. He’s a firm believer of exercise and eating everything in moderation. hehe But there are a few recipes out there which caught my eye and I’ve written down in my recipes-to-try list! hehe One of which is the cauliflower rice!

Cauliflower rice

I was intrigued by the cauliflower rice ever since I’ve seen it on instagram  (follow me on @lianneelow). It’s not rice, but it’s cauliflower that is made to look like rice, and it’s absolutely delicious! hehe There are many different ways to make it and there’s no right or wrong way. The best thing about it is that you can flavour it any way you want! Absolutely anything that you fancy!

Cauliflower rice with dishes

I had mine two ways. One as a substitute for rice/quinoa (with dishes) and another in a salad! They both worked really well but I am addicted to the salad. Which is the recipe I’ll be sharing with you today. And trust me, even though you don’t intend to change your diet, this is something you definitely should try making! Plus, there’s no harm in having something healthy yes? hehe

Cauliflower Rice (Adapted from Nom Nom Paleo)

1 head of cauliflower (cut into small pieces)

3 shallots, finely sliced

1-2 tbs olive oil

1 tsp garlic salt

1 tsp ground ginger

1 tsp ground coriander

A bunch of fresh coriander, roughly chopped

Freshly ground black pepper

cauliflower

Steps : 

1) In a food processor, pulse the cauliflower into the size of couscous or rice grains.

2) In a heavy-based pan, heat the olive oil and sautéed the finely sliced shallots until its soft and aromatic. When it’s softened, add the cauliflower and stir until it is well coated and mixed thoroughly.

3) Season the cauliflower rice with the garlic salt, ground ginger and ground coriander. Cover the pan and allow it to cook for 5-10 minutes. Season with freshly ground pepper and fold in the fresh coriander.

cauliflower rice salad

Cauliflower Rice Salad (Original recipe)

2 cups cauliflower rice

200-300g butternut squash, cubed

1 tsp smoked paprika

1 pint cherry tomatoes (250g, sliced into halves)

Juice of 1 lemon

3 tbs extra virgin olive oil

1 can of chickpeas, drained

salt & pepper, to season

handful of fresh coriander, roughly chopped

Steps :

1) On a lined baking tray, place the butternut squash and sprinkle paprika and salt. Drizzle some olive oil over. In a preheated oven (180 degrees celcius), bake the butternut squash for 15-20 minutes, or until the squash is tender. Remove from the oven and set aside to cool.

2) In a small bowl, emulsify the oilve oil with the lemon juice and set it aside.

3) In a large bowl, place the cauliflower rice, then top with the butternut squash, cherry tomatoes and season with salt & pepper. Drizzle the emulsified lemon juice and olive oil and add in the chopped coriander. Give it a good mix until well combined.

Cauliflower rice salad

4) Eat it by the spoonful or keep it in the fridge for up to 3 days.

my lunch

I had mine with some extra pine nuts and a hard boiled egg for some extra protein! hehe See, you can have it anyway you fancy!

Enjoy and remember to always cook and bake with love! 

{Guest Post} Homemade Bacon

homemade bacon

Happy midweek ! Hope everyone is having a great week so far. I’m really excited about today’s post, cause for the first time, the Mr is posting as a guest of Food Made With Love! (: If you follow my instagram (@lianneelow), you would know how much the Mr and I love cooking together. The kitchen is definitely our happy place, trying new recipes and creating yummy dishes. Teamwork! hehe Recently though, the Mr have been trying new things on his own. Which is why I thought it was perfect for him to do a guest post of something that was so so delicious! So do enjoy (:

~~~~~~~~~~~~~~~~~~~~~~~~~~~~~~~~~~~~~~~~~~~~~~~~~

Homemade Bacon 

(Guest Post by The Mr, The Training Geek)

The Mr with his bacon - post curing

Why?

Our usual weekend brunch brought us to Merchants Guild which my wife truly adores! There, we made our choices and I added an additional side of bacon. When it came, this bacon was not the usual bacon you get. Thick-cut bacon. Not something you can easily find or purchase. So that’s why I set off on making my own bacon.

Bubble and Squeak with a side of thick cut bacon

What is involved?

Lots of salt, lots of sugar and anything else which impart flavour to the pork which you want to put in. And of course, a nice big slab of pork belly. The equipment required is minimal if you have a bbq pit somewhere.

Curing the pork belly

Ingredients:

1 slab of pork belly (minimum 2kg)

2 parts salt to 1 part sugar (you can put in any amount you want but keep to the ratio).

Herbs and spices (anything you want; but I used 6 cloves of garlic, 3 sprigs of rosemary, handful of peppercorns, 3 sprigs of lemon thyme, 1 tbs ground coriander and 3 dried bay leaves)

Equipment:

Ziplock bag/Tupperware

Smoker/Bbq

Hickory wood chips

How?

The Curing Process

1. Combine the salt, sugar, herbs and spices into a food processor and blend till everything is evenly combined.

Blending the herbs and spices

2. Once the cure mixture is done, pack the mixture all over the pork belly, covering the pork with a layer of the curing mixture.

3. Carefully place this into a ziplock bag or into a Tupperware box with a rack at the bottom to allow any liquid to drip.

4. Leave the pork in the fridge for at least 7 days for it to cure and let the curing mixture remove as much liquid as possible. Through the 7 days, check for any accumulation of liquid. Feel free to drain the liquid or add more curing mixture to the pork. At the end of the 7 days, the pork should be of a solid nature and there would be no bounce when pressing into the flesh.

5. Once this is done, rinse the pork under water to remove the curing mixture and allow the pork to dry out more in the fridge uncovered. This also allows a sticky layer to form around the pork which helps retain the smokeness from the next process.

After the salt is washed off

Leaving it uncovered in the fridge for a day

The Smoking Process

1. After leaving the pork belly in the fridge uncovered for a day, the cured meat is now ready for smoking in the bbq. To prepare your bbq, heat the bbq up till the temperature of the bbq reaches 200 degree Celsius.  Prepare your hickory chips by soaking them in liquid for at least half an hour. At this time, you can choose to use any liquid which could impart more flavour to the pork. In my case, I decided to use apple juice (with the understanding that apple and pork go well together).

2. Once the hickory chips are ready, you can either place them with the coals (if yours is a charcoal bbq) or in a smoking box (for electric/gas bbqs) and allow the smoke to fill the bbq up. Once the bbq is ready, place your pork into the bbq and rest it on a rack and allow the smoking process to begin. This will take 2-4 hours depending on how much smokeness you want your bacon to have.

Smoking the meat

3. Constantly monitor the temperature of the bbq, ensuring it stays around 200 degrees Celsius or an internal temperature of the meat at 150 degrees. Once you feel that you have imparted enough smokey flavour to the bacon, feel free to remove it from the bbq.

The Cutting Process

1. Once you have taken your bacon out of the bbq, you can begin slicing it up, ready for storage or consumption. Please remember that despite the smoking process, the bacon is still not fully cooked and you will need to cook it before consuming it.

Smoking process complete!

2. Firstly, remove the rind of the pork belly which should easily come off. Put that in an preheated oven (200 degrees celcius) for 20-30 mins and enjoy a nice piece of crackling from it.

beautiful crackling

3. Next, slice the sides off so that you get an even piece of pork belly. These cut-offs can be sliced up into bacon bits for future use.

4. From there, I chose to slice thick pieces of bacon (as I enjoy a thick-cut piece of bacon). If you have a meat slicer, you can slice it up to your desired thickness. If not, just use a knife and be patient with it. In total, I managed to get at least 20 thick slices of bacon from one pork belly. Either keep it in the fridge for quick consumption or in the freezer if you choose to slowly savour it.

bacon all sliced up

sliced bacon

5. The next thing to do is fry the bacon up and enjoy the fruits of your labour!

perfectly fried thick-cut bacon

Enjoy!

~~~~~~~~~~~~~~~~~~~~~~~~~~~~~~~~~~~~~~~~

Open homemade beef patty sandwich with homemade thick-cut bacon

To enjoy the bacon, the Mr whipped up his burger patty (my ultimate fav dish of his) and we had an open beef sandwich with his beautiful fried thick-cut bacon! Let me tell you, the 1 week is definitely worth the wait! It does not taste anything like bacon you buy from the supermarket! The flavours were so good, with a slight hint of apple! YUMMO!

I do hope you enjoy my first ever guest post and hopefully it has inspired you to make some bacon of your own! Can’t wait to hear your adventures! Have a great rest of the week and let’s all welcome the long weekend together! Wheeee! (:

Remember to always cook and bake with love! 

PS : Thank you my dearest Mr for taking time to write up this post! I love you! x

Babi Guling

Babi Guling

Good evening dear readers. So sorry for the lack of posts of late! Been really busy at work, and will crash the moment I hit the beds! But tonight, to make up for it, I’m going to share a recipe that would make you salivate from start to finish! Babi guling! I’m not sure if you have had this before, but let me tell you, it’s something you definitely want to try!

babi guling in Ubud

The first time I had babi guling was in Ubud when the Mr and I went for our honeymoon! (: It was highly recommended by a close friend, and the moment we tried a mouthful, we understood why. It was absolutely delicious. The meat was so tender and melts in your mouth. The skin was so crispy! Just the way we love our pork! hehe While walking to the shops after our delicious meal, we were lucky enough to see one of the suckling pigs delivered to the shop on top of a man’s head! hehe Love to see things that we don’t get to see everyday. Made our trip more memorable! The suckling pig was roasted to perfection! We were so tempted to have another plate just looking at it! hehe

Babi guling out of the oven

My memories were triggered when I was watching MKR and the winning team made their version of babi guling. It looked so so good and I was hoping they would post their recipe on the MKR website. Thankfully, they did! The mr requested for me to make it a few weekends ago and I happily and most willingly did! (:

spice paste - base gede

When I made the spice paste (base gede), I knew immediately it was gonna be really good as it smelt really close to the one we had in Ubud! I got more and more excited as the spices were blending as the smell of the aromatics just filled the kitchen. I couldn’t wait to get it into the oven and bake it! hehe The only thing that I would do when I make it again is to marinade the pork with the spice paste for at least a couple of hours, so that it would flavour the meat more!

Babi guling - sliced

Other than that, everything was perfect, from the crispy skin to the tender meat. Absolutely divine! We just wanted to finish everything, but had to leave some for lunch the next day! hehe So do give this a try, it’s no surprise why Dan & Steph are the winners of MKR. Their recipe was spot on and definitely a keeper! heh Please don’t get overwhelmed by the amount of ingredients! It’s really worth the trouble of finding them all!

Babi guling - Served

Babi Guling (Recipe adapted from MKR)

1.5kg pork belly, rind scored

2 1/2 tbs olive oil

300ml coconut milk

100g bean shoots

2 tsp kecap manis

A bunch of bok choy, boiled and drained

2 tsp shallot oil

Steamed jasmine rice, to serve

Spice Paste (Base Gede)

Juice of 1 lime

4 long red chillies, deseeded

1 stalk of lemongrass,  white part only, bruised and finely chopped

4 green spring onions (white tender part only) roughly chopped

2 cloves of garlic

2cm piece of fresh ginger, finely chopped

2 cm piece of galangal, finely chopped

1 tbs ground tumeric

1 tbs ground coriander seeds

1 tbs vegetable oil

1 tbs palm sugar

2 tsp ground black pepper

1/2 tsp shrimp paste

1/2 tsp salt

Sambal (For the bean shoots)

4 green spring onions (the green part)

2 small red chillies, deseeded

2 cloves of garlic

 1 cm piece of fresh ginger, finely chopped

1 lemongrass (white tender part only), bruised and finely chopped

2 fresh lime leaves

1/2 tsp shrimp paste

Juice of 1/2 lime

1 tbs vegetable oil

1/2 tsp salt

pinch of ground black pepper

Spice paste rubbed on pork belly

Steps :

1) Preheat oven to 240 degree C.

2) To make spice paste, process all ingredients in a blender to form a smooth paste. Reserve 1/4 cup for the sauce.

3) Lightly prick the meat side of pork with a sharp knife or skewer and rub in spice paste in a thick layer. Roll lengthways and secure at several intervals with butchers string. Place in a baking dish. Rub salt into skin.

Spice paste and pork belly

Spice paste evenly spread on the meat side of the pork belly

All rolled up!

4) Roast for 20 minutes. Reduce oven to 175 degree C and cook for a further 1 hour 15 minutes or until tender and cooked through. Remove from oven. Rest lightly covered with foil for 30 minutes.

Babi guling - ready to be sliced

5) To make sauce, heat 2 teaspoons of the oil in a small saucepan over medium heat. Add reserved spice paste. Cook for 5 minutes or until fragrant. Stir in coconut milk and juices from rested pork. Bring to a boil. Simmer for 5 minutes.

6) To make sambal, process all ingredients until smooth.

7) Cook bean shoots in a saucepan of boiling salted water until tender. Drain and set aside. Heat a lightly oiled frying pan. Cook sambal until fragrant. Add bean shoots and toss to combine. Stir in kecap manis.

8) In the same pot of water, boil the bok choy until tender, drain and place in a bowl. Add the shallot oil and toss it well.

8) To serve, slice the pork into 1-inch pieces and serve on hot steamed jasmine rice with the sambal bean shoots, bok choy and lots of sauce.

Babi guling with sambal bean shoots and sauce

ENJOY! (:

Babi guling - Served

So dear readers, hopefully you’re not too hungry after reading this post! But do give this a go as you would definitely not regret it! Especially if you and your loved ones are meat lovers. This is definitely a dish for you! (: Hope all of you had a good (and delicious) weekend! Here’s to a good week ahead!

PS : The sauce is so good, even my mr who usually isn’t a fan of sauce couldn’t stop pouring over his rice! hehe

Remember to always bake and cook with love!

Eggless & Vegan Banana Bread

Eggless and Vegan Banana Bread

Banana cake. Who doesn’t love a thick slice of warm banana goodness?? I could have it for breakfast, tea or dessert! Actually, I could have it at any time of the day. I have done my fair share of baking different kinds of banana bread. Looking back on what I’ve shared, I’ve done a walnut, chocolate and maple banana bread and a sour cream maple banana cake. One that I never thought I would try is a vegan version of banana cake!

Eggless & vegan banana bread

To be honest, I never thought of making a cake without eggs before! But after I saw the post on OvenHaven (super duper talented, check her blog out! hehe) I knew I had to give it a try! What more when it’s actually really healthy? hehe This would be perfect for your kids and children with or without allergies! hehe The cake came out so moist, soft and light! It was just filled with banana with every single bite! Absolutely divine!  Especially when it’s warm! I had mine with some butter and also I had it for dessert with a scoop of my homemade salted caramel ice cream! Yummi-li-cious!!! So give it a try if you’ve never made anything eggless or vegan like me, and be delightfully surprised! hehe

Eggless and vegan Banana Bread (Adapted from Veg Recipes of India)

4 ripe large bananas

1 1/2 cups plain flour

2/3 cups olive oil

1/2 cup fine brown sugar

1 tsp vanilla bean paste

1 1/2 tsp baking powder

1/2 tsp baking soda

Steps :

1) Preheat the oven to 180 degrees celcius. Grease a bread/loaf tin with some olive oil.

2) Mash the bananas and place them in a mixing bowl. Add the olive oil, vanilla bean paste and sugar  and blend till well combine.

3) In a separate bowl, combine the plain flour, baking powder and baking soda. Add it into the mixing bowl, 1/2 cup at a time. Slowly mix them till well combined.

4) Pour the mixture into the prepared bread/loaf tin and bake for 30-40 minutes or until a toothpick inserted to the middle of the bread comes out clean.

5) Allow it to cool for 10 minutes in the bread/loaf tin before you turn it out onto a cooling rack. Slice and serve warm with butter or a scoop of ice cream. ENJOY! (: Cling wrap the rest of the bread and keep it in a tupperware in the fridge.

eggless and vegan banana bread with salted caramel ice cream

The next time I make these, I’m gonna put some walnuts, sunflower seeds and maybe some chocolate chips! hehe There’s nothing better than the combination of banana and chocolate! Do give this a try! I am very sure you will love it! Have a great and blessed Sunday! (:

Remember to always cook and bake with love! 

Prawn Aglio Olio & A Wine Giveaway {Winners Announced}

Prawn aglio olio with Taylors Estate Pinot Gris

Good evening my dear readers! (: I hope that all of you had a wonderful weekend especially if you had a long one because of the Anzac Day holiday. I’ve got some exciting news to share with all of you! (: A week back, I received an email from  Taylors Wines who wanted me to do a wine giveaway on my blog. Of course, I said yes! hehe I was also so lucky to received not one, but two bottles of Pinot Gris to taste! How generous are they? Couldn’t be happier!

Pinot Gris came in the mail

Before I go into more details of the wine and the giveaway, I would like to tell me my thoughts about the Pinot Gris! Pinot Gris has always been one of my favourite type of wine. hehe I had a glass before bed one night, and really love how clean and crisp it tasted with tones of pear and apple. I knew instantly what would pair with it perfectly – seafood. My dearest husband read my mind, and made an amazing prawn aglio olio with pan seared scallops for dinner the following night!

Prawn aglio olio with seared scallops paired with a glass of pinot gris

He even used some of the wine in the sauce and it was so good! I wanted more (: The prawn and scallops were so sweet & succulent, it just complimented the wine perfectly.

Prawn aglio olio with seared scallops

Prawn Aglio Olio with Pan Seared Scallops (The mr’s original recipe, serves 2)

5 cloves of garlic, finely chopped

3 small chillies, de-seeded and finely chopped (you can increase or reduce the amount of chilli depending on how spicy you like your dish to be!)

2 tbs fresh basil, finely chopped

1/2 cup white wine (I used Taylors Estate Pinot Gris)

2 tbs olive oil (plus an extra tbs for the scallops)

Salt & pepper, to season

12 prawns, peeled and cut into chunks

6 scallops, left whole

Pasta of your choice

Freshly grated parmesan cheese, to garnish

Steps :

1) Cook the pasta according to the instructions on the package. Strain and run under cold water so that the pasta will not stick together. Set aside while cooking the sauce.

2) In a heavy based pot, heat the olive oil on medium fire and fry the garlic and chilli till fragrant.

3) Add the prawns, and fry till it’s coloured and no longer translucent. Add the chopped basil and white wine. Allow this to simmer for about 5 minutes.

4) Pour the pasta into the sauce and mix it well. Set aside, and keep it warm.

5) Pat dry the scallops and season with sea salt. Heat a non-stick pan on low-medium fire and add 1 tbs of olive oil. Place the scallops into the pan and flip every 30 seconds. Repeat each side for about 3 times, or until the scallops have a nice golden brown sear.

6) Place the pasta on a plate and top with 3 scallops per person. Garnish with some freshly grated parmesan cheese. Serve with a glass of Pinot Gris. ENJOY!

Prawn aglio olio with seared scallops

And now, the part that you’ve been waiting for so patiently…. the giveaway! (:

Taylors Wines is a family-owned wine company, in South Australia’s stunning Clare Valley, that was born from a passion of producing exceptional,  hand crafted wines. They are “Bringing great wines to life” and would love to give two lucky readers two bottles of their beautiful Taylors Wine –  Taylors Estate Pinot Gris 2011 and Taylors Estate Shiraz 2010.

Taylors Estate wines

How do you win these amazing wines?

To enter this giveaway:

  • All you have to do is to leave a comment at the end of the post to let me know : What is your favourite wine and what do you like to pair it with? 
  • Open to Australian residents only! (So sorry!)
  • Please make sure you’re of a legal drinking age and be able to provide a proof of age (it is needed to be sent to the company before they can send you the wine)
  • The winners will be drawn on the 5th of May 2013, Sunday at 10pm (Melbourne time).
  • You may reenter daily, one entry a day (YAY!)
  • Winner will be picked via random.org and announced on this blog and notified via email

Good luck and have a great week ahead! (:

Remember to always cook and bake with love!

This is a sponsored post by Taylors Wines. I tasted the Pinot Gris with compliments of Taylors Wines, however, the review, opinions are honest and based on my personal taste and preference. The recipe is a Food Made With Love original.

~~~~~~~~~~~~~~~~~~~~~~~~~~~~~~~~~~~~~~~~~~~~~~~~~~~~~~~~~~~~~~~~~~~~~~~~~~~~~~~~

And the winners are….. Diana and Coco!! (: Congratulations!

Winner - Number 4

Diana

Winner - Number 13Coco

Congratulations you two! (: Will be dropping you an email or a reply soon! Hope you enjoy the wines! hehe Have a great week ahead! xx

~~~~~~~~~~~~~~~~~~~~~~~~~~~~~~~~~~~~~~~~~~~~~~~~~~~~~~~~~~

Update : Unfortunately, I can’t get hold of Diana and Ross (who was picked after not hearing from Diana) so I had to pick another winner! Congrats Zoe!! (: Hope you will enjoy this wine with Jeff!

New winner

comment number 20

{Quick & Easy} Fig Jam

Fig Jam

As promise, I decided to share the recipe for fig jam I used to have with my scones! You will realise it’s so easy and something you can do in less than 30 minutes! Be warned though, cause this is VERY ADDICTIVE! haha Once you’ve tried a spoonful, you would want to have another, and another, and another!

chopped dried figs

Another plus point is that this recipe uses dried figs, so you can make this all year round! Trust me, you would definitely want a bottle of this in your fridge all the time. hehe I’ve had it on my scones, croissants, with cookies and of course, on it’s own! YUMMO! Just can’t get enough! (:

Fig jam bottled

So quickly get a packet of dried figs and make some jam now! (:

Dried Fig Jam (adapted from Tastespotting)

250g dried figs, chopped into quarters

1 cup of water

1 tsp lemon juice

Ingredients

Steps :

1) In a small heavy base pot, place the dried figs and water and bring it to a boil. Lower the heat and allow it to simmer for about 20 minutes, or until the figs are plumped up.

2) Turn off the heat and pour the mixture into a blender. Add the lemon juice and blend till smooth with a spreadable consistency. Be careful when blending as the mixture is very hot! If it’s too thick, just add more water, 1 tsp at a time.

Blending it into a spreadable paste

3) Allow the mixture to cool, and then place it in an air tight bottle, and keep it refrigerated. It can last up to 2 weeks.

Fig jam

Enjoy! (: If you’re like me, take a spoon and dig in immediately! hehe Simple, quick, delicious and addictive! Cannot get any better!

Have a great week ahead everyone!

Remember to always cook and bake with love!