Toddler Eats : Cheesy Chicken & Veggies Meatballs

unnamed-2-1-1

Now that Lochlan has turned one (where did time go??), I’m trying to wean him from purees and introduce chunkier food, to encourage him to chew. Don’t get me wrong, he knows how to chew. But just prefers the purees cause he could finish it much quicker. haha So this marks the start to my new series of Toddler Eats! Hopefully it will be helpful to mummies out there who also want to try different foods and make them from their kitchen when time permits!

I decided to try making something I thought he might like! I mean, who doesn’t enjoy a good meatball? Especially with the addition of cheeeeese! These are quick and easy and you could have it on its own or mix it with pasta and some homemade tomato sauce and viola! Meatball pasta!

Meatball pasta

Lochlan’s Verdict : 2 1/2 meatballs (together with other food for dinner and strawberries for dessert hehe). I think thats a not too bad start!

 With the addition of cheese, you don’t even need to add salt to it. So it’s perfect even for babies from 10 months! Especially if you wanna do Baby-Led-Weaning. hehe Perfect finger food! These are not just for your little ones at home, the mr and I enjoyed it too!

So here’s the recipe, do give it a shot and let me know what u or your kiddos think!

Cheesy Chicken & Veggies Meatballs (A Food Made With Love Original Recipe)

Ingredients : Makes 24-26 meatballs

250g mince chicken (or meat of your choice)

2 stalks of spring onions, finely sliced

1 small carrot, grated

1/4 apple, grated

2 cloves of garlic, finely chopped

1/2 zucchini, grated

2-3 florets of broccoli, finely chopped

50g cheddar cheese, grated

1 egg

Ground black pepper, to season

Ingredients

(I’ve got a double yolk! Lucky me! hehe)

Steps :

1) Preheat your oven to 170 degrees celcius. Spray/Oil a baking tray/ casserole dish and set it one side.

2) Mix all the ingredients in a big bowl until well combined.

Mixed till well combined

3) Using a tablespoon, roll the mixture into balls. Do note that the mixture will be a bit wet and sticky. Wetting your hands might help in the rolling process.

Rolled out

4) Place the meatballs onto the baking dish, and bake for 12-15 mins, until the meatballs are cooked through and/or slightly browned.

All baked

5) Serve as is or you could cook it in a homemade tomato sauce and toss it through some cooked pasta for a variety!

Enjoy!

P.S : You don’t have to grate the vegetables if you’re cooking for yourself or older kids and want more texture. Just finely diced them and it would be as delicious! Also you could always change the types of vegetables in the meatballs, find a combination that wins the most votes in your house! (:

Have a lovely weekend everyone! Remember to always cook and bake with love!

Till the next post, xx !

Tagine Magic : Moroccan Meatballs & Baba Ganoush

IMG_8881-1-1

I haven’t had much Moroccan food, but I can distinctly remember the first time I had it while we were still living in Brunswick many years back. On Sydney Road sits a small little Spanish/Moroccan restaurant, LaPaella, that sells really delicious Moroccan food and it was from this experience where I drew my inspiration from! I was really lucky to receive an Emile Henry tagine from Kitchenware Superstore, so it was perfect for me to make something Moroccan for dinner!

emile_henry_red_tagine

(photo credits : The Kitchenware Superstore)

The 32cm tagine came in a beautiful dark red and the best thing was it was made using the new flame top tecnologyan innovation in ceramics, with the development of a new glazed clay, exceptionally resistant to heat. So it didn’t even need a flame diffuser if you’re using the stovetop! How good and convenient is that?

Moroccan meatballs with baba ganoush

It also keeps the food warm for a longer time! So you’ll still get hot food after all the photo taking! haha (: Definitely perfect for me! hehe

Moroccan meatballs with baba ganoush and turkish bread

I am all for having a balanced meal, so besides the Moroccan meatball, I charred some vegetables, added some okra and also made baba ganoush to go with as a side! This combination, I have to admit, is addictive! hehe You can’t stop having it. I assure you!

So here is the recipe and if you don’t have a tagine, I encourage u to get one, if not, you could always make it in a shallow frying pan. But a tagine is recommended! hehe

Moroccan Meatballs with Baba Ganoush (Recipes adapted from Baltic Maid & David Lebovitz)

For the meatballs :

300g mince pork

300g mince beef

1 small onion, finely chopped

2 cloves garlic, finely chopped

1 tsp salt

1 tsp ground ginger

1 tsp paprika

1 tsp ground coriander

1 tsp cumin

1/2 tsp cinnamon

2 tbs of olive oil, for frying

For the spicy tomato sauce : 

1 can of chopped tinned tomatoes

1/2 cup passata

2 cloves of garlic, finely chopped

1 tsp chilli flakes

1/2 cup of beef stock

1 packet of okra (about 200g)

1 red capsicum

1 yellow capsicum

1 green capsicum

1 tsp salt

For the baba ganoush :

2 medium size eggplant

2 heap tbs tahini

Juice of 1 lemon

2 cloves garlic, peeled and smashed

1/4 tsp chilli power

1 tbs olive oil, and extra to serve

1 tsp salt, or more to season

chopped parsley & chilli flakes, to garnish

Steps :

1) Under a hot grill, grill the capsicums and egg plant till they are tender and charred. Place them in a metal bowl and cover with cling wrap for about 10 mins. The charred skin would peel off easily. Slice the capsicum lengthwise and place in a bowl. Put the grilled eggplants (let whole) aside.

2) Place the tagine on the stove over medium heat. Add the tinned chopped tomatoes, passata, garlic, beef stock and allow it to come to a simmer for 10 mins. Add the okra and cover, allowing the okra to soften (about 10 mins). Add the chilli flakes.

making the spicy tomato sauce

3) Add the sliced roasted capsicum into the sauce and allow it to simmer for another 10 mins. Stirring to make sure the bottom is not sticking. Then switch it off, leaving the cover on.

Add the roasted capsicum into the sauce

4) For the meatballs : Add all the ingredients into a large meta bowl and mix till well combined.

Ingredients for the meatballs

5) Form the meatballs according to the size you fancy and place them on a plate. Heat a heavy based frying pan on medium heat then add the olive oil. Brown the meatballs on both sides then add them into the spicy tomato sauce (in the tagine). Cover and allow it to simmer on low heat for 20 minutes.

Frying the meatballs

6) While the meatballs are simmering away, slice the roasted eggplant into half, lengthwise, and scrape all the flesh into a food processor. Add the garlic, tahini, chilli powder and blend till quite smooth. Add the lemon juice, salt and olive oil. Blend till well combined. Place in a bowl, drizzle with more olive oil and garnish with chilli flakes and chopped parsley.

Moroccan meatballs

7) Garnish the meatballs with fresh parsley and serve with baba ganoush and warm turkish bread!

Moroccan meatballs with baba ganoush and turkish bread

Enjoy! (:

Hope you all had a great weekend and here’s to an awesome week ahead! Remember to always cook and bake with love! Till the next post, xx!

Disclaimer : I was given the tagine by Kitchenware Superstore to test and write a review, but all opinions and experience are based on my time of use! Thanks so much for this amazing tagine! 

Salmon En Papillote

Salmon En Papillote

Cooking. Definitely something I find joy in. Something I love. No matter how tired or long the day is, I always look forward to being in the kitchen. Be it something I’ve cooked many times before, or trying out a new recipe, it always makes a sweet end to my day. Not to mention the smile on the Mr’s face after eating it. Just can’t get any better than this!

Taylors Clare Valley Gewurtztraminer 2011

It’s the time of the month again when Taylors Wines has so generously given me two bottles of wine to taste and come up with a recipe that includes it as well as be perfect to pair with! This month, I decided to choose one that I never had much experience with – The Taylors Estate 2011 Clare Valley Gewürztraminer! This wine is light and crisp, with citrusy notes so I only had one protein in mind for it. FISH!

Salmon en papillote with pan fried jerusalam artichokes

There was one way that I’ve been wanting to try out ever since I’ve had it a few years back. En papillote is a method of cooking where food is put in a folded parchment paper in a shape of a pouch or parcel, and then baked! This method is perfect for fish, cause it keeps its moisture while steaming in the pouch. hehe I was taught this method by the talented chefs from Cookyn Inc, when they came to my place to do a private dinner party for my brother’s birthday! Amazing! So big thank you to them!

perfectly cooked salmon

This method doesn’t take long for the fish to be cooked, and the only time consuming step is the preparation of the ingredients. But once that is done, you get a beautifully cooked fish on your plate within 15 minutes! Of course, that depends on the thickness of your protein. hehe So definitely give this method a try, I’m sure you will love it as much as we did!

Salmon en papillote

Salmon En Papillote (Adapted from Cookyn Inc, serves 4)

Ingredients prepped

4 fillets of salmon, cut into 2 inches in width and skin removed & reserved

1 chorizo, cut into cubes

1/2 green capsicum, cubed

1/2 yellow capsicum, cubed

1/2 lemon, thinly sliced

4 tbs of Gewürztraminer (or any white wine, you could use champagne too if you feel generous!)

Salt & pepper, to season

1 packet of brown shimeiji mushrooms, washed and separated

2 cloves of garlic, finely chopped

1 tbs olive oil

2 tbs unsalted butter

thinly sliced lemon

Steps :

1) Preheat the oven to 170 degrees celcius. Cut 4 pieces of parchment paper (about 30 cm long) and lay them on a flat surface. Then place 3 slices of lemon on the paper without any overlap.

lemon on parchment paper

My paper is fluted and it can be easily done by folding your parchment into a square and then folding it into half diagonally again and again until it gets too small to do so. Then flatten it out before placing the lemon slices.

2) Place the slice of fish on top the of lemon, then add a tbs of chorizo, yellow capsicum and green capsicum.

All ready to be folded

3) Bring the two ends of the paper together and fold it over twice and scrunch them together so they do not unfold. Do the same for one side of the pouch, leaving the other side open.

One side of the pouch left open

4) Carefully pour 1 tbs of Gewürztraminer into each pouch. Then fold the rest of the pouch to seal all the ingredients in. Place the pouches onto a baking tray and bake it in the preheated oven for 17 minutes.

5) While the fish is cooking, heat up a small frying pan and add the olive oil. Fry the garlic till it’s fragrant, careful not to burn them as it will turn bitter. Add the mushrooms and fry till tender. Add the butter and allow it to coat the mushrooms well. Keep it warm until ready to be served.

6) In another frying pan, heat it up on medium heat and place the salmon skin in the pan. Fry both sides till it’s crispy and golden, place on a paper towel to absorb the excess oil. Set aside.

crispy salmon skin

7) To serve : Open the parchment paper, and place the sautéed mushrooms on the fish and top it with a piece of crispy salmon skin. Serve it with your favourite side (I had butter sautéed Jerusalem artichokes with pine nuts) and a glass of Gewürztraminer!

Salmon en papillote - served

Enjoy! (:

Just for fun, I’ve made a short video of the steps from start to finish! Sorry about the background noise but I hope it helps in clarifying how it is done! (:

Thank you Taylors Wines once again for the beautiful Gewürztraminer! It was delicious and definitely one that I can see myself having with my seafood! hehe Hope you all had a wonderful weekend and remember to always cook and bake with love! Till then, xx !

Dry Mee Siam

Dry Mee Siam

Good evening dear readers. I hope you’re having a great weekend so far! Mine has been really relaxing, trying out new recipes and cooking up a storm in the kitchen. It definitely felt good cooking and baking again after quite a long time! One of the things I tried is dry mee siam. hehe If you don’t know what mee siam is, it is a malaysian dish and is similar to fried rice vermicelli with lots of aromatics to make it flavourful and delicious! It’s usually comes with a gravy, but I do prefer the dry version. Every mouthful makes me nostalgic!

Dry mee siam

As my sister-in-law says, it brings the taste of home (有家的味道) ! I was quite worried about how it would turn out, but it was pretty good for a first timer! hehe And quite simple as well! Just blend all the aromatics together, fry, add stock, rice vermicelli, viola! Definitely something you can consider making during parties! I topped mine with prawns, fried beancurd, chinese chives and crispy fried shallots! But you can top it with anything you like, for meat lovers, you could shred some chicken in as well! heh So what are you waiting for? Give it a try!

Dry Mee Siam (adapted from Valee Belly & To Food With Luv)

1 packet of rice vermicelli (about 400-500g)

300g bean shoots

300g prawns, shelled and deveined

100g fried beancurd/ firm toufu, sliced and fried till golden brown

3 hard boiled eggs, cut into halves

10 stalks chinese chives, finely chopped, extra for garnish

2 tbs vegetable oil

2 cups chicken stock

2 tbs fish sauce

2 tbs tamarind paste

2 tsp brown sugar

ground white pepper

fried shallots

1 lime, cut into wedges

Aromatics / Spice blend : 

5 cloves of garlic

10 shallots

20g belachan

55g dried shrimps, soaked and drained

3 heap tbs sambal chilli

2 tbs fermented yellow beans/taucheo (I used crushed salted soya beans)

Blending the aromatics

Steps :

1) In a blender, place the garlic, shallots, belachan, dried shrimps, sambal chilli and fermented yellow beans. Blend till it becomes a fine paste.

Blended aromatics

2) In a heavy based frying pan or wok if you have one, heat the vegetable oil on high heat. Add the prawns and fry till its cooked through. Set it aside. Fry the blended aromatics for about 8-10 minutes, till fragrant. Remember to keep stirring it so that they do not burn.

3) Add the chicken stock, fish sauce, brown sugar and tamarind paste and bring the mixture to a boil, lowering the heat and allow it to simmer for 5 minutes.

4) Add the rice vermicelli and bean sprouts and mix well till well combined. Toss it well to make sure the rice vermicelli is well coated and the liquid is absorbed and almost dry. Add the chives and give it another good toss.

5) To plate, place some dry mee siam on the plate/bowl, top it with hard boiled eggs, fried beancurd, prawns, more chives, fried shallots and a wedge of lime. Remember the lime as it gives the dish a sourish and refreshing kick!

Dry Mee Siam

Now it’s time to sit down and enjoy! (: Hopefully you’ll love it as much as we did! Brought us straight back to Singapore hehe

Remember to always cook and bake with love! 

Babi Guling

Babi Guling

Good evening dear readers. So sorry for the lack of posts of late! Been really busy at work, and will crash the moment I hit the beds! But tonight, to make up for it, I’m going to share a recipe that would make you salivate from start to finish! Babi guling! I’m not sure if you have had this before, but let me tell you, it’s something you definitely want to try!

babi guling in Ubud

The first time I had babi guling was in Ubud when the Mr and I went for our honeymoon! (: It was highly recommended by a close friend, and the moment we tried a mouthful, we understood why. It was absolutely delicious. The meat was so tender and melts in your mouth. The skin was so crispy! Just the way we love our pork! hehe While walking to the shops after our delicious meal, we were lucky enough to see one of the suckling pigs delivered to the shop on top of a man’s head! hehe Love to see things that we don’t get to see everyday. Made our trip more memorable! The suckling pig was roasted to perfection! We were so tempted to have another plate just looking at it! hehe

Babi guling out of the oven

My memories were triggered when I was watching MKR and the winning team made their version of babi guling. It looked so so good and I was hoping they would post their recipe on the MKR website. Thankfully, they did! The mr requested for me to make it a few weekends ago and I happily and most willingly did! (:

spice paste - base gede

When I made the spice paste (base gede), I knew immediately it was gonna be really good as it smelt really close to the one we had in Ubud! I got more and more excited as the spices were blending as the smell of the aromatics just filled the kitchen. I couldn’t wait to get it into the oven and bake it! hehe The only thing that I would do when I make it again is to marinade the pork with the spice paste for at least a couple of hours, so that it would flavour the meat more!

Babi guling - sliced

Other than that, everything was perfect, from the crispy skin to the tender meat. Absolutely divine! We just wanted to finish everything, but had to leave some for lunch the next day! hehe So do give this a try, it’s no surprise why Dan & Steph are the winners of MKR. Their recipe was spot on and definitely a keeper! heh Please don’t get overwhelmed by the amount of ingredients! It’s really worth the trouble of finding them all!

Babi guling - Served

Babi Guling (Recipe adapted from MKR)

1.5kg pork belly, rind scored

2 1/2 tbs olive oil

300ml coconut milk

100g bean shoots

2 tsp kecap manis

A bunch of bok choy, boiled and drained

2 tsp shallot oil

Steamed jasmine rice, to serve

Spice Paste (Base Gede)

Juice of 1 lime

4 long red chillies, deseeded

1 stalk of lemongrass,  white part only, bruised and finely chopped

4 green spring onions (white tender part only) roughly chopped

2 cloves of garlic

2cm piece of fresh ginger, finely chopped

2 cm piece of galangal, finely chopped

1 tbs ground tumeric

1 tbs ground coriander seeds

1 tbs vegetable oil

1 tbs palm sugar

2 tsp ground black pepper

1/2 tsp shrimp paste

1/2 tsp salt

Sambal (For the bean shoots)

4 green spring onions (the green part)

2 small red chillies, deseeded

2 cloves of garlic

 1 cm piece of fresh ginger, finely chopped

1 lemongrass (white tender part only), bruised and finely chopped

2 fresh lime leaves

1/2 tsp shrimp paste

Juice of 1/2 lime

1 tbs vegetable oil

1/2 tsp salt

pinch of ground black pepper

Spice paste rubbed on pork belly

Steps :

1) Preheat oven to 240 degree C.

2) To make spice paste, process all ingredients in a blender to form a smooth paste. Reserve 1/4 cup for the sauce.

3) Lightly prick the meat side of pork with a sharp knife or skewer and rub in spice paste in a thick layer. Roll lengthways and secure at several intervals with butchers string. Place in a baking dish. Rub salt into skin.

Spice paste and pork belly

Spice paste evenly spread on the meat side of the pork belly

All rolled up!

4) Roast for 20 minutes. Reduce oven to 175 degree C and cook for a further 1 hour 15 minutes or until tender and cooked through. Remove from oven. Rest lightly covered with foil for 30 minutes.

Babi guling - ready to be sliced

5) To make sauce, heat 2 teaspoons of the oil in a small saucepan over medium heat. Add reserved spice paste. Cook for 5 minutes or until fragrant. Stir in coconut milk and juices from rested pork. Bring to a boil. Simmer for 5 minutes.

6) To make sambal, process all ingredients until smooth.

7) Cook bean shoots in a saucepan of boiling salted water until tender. Drain and set aside. Heat a lightly oiled frying pan. Cook sambal until fragrant. Add bean shoots and toss to combine. Stir in kecap manis.

8) In the same pot of water, boil the bok choy until tender, drain and place in a bowl. Add the shallot oil and toss it well.

8) To serve, slice the pork into 1-inch pieces and serve on hot steamed jasmine rice with the sambal bean shoots, bok choy and lots of sauce.

Babi guling with sambal bean shoots and sauce

ENJOY! (:

Babi guling - Served

So dear readers, hopefully you’re not too hungry after reading this post! But do give this a go as you would definitely not regret it! Especially if you and your loved ones are meat lovers. This is definitely a dish for you! (: Hope all of you had a good (and delicious) weekend! Here’s to a good week ahead!

PS : The sauce is so good, even my mr who usually isn’t a fan of sauce couldn’t stop pouring over his rice! hehe

Remember to always bake and cook with love!

Prawn Aglio Olio & A Wine Giveaway {Winners Announced}

Prawn aglio olio with Taylors Estate Pinot Gris

Good evening my dear readers! (: I hope that all of you had a wonderful weekend especially if you had a long one because of the Anzac Day holiday. I’ve got some exciting news to share with all of you! (: A week back, I received an email from  Taylors Wines who wanted me to do a wine giveaway on my blog. Of course, I said yes! hehe I was also so lucky to received not one, but two bottles of Pinot Gris to taste! How generous are they? Couldn’t be happier!

Pinot Gris came in the mail

Before I go into more details of the wine and the giveaway, I would like to tell me my thoughts about the Pinot Gris! Pinot Gris has always been one of my favourite type of wine. hehe I had a glass before bed one night, and really love how clean and crisp it tasted with tones of pear and apple. I knew instantly what would pair with it perfectly – seafood. My dearest husband read my mind, and made an amazing prawn aglio olio with pan seared scallops for dinner the following night!

Prawn aglio olio with seared scallops paired with a glass of pinot gris

He even used some of the wine in the sauce and it was so good! I wanted more (: The prawn and scallops were so sweet & succulent, it just complimented the wine perfectly.

Prawn aglio olio with seared scallops

Prawn Aglio Olio with Pan Seared Scallops (The mr’s original recipe, serves 2)

5 cloves of garlic, finely chopped

3 small chillies, de-seeded and finely chopped (you can increase or reduce the amount of chilli depending on how spicy you like your dish to be!)

2 tbs fresh basil, finely chopped

1/2 cup white wine (I used Taylors Estate Pinot Gris)

2 tbs olive oil (plus an extra tbs for the scallops)

Salt & pepper, to season

12 prawns, peeled and cut into chunks

6 scallops, left whole

Pasta of your choice

Freshly grated parmesan cheese, to garnish

Steps :

1) Cook the pasta according to the instructions on the package. Strain and run under cold water so that the pasta will not stick together. Set aside while cooking the sauce.

2) In a heavy based pot, heat the olive oil on medium fire and fry the garlic and chilli till fragrant.

3) Add the prawns, and fry till it’s coloured and no longer translucent. Add the chopped basil and white wine. Allow this to simmer for about 5 minutes.

4) Pour the pasta into the sauce and mix it well. Set aside, and keep it warm.

5) Pat dry the scallops and season with sea salt. Heat a non-stick pan on low-medium fire and add 1 tbs of olive oil. Place the scallops into the pan and flip every 30 seconds. Repeat each side for about 3 times, or until the scallops have a nice golden brown sear.

6) Place the pasta on a plate and top with 3 scallops per person. Garnish with some freshly grated parmesan cheese. Serve with a glass of Pinot Gris. ENJOY!

Prawn aglio olio with seared scallops

And now, the part that you’ve been waiting for so patiently…. the giveaway! (:

Taylors Wines is a family-owned wine company, in South Australia’s stunning Clare Valley, that was born from a passion of producing exceptional,  hand crafted wines. They are “Bringing great wines to life” and would love to give two lucky readers two bottles of their beautiful Taylors Wine –  Taylors Estate Pinot Gris 2011 and Taylors Estate Shiraz 2010.

Taylors Estate wines

How do you win these amazing wines?

To enter this giveaway:

  • All you have to do is to leave a comment at the end of the post to let me know : What is your favourite wine and what do you like to pair it with? 
  • Open to Australian residents only! (So sorry!)
  • Please make sure you’re of a legal drinking age and be able to provide a proof of age (it is needed to be sent to the company before they can send you the wine)
  • The winners will be drawn on the 5th of May 2013, Sunday at 10pm (Melbourne time).
  • You may reenter daily, one entry a day (YAY!)
  • Winner will be picked via random.org and announced on this blog and notified via email

Good luck and have a great week ahead! (:

Remember to always cook and bake with love!

This is a sponsored post by Taylors Wines. I tasted the Pinot Gris with compliments of Taylors Wines, however, the review, opinions are honest and based on my personal taste and preference. The recipe is a Food Made With Love original.

~~~~~~~~~~~~~~~~~~~~~~~~~~~~~~~~~~~~~~~~~~~~~~~~~~~~~~~~~~~~~~~~~~~~~~~~~~~~~~~~

And the winners are….. Diana and Coco!! (: Congratulations!

Winner - Number 4

Diana

Winner - Number 13Coco

Congratulations you two! (: Will be dropping you an email or a reply soon! Hope you enjoy the wines! hehe Have a great week ahead! xx

~~~~~~~~~~~~~~~~~~~~~~~~~~~~~~~~~~~~~~~~~~~~~~~~~~~~~~~~~~

Update : Unfortunately, I can’t get hold of Diana and Ross (who was picked after not hearing from Diana) so I had to pick another winner! Congrats Zoe!! (: Hope you will enjoy this wine with Jeff!

New winner

comment number 20

Bring It On : Pizza Fight At The Grosvenor Hotel

The Grosvenor Hotel

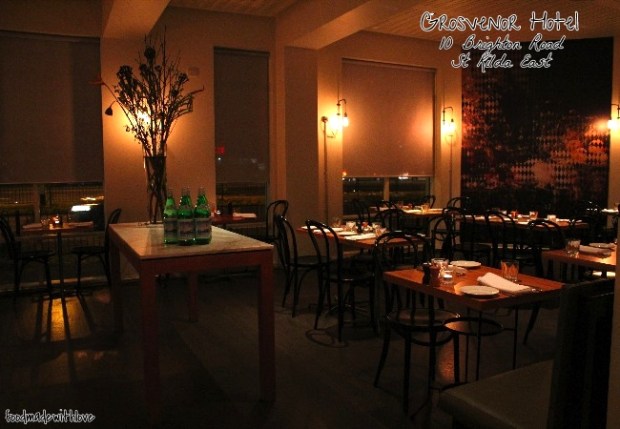
Don’t worry dear readers, this was not a physical fight! hehe It was more of a challenge. One that involves creating the best pizza and be crowned the champ! (: Thanks to the Grosvenor Hotel and Tink PR, some food bloggers and I had the chance to get flour all over our fingers and learn the art of making a good pizza dough. I was definitely looking forward to creating my very own pizza! To be honest, I didn’t realise how serious the competition was until everyone was tweeting about bringing their own secret ingredient! And when I went empty handed, only one thing was on my mind ” uh-oh, I’m in big trouble ” haha. It made me super duper nervous! In addition to that, it was my first time meeting most of the people invited for this challenge – Iron Chef Shellie, I Eat Therefore I Am, I’m So Hungree, Brunch Addict, Sweet Cherrie Pie & Ms D (Never Too Sweet For Me). But I have to say, I really didn’t need to be nervous, cause everyone was so friendly (with their game face on hehe) and we had so much fun from the start to the end! Definitely a night to remember! (:

Passionfruit, lime and basil cocktail

When everyone arrived, we were brought to our table by the gorgeous Julia (From Tink PR) and introduced Chef Emile to us! In the midst of all the introductions, the table was filled with a spread of chicken liver parfait & hot bread, antipasto and some arancini balls.

Chicken liver parfait & antipasto

The chicken liver parfait was my favourite! It was so smooth and just perfect when spread on the bread. YUMS!

Arancini balls

The arancini balls were the perfect bite size, and had bits of chicken in them! After filling out tummies, we headed towards the kitchen to learn about making the dough.

Ingredients for the pizza dough

We each had our own dough to work on, and boy was it a work out to just get the dough right! I was standing next to Thanh and we just couldn’t stop laughing as we went along! We were lucky enough to have Chef Emile and Stefano there to give us a hand and to make sure we are on the right track!

Chef Emile & Stefano giving us a hand or two!

My own pizza dough

After what felt like hours, our dough was finally ready to be cling wrapped and proofed!

Stefano distributing the dough

While our doughs were proofing, Stefano took out a whole tray of perfect looking doughs so that we could learn how to stretch them by hand! The right hand stretches while the left hand rotates the dough! Definitely easier said than done, but I had so much fun! It was like playing with playdough haha

The pizza base is formed by hand

All stretched out!

It was even an art to place them on the wooden boards before putting the ingredients on!  And at this point, everyone had their game face on and were all ready for the challenge! 

Thanh and I with our

(Photo credits : Thanh from Instagram)

I stole this photo from Thanh cause it shows exactly how prepared we were with our “ping pong” bats! From the grin on our faces, you know how much fun we’re having! hehe

All getting ready to create our pizzas in groups

We all gathered around the table and Julia starts explaining how the challenge will be carried out. We were split into three groups so that the wood oven pizza won’t be over crowded. So off went the first group of savouries!

Bakkwamon by Ashley of I'm So Hungree

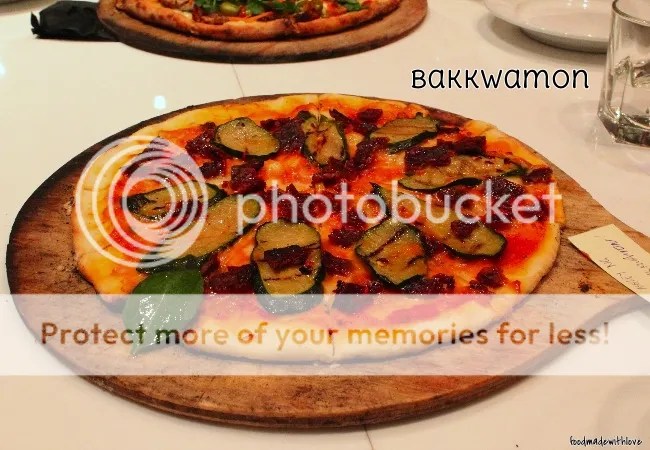
The first was Bakkwamon by Ashley of I’m So Hungree and it was inspired by her dad! Her secret ingredient was homemade bak kwa! Plus her pizza base was the gluten free one! hehe It was so delicious! I could just eat the bak kwa all night long! (:

Banhmigeddon by Shellie of Iron Chef Shellie

This was one of my favourites of the savouries for the night! It was Shellie’s (Iron Chef Shellie) banhmigeddon! The lemongrass chicken was SO GOOD! I was super tempted to go for seconds but had to control myself cause I had alot more to taste through the night hehe

The Karaage Kid by Thanh of I Eat Therefore I Am

Thanh (I Eat Therefore I Am) made the karaage kid – He brought in pieces of crispy karaage (fried chicken) and drizzled yummy roasted sesame sauce! That’s pure magic and was also one that I really enjoyed for the night! (:

Second round includes :

Fiddle to the Fennel By Scott of Brunch Addict

Fiddle to the Fennel was created by Scott of Brunch Addict! How cute is the name? I’m not a but fan of fennel but this was so good and the sweetness of the caramelised onions just stood out with every bite! Noms!

Baa Baa's Delight by Sabrina of Brunch Addict

Sabrina of Brunch Addict made Baa Baa’s Delight and how pretty are the beets on the pizza? With the classic combination of lamb and minted yogurt, this was also really good! In fact everyone’s pizza were awesome creations and it was so difficult to rate them!

After all the savouries, of course up comes the sweets! Even though we were all quite full by then, there is always room for dessert yes? YES! Cause I decided to walk on the sweet side that evening, together with Miss D (of course!) and Cherrie! We were spoilt for choice for the ingredients and ended up using almost similar things with slight variations of each! So it was definitely a close fight!

Bananas about Dulce de leche and bacon by Cherrie Moore

Cherrie made hers with a dulce de leche base, mashed banans, almond flakes and her secret ingredient, bacon! The combination of sweet and savoury was just brilliant! Almost reminded me of the Elvis sandwich which I LOVE! hehe

Sweet Attack by Daisy of Never Too Sweet For Me

Our dearest queen of sweets, Daisy (Never Too Sweet For Me) of course created a dessert pizza for the night! hehe Her was called ‘Sweet Attack’ and it had dulce de leche as the base, with almond flakes, almond crumble, honeycomb and nutella! It was deliciously sweet! hehe Everyone loved it! Noms!

Banana Nut Cracker by Me!

Last but not least, it’s my creation : Banana nut cracker ! I was thinking about breakfast cereals for some reason, so I decided to do a breakfast inspired one with butterscotch sauce, bananas,  almond crumble, flaked almonds, walnuts and sprinkled with some cinnamon sugar. Of course, I’m biased and I did like mine! haha I think just cause it’s everything I love on a plate! Especially the subtle hit of cinnamon with every bite. Reminds me of cinnamon sugar churros! NOMS! hehe

Once everyone had scored their peers (including our own creations), Julia and Chef Emile went into another area to add up the scores and after 20 minutes, the winners were announced! There was a tie in the first place and it was none other than the Banhmigeddon (by Shellie) and Sweet Attack (by Daisy)! Congrats girls!! And to my surprise, I came in second! WHEEEEE! (: And our pizzas went on as their specials the following day and will be on their specials for the next week for everyone to try!

Specials menu at Grosvenor Hotel

So I need your help dear readers! Please head to the Grosvenor Hotel’s Facebook page and vote for my pizza! Every single vote counts! Plus if you are around the area, or feel like a pizza for dessert, do head down to Grosvenor Hotel to get some. You can either dine in or takeaway and for just $17 (and $12 on Tuesdays!). Every pizza you order is considered a vote too!

Vote for me please! (:

So do click on the link above or just head to https://www.facebook.com/grosvenorhotelstkilda and search for the picture of my pizza and “like” ! Your help and support is greatly appreciated! (:

Facebook page

Thank you all once again and especially those who have already voted! One more week and the winner will be announced! hehe Fingers and toes crossed! (: Thank you Grosvenor Hotel, Chef Emile and Julia for organising such an awesome event!

Disclaimer : I was invited to this pizza making event as a guest of Grovenor Hotel and Tink PR.

Fusion Friday : Seafood Green Curry Penne

TGIF everyone! (: I’m sure everyone is as thankful as I am that the weekend is here and if you’re as lucky, you would have Monday off and thus having a long weekend! Hurray! To celebrate, I’m going to share with you the recipe I promised from my last post of the Fresh Food Market at Highpoint!

I have to say, I’m not a huge fan of fusion food, but I will never turn down the chance to try it when it is presented in front of me. So as I was walking around the Fruit & Vegetable market and bouncing ideas off the Mr, he suggested that I should do an asian flavoured pasta dish! WAH! Why not, yes? So the first thing that came to my mind was green curry! I see this less fusion, more a pasta with an asian flare! hehe

I do apologise that I didn’t quite have the patience or time to make my own green curry paste, but I did find one that I’ve used before, so I knew it would taste yummy. If you have a green curry paste recipe to share with me, I would be more than happy to try it during my holidays! (:

So these were the ingredients I used for my dish. Which includes fresh ingredients that I got from the market, and a few that came in the hamper given by compliments of Highpoint and Mango! (: I am sure you have some things in the pictured stored in your pantry. I realise I didn’t place the onion and garlic that I used from my pantry in the picture. hehe But I’ve definitely written them in my recipe, so fear not!

This pasta dish definitely has a kick to it. It might most definitely be the green curry paste I used but I do love a dish with that leaves my tongue tingly and tummy warm and fuzzy! hehe So if you do like spicy food, and want to try something different, I urge you to give this a try! The Mr and I both loved it and would definitely make this again soon! (:

Seafood Green Curry Penne (a Food Made With Love original recipe, serves 4)

1/2 large onion, finely chopped

3 cloves of garlic, finely chopped

5 shiitake mushrooms, cut into quarters

3 green thai eggplant, cut into quarters

4 purple thai eggplants, cut into wedges

3 small Adelaide tomatoes, cut into chunks

5 grape tomatoes, sliced into half

50g fish cake, cut into strips

100g green curry paste

400ml light coconut milk

300ml water

500g supreme marinara mix

400g dried penne (or any type of pasta you prefer)

2 tbs olive oil

handful of Thai basil leaves

fried shallots and coriander, to garnish

Steps :

1) In a large pot of water, add some salt and bring it to a boil. Cook pasta according to the directions on the packet. Drain and run it under cold water. Set it aside while preparing the green curry.

2) In a frying pan/wok, heat the olive oil on medium heat and fry the green curry paste till fragrant. Add the chopped onion and garlic and fry till it’s soft. Be careful not to burn the garlic, as there would be a bitter after taste.

3) Carefully add the coconut milk into the pan. Stir it until the paste is mixed well and combined with the coconut milk.

3) Add the eggplants and cover the pan, allowing it to simmer for 10 minutes. Then add the tomatoes and mushrooms and return the lid on the pan. Simmer for another 10 minutes or until the tomatoes are soft.

4) Add the water, fish cake and seafood and allow it to come to a boil. Careful not to boil it for too long, as the seafood might over cook and get tough! Add the thai basil leaves and stir it into the sauce.

5) Pour in the cooked pasta and toss it well, making sure every single penne is coated with the sauce. If it’s looking a little dry, add a bit more water and give it a good stir.

6) Garnish with fried shallots and chopped coriander before serving.

Enjoy! (: I know it seems like alot of preparation to go through, but do give this a try and let me know what you think and if you added other things! Would definitely love to try other combinations. Have a great weekend everyone! (:

Remember to always cook and bake with love!

Oven-fried Chicken

Fried chicken. How could you not like fried chicken? I would happily chow down two without much thought! haha But what could be better than fried chicken? Oven-fried chicken of course! Anything to make it feel a little less sinful than the oil-fried version. Just so you could enjoy it guilt-free. Definitely a win-win, if you ask me! (:

I chanced upon this recipe on Everyday Maven, and was coincidentally craving for something fried. It’s really quick and easy as well! Even though it’s baked, the chicken is so crunchy with every bite! The mr and I are addicted to it! We had it twice in a week. Definitely gonna make this for my family at the end of the year.

The chicken pieces were coated with crushed melba toast. I have to admit, I’ve heard of melba toast a number of times, but never really tried it or used it to cook. These were mini toasts that were baked and they were really amazing! Unlike normal bread crumbs, these ensures that the coating remains crunchy and not get soggy even after being baked. Would definitely not hesitate to use melba toast in the future! hehe

And what goes well with fried chicken? A side of kipfler and broccolini salad of course! Of course if you want to keep to the healthy-theme, you could always have it with a side of salad. Your tummies will still be satisfied. (: So I urge you to give this a try, you will never need to feel bad about have fried chicken ever again! hehe

Oven-fried Chicken (adapted from Everyday Maven)

800g chicken pieces (skin removed)

1 box of Melba toast (5-ounce/142g), crushed

1/2 tsp garlic salt

3/4 tsp ground black pepper

1/2 tsp cayenne pepper

3/4 tsp hot paprika

1/2 tsp dried oregano

1/4 cup kewpie mayonnaise

1 tbs Dijon mustard

Steps :

1) Place the melba toasts in a zip lock bag. Using a rolling pin, crush them till they are relatively fine, leaving some little pebbles for texture and maximum crunchiness. You could also place them in a food processor, but be careful not too completely pulverize them.

2) Add the garlic salt, black pepper, cayenne pepper, paprika and dried oregano into the zip lock bag and give it a good shake. Pour the seasoned crumbs into a plate.

3) In a separate bowl, mix the kewpie with the dijon mustard and mix till well combined.

4) Preheat the oven to 200 degrees celcius. Coat each piece of chicken with the mayo mixture (just enough to lightly coat) and roll it in the melba toast crumbs. Make sure the chicken pieces are covered well and evenly.

5) Place the chicken pieces on a cooking rack and place in the oven to bake for 40 minutes.

Enjoy it with a side of your choice! (: Don’t worry, I didn’t only have one piece. hehe I couldn’t resist another (or two)! Have a great weekend everyone!

Remember to always cook and bake with love!