Toddler Eats : Cheesy Chicken & Veggies Meatballs

unnamed-2-1-1

Now that Lochlan has turned one (where did time go??), I’m trying to wean him from purees and introduce chunkier food, to encourage him to chew. Don’t get me wrong, he knows how to chew. But just prefers the purees cause he could finish it much quicker. haha So this marks the start to my new series of Toddler Eats! Hopefully it will be helpful to mummies out there who also want to try different foods and make them from their kitchen when time permits!

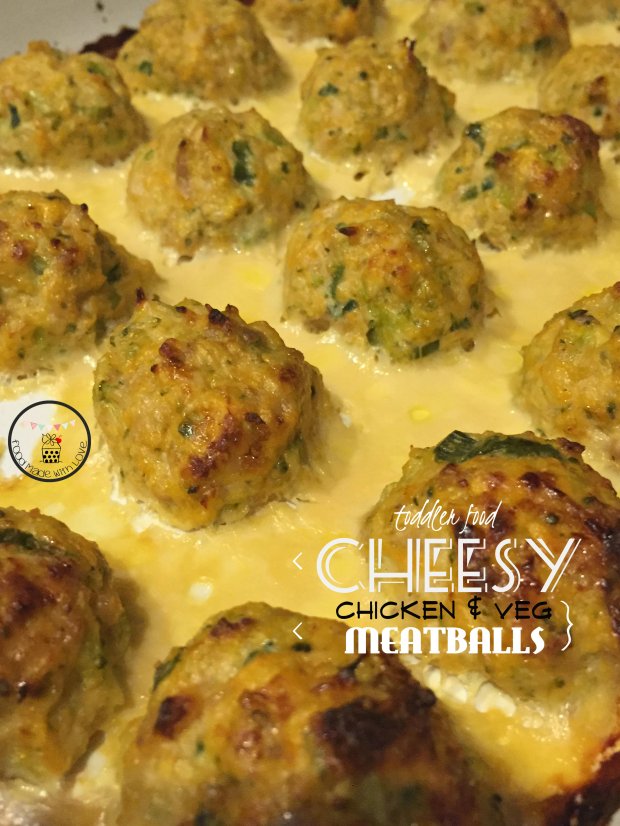
I decided to try making something I thought he might like! I mean, who doesn’t enjoy a good meatball? Especially with the addition of cheeeeese! These are quick and easy and you could have it on its own or mix it with pasta and some homemade tomato sauce and viola! Meatball pasta!

Meatball pasta

Lochlan’s Verdict : 2 1/2 meatballs (together with other food for dinner and strawberries for dessert hehe). I think thats a not too bad start!

 With the addition of cheese, you don’t even need to add salt to it. So it’s perfect even for babies from 10 months! Especially if you wanna do Baby-Led-Weaning. hehe Perfect finger food! These are not just for your little ones at home, the mr and I enjoyed it too!

So here’s the recipe, do give it a shot and let me know what u or your kiddos think!

Cheesy Chicken & Veggies Meatballs (A Food Made With Love Original Recipe)

Ingredients : Makes 24-26 meatballs

250g mince chicken (or meat of your choice)

2 stalks of spring onions, finely sliced

1 small carrot, grated

1/4 apple, grated

2 cloves of garlic, finely chopped

1/2 zucchini, grated

2-3 florets of broccoli, finely chopped

50g cheddar cheese, grated

1 egg

Ground black pepper, to season

Ingredients

(I’ve got a double yolk! Lucky me! hehe)

Steps :

1) Preheat your oven to 170 degrees celcius. Spray/Oil a baking tray/ casserole dish and set it one side.

2) Mix all the ingredients in a big bowl until well combined.

Mixed till well combined

3) Using a tablespoon, roll the mixture into balls. Do note that the mixture will be a bit wet and sticky. Wetting your hands might help in the rolling process.

Rolled out

4) Place the meatballs onto the baking dish, and bake for 12-15 mins, until the meatballs are cooked through and/or slightly browned.

All baked

5) Serve as is or you could cook it in a homemade tomato sauce and toss it through some cooked pasta for a variety!

Enjoy!

P.S : You don’t have to grate the vegetables if you’re cooking for yourself or older kids and want more texture. Just finely diced them and it would be as delicious! Also you could always change the types of vegetables in the meatballs, find a combination that wins the most votes in your house! (:

Have a lovely weekend everyone! Remember to always cook and bake with love!

Till the next post, xx !

Chicken Tagine – MealDish

chickentagine-1-1

Good evening dear readers! So sorry for the hiatus! It’s been a busy few months with Baby Ho’s grandparents (both paternal and maternal) and uncle & aunty coming to visit him consecutively! So I haven’t had the chance to sit down and churn posts out! But I will be doing it whenever I can, I promise!

So a few months back, I was introduced to MealDish. A website that aims to help people eat healthier, eat fresh, whilst minimising food waste and saving them time and money. This was absolutely perfect for me, especially since I can only get down to cooking with Baby Ho is asleep!

So off I went to the website and it’s so simple to use and follow!

MealDish 1

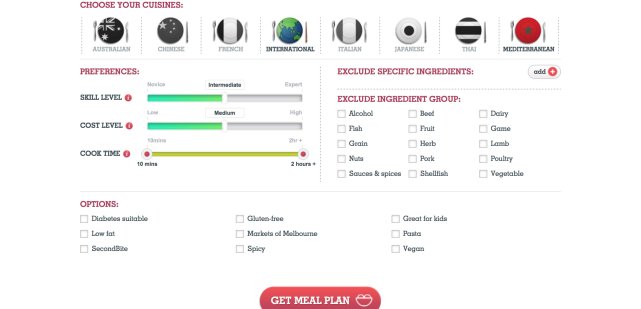
You just have to choose what you like, the number of recipes you want and then click the number of people you’re cooking for and get a meal plan! As easy as that!

MealDish 3

If you have any particular cuisine you would like to try, or specific ingredients to exclude or you have intolerances, there are options for you to tick too! So it’s really for everyone. I did different options and there are heaps of recipes to choose from. They even suggests side dishes that would go perfectly with the recipe you decide to cook that day. Sounds good, no?

MealDish 2

So I decided to just go with the quick option and choose the type of protein I wanted to cook with – Chicken! These were the 5 options I was given, and straight away I was drawn to the chicken tagine recipe, especially cause my beautiful tagine has been sitting on the shelf ever since I made my Moroccan meatballs one and half year ago! haha So it was time to get it on the stove again.

MealDish 4

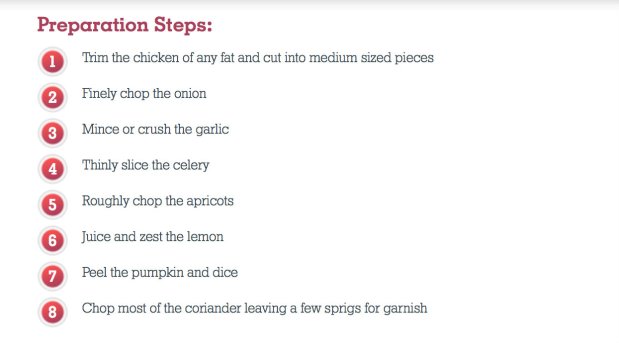
If you’re a person who loves order and likes to get everything ready before you cook, Mealdish is definitely for you. The recipe comes with ‘Preparation Steps’ so that you have everything ready to go when you start cooking, missing nothing out! This cuts your cooking time and dinner will be on the table, pipping hot, in no time!

MealDish 5

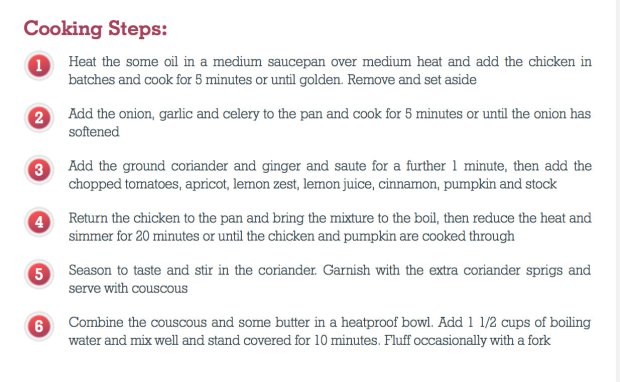
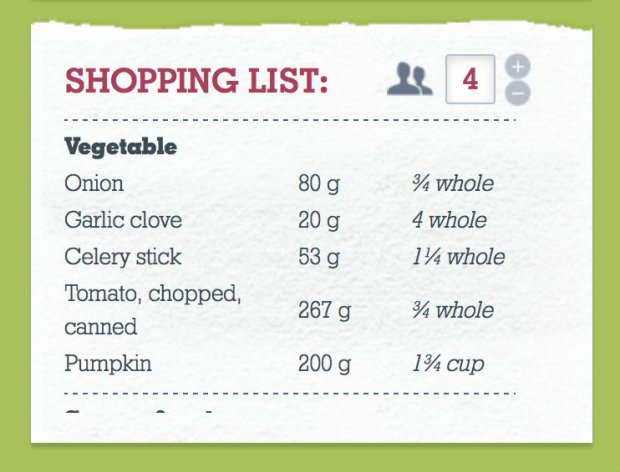
Of course, there’s ‘Cooking Steps’ which are clear and easy to follow. What’s best about this website is that they have a ‘Shopping List’ tailored to the number of people you are cooking for. So there’s no waste and you just buy what is needed!

MealDish 6

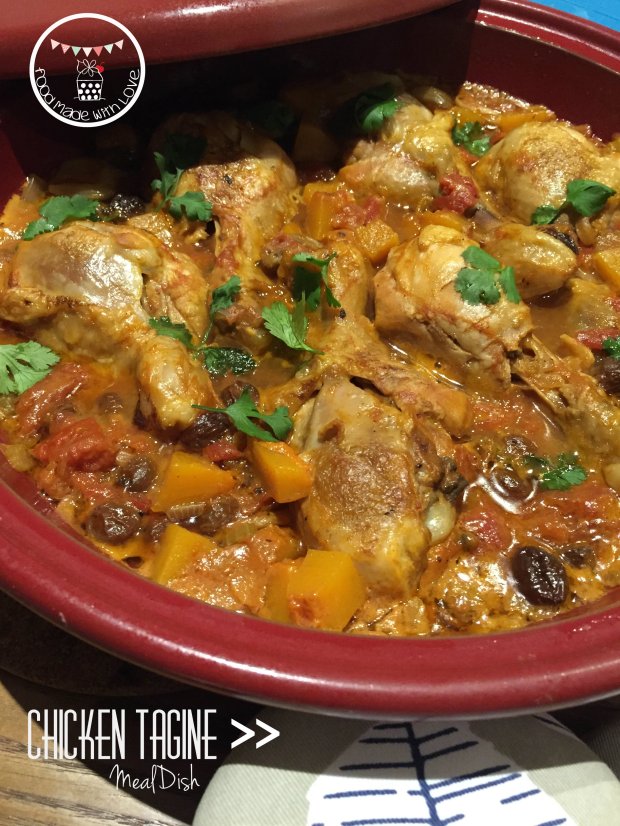
Chicken Tagine

The results were as good as I thought it would be! The Mr loved it and even though I made enough for 4 people, we only had a serve left! What’s best is, this recipe had both protein and vegetables rolled into one! So we only needed that one dish for dinner. Paired with toasted Turkish bread – Dinner was ready within an hour!

So if you are looking for inspirations to cook your family or even just yourself something delicious, and want something quick and easy, hop onto the MealDish website and you will definitely find something you fancy!

Here’s the ingredients used for this dish. The steps are as described in the ‘Cooking Steps’ above! Or you could always just head to the website and search for the recipe to get the ingredient amounts tailored to the number of people you are cooking for!

Ingredients :

(For 4 people)

3/4 Onion whole

4 Garlic cloves

1 1/4 Celery stick

3/4 can tinned tomato

200g Pumpkin

2 tsp Coriander

3/4 tsp Ground Ginger

3/4 Cinnamon Stick

1/4 Lemon

1/4 cup apricot (I used raisins)

3/4 cup Chicken stock

8 Chicken drumstick

3/4 cup couscous

2 tbs fresh coriander

Chicken Tagine

Have a great rest of the day and hope you all will have an awesome hot dinner tonight since it’s freezing here in Melbourne!

Till the next post, remember to always cook and bake with love! xx

Ratatouille & A Good Food and Wine Tickets Giveaway!

Ratatouille

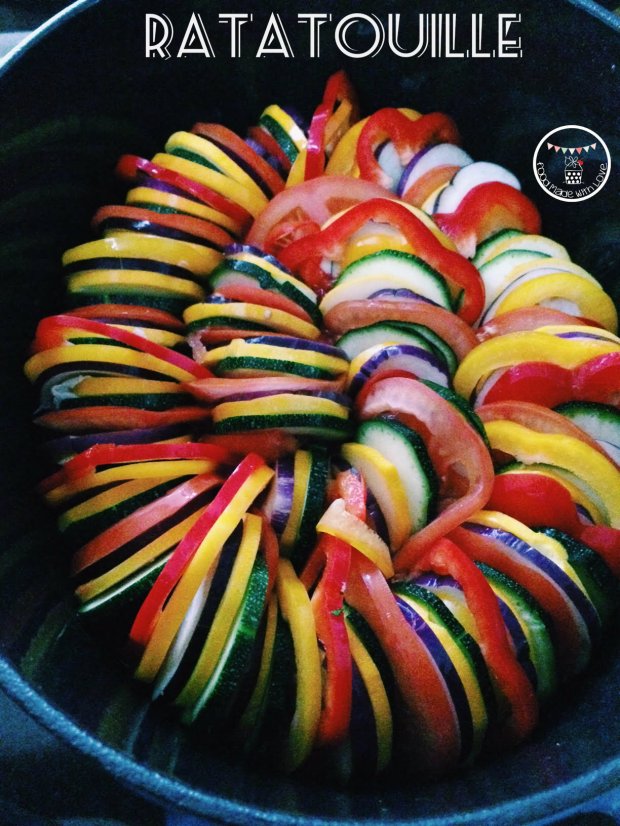
I’ve always wanted to give this a try. Ever since I watched the little rat who could cook this dish perfectly in Ratatouille! The vibrant colours just catches my eye instantly, and I think it’s such a celebratory dish – A celebration of colours!

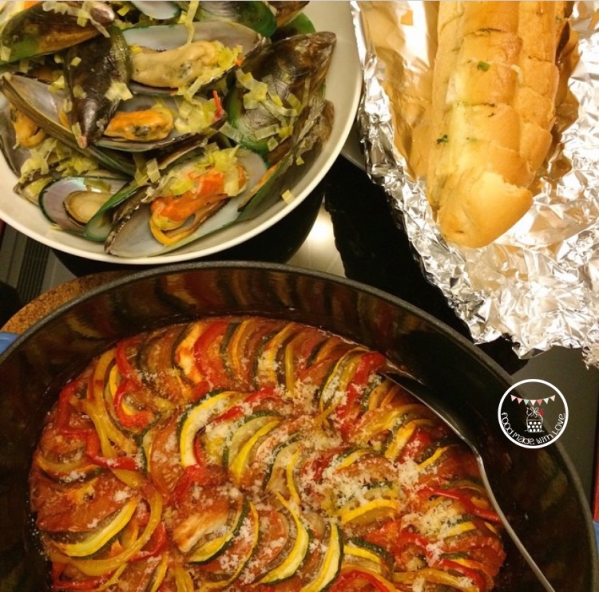
Also, it was my brother’s birthday and I just wanted to cook him something special! Of course, I didn’t only cook him one dish, I made 4! haha This dish pairs perfectly with seafood, so I made some white wine and cream mussels, homemade garlic bread and mushroom risotto! Mmmm!

kors birthday

mushroom risotto

Don’t you love just cooking for people you love? It’s seriously something I love to do. And seeing their reaction when they take the first bite, it’s worth all the time and effort!

Ratatouille

Making the ratatouille was so much fun! One reason was that I got to play with the mandolin. Slicing those vegetables into the same thickness couldn’t be any easier! Fastest prep ever! haha So if you would like to impress your guest the next time u cook for them, I highly recommend making them ratatouille! My family loved how it looked, and enjoyed every single bite!

Ratatouille

Ratatouille (Adapted from The Walsh Cookbook)

Ingredients : 

1 medium green zucchini

1 medium yellow zucchini

1 eggplant (preferably the thin ones)

1 red capsicum

1 yellow/green capsicum

3 tomatoes

1 red onion, diced

2 cloves of garlic, finely chopped

1 can of tomato puree

1 tsp red chilli flakes

1 tsp italian herbs/ mixed herbs

1 tsp salt

2 tbs olive oil

Parmesan cheese

Steps :

1) Preheat oven to 170 degrees celcius. Try to get the vegetables around the same size, so that they would look neater in your dish! Slice all the vegetables using a mandolin and set aside.

2) Heat a cast iron pot (or any pot that can be used in an oven) over a medium-high flame. Add the olive oil, garlic and onion and sauté till fragrant, careful not to burn them, as they will have a bitter after taste. Add in the tomato puree, salt, herbs & chilli flakes, and allow it to simmer for 5 mins.

3) Carefully arrange the vegetables, alternating the slices of zucchini, eggplant, capsicum and tomato. Continue laying them till you fill your dish and cover with a baking paper to allow it to steam and cook, keeping all the juices in. Bake for 45 mins.

Covered with baking paper

4) Remove the baking paper and sprinkle the parmesan cheese over the top and serve!

How easy is that? And I can promise you that everyone will definitely enjoy this! So definitely give it a try when you can!

~~~~~~~~~~~~~~~~~~~~~~~~~~~~~~~~~~~~~~~~~~~

Okie. So now… time for the GIVEAWAY!

GFWS Citi_Logo 2015-02

So everyone knows the one event I look forward to every year is no doubt the Melbourne Good Food and Wine Show. Endless food & wine, beautiful produce and you get to meet your favourite chefs!

Good Food Theatre

This year, I am lucky enough to be given 2 double passes to giveaway to my readers! Whoopeedoo! What’s more exciting is that this year, Ainsley Harriott will be there for all 4 days of the show (5-8 June), along with Miguel Maestre & Alastair McLeod! So you definitely don’t want to miss the show this year! I can still remember when the Mr bought me tickets to a Private Dining session with Manu Feildel 3 years ago! Definitely a dream come true and an experience I will never forget!

How do you win those tickets? Easy!

  • Leave a comment and share with me the favourite dish you love to cook for your loved ones for a special occasion!
  • This giveaway is only open to Australian residents! (Sorry international readers!)
  • Please join me on my journey! Follow me on FacebookInstagram and Twitter! Let me know once you have followed me!
  • You may re-enter daily! One entry a day! (Oh yeah!)
  • Winners will be announced on the 29th of April, 10pm.
  • Winners will be picked via random.org and notified on this blog post and via email.

So what are you waiting for? Let’s go!

~~~~~~~~~~~~~~~~~~~~~~~~~~~~~~~~~~~~~~~~~~~~~~~

WINNERS!

Congratulations to Good Food Good Karma and Ross! Here’s what they said :


Comment Number 8 Winner 1 - Number 8

Comment number 6 Winner 2 - Number 6

Salmon and roast! Two delicious things I too would cook for loved ones at a special occasion! Congrats again and I will be in contact with you soon, through email! Thanks everyone for participating!

Disclaimer : The tickets were given in compliments of Red Agency and I wasn’t paid to run this giveaway. 

The Coconutty Baked Brownie Bites

unnamed-8-1-1

Brownie. Who doesn’t love them? If you don’t, I’m not sure we can be friends. haha Kidding! But brownie is always something I cannot resist. When I see it, I have to have it – warmed, with a scoop of vanilla ice cream. PERFECTO!

There are many different type of brownies, but the ones I love most is crispy on the outside, and fudgey in the middle, and I think I found the perfect recipe!

All baked and cut

Just seeing how the top bit cracks, puts a smile on my face! And being a tad bit OCD and one who is trying to (but failing) lose the baby weight, I decided to cut them into bite size, so that I don’t feel too guilty when having one, or two. hehe

I’m in a coconutty phase, so I decided to add some fine desiccated coconut through the batter before baking and the flavour wasn’t too overpowering. Chocolate was still the major flavour with a tinge of coconut! Mmmm. Plus this wasn’t too sweet. Just the right level of sweetness!

So if you do like your brownie, I urge you to try this recipe, if you haven’t already heard of The Baked Brownie! My dad was here when I made these and he actually said, “How come the brownie from outside doesn’t taste like that?” haha That was one big compliment for me! hehe

The Coconutty Baked Brownie with Vanilla Ice Cream

Coconutty Baked Brownie Bites (Adapted from Pretty Simple Sweet)

 155g plain flour

1 tsp salt

2 tbs desiccated coconut

2 tbs cocoa powder

310g dark chocolate, cut into smaller pieces

230g unsalted butter

1 tsp instant espresso powder

100g caster sugar

100g packed light brown sugar

1 tsp vanilla bean paste

5 eggs, room temperature

Steps :

1) Preheat oven to 180 degrees celcius. Line the baking tin (I used a 9×13 inch rectangular baking tray) with baking paper, leaving some extra hanging off the sides for easy removal of the brownie.

2) In a medium bowl, mix the plain flour, salt, cocoa powder and desiccated coconut together. Set it aside.

3) Put the chocolate, butter, and instant espresso powder in a large bowl and set it over a small pot of simmering water, stirring occasionally, until the chocolate and butter are completely melted and smooth. Turn off the heat, but keep the bowl over the water and add the sugars. Whisk until completely combined, then remove the bowl from the pan. Allow the mixture to cool till room temperature.

4) Add 3 eggs to the chocolate mixture and whisk until combined. Add the remaining 2 eggs and whisk just until combined. Add the vanilla bean paste and stir until combined. Don’t overmix at this stage or your brownies will be cakey.

5) Add the flour mixture to the chocolate mixture and fold until just a bit of the flour mixture is visible.

6) Pour the batter into the prepared pan and smooth the top. Bake in the center of the oven for 30 minutes, rotating the pan halfway through the baking time, until a toothpick inserted into the center of the brownies comes out with a few moist crumbs sticking to it. Let the brownies cool completely, then lift them out of the pan using the parchment paper.

Baked and ready to be cut

Cut into bite sized squares

7) Cut them into bite sized squares and serve them warm with a scoop of ice cream!

Hope you all had a great weekend! Make these and have them today so that you can chase away any Monday blues and have a fantastic week ahead!

Remember to always cook and bake with love! Till the next post, xx.

PS: There will be a give-away in the next post, so stay tuned! (:

BBQ Made Easy with Heat Beads® Chimney Booster

Heat Beads(r)

I love BBQs. It’s just something that could bring everyone together, around the fire, and enjoy the love for food. To me, BBQs are perfect all year round. In the Summer, with a beer or cider in one hand, and a pair of tongs on the other. In Winter, it will act as a heater or a camp fire, keeping us warm and toasty! hehe

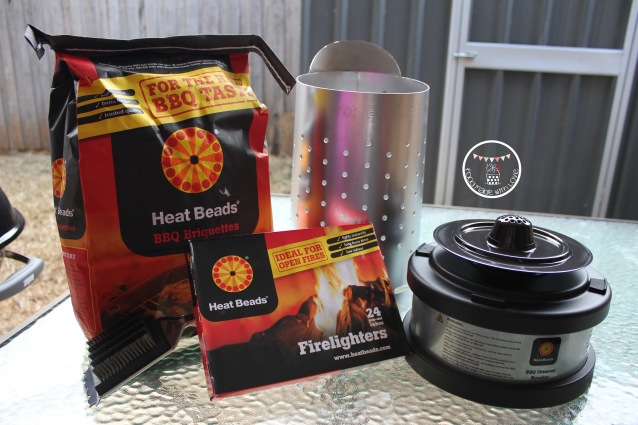
Setting up a BBQ can be tricky and time consuming, depending on the weather conditions. So when KeepLeft PR contacted me and asked if I would like to try the the Heat Beads® BBQ Chimney & Chimney Booster for a quick and easy BBQ experience, I couldn’t say no! I couldn’t be more thankful for the generosity of Heat Beads® as they didn’t only give me the Heat Beads® briquettes, firelighters, the Heat Beads® BBQ Chimney & Chimney Booster, they gave me my dream BBQ as well – The Weber! I was over the moon when the packages arrived!

The Weber BBQ

Heat Beads® BBQ Chimney & Chimney Booster

Instead of the usual hour or more taken to get the briquettes ready for some action, with the Heat Beads® BBQ Chimney & Chimney Booster, you can get your briquettes hot enough for the BBQ in 12 minutes (with a few minutes more if it’s cold and windy)! How amazing is that?? And it’s so easy to use as well! I was a little worried at first, as the Mr is in the USA doing a seminar tour. So I had no help, plus he’s always usually the one setting it up!

Setting up the BBQ Chimney & Chimney Booster

But trust me, it could all be done in a few quick steps!

Put the Heat Beads® briquettes in the Heat Beads® BBQ Chimney, place the Heat Beads® firelighters on the firelighter plate of the Heat Beads® Chimney Booster, light the firelighters using a match or gas lighter, place your Heat Beads® BBQ Chimney on top of the Chimney Booster and turn on the switch!

Lighting the firelighters on the firelighter plate

Now all you gotta do is wait for 12 minutes! I decided to put the Booster to the test, and BBQed on a super windy and cold night. It took 14 minutes for the briquettes to be hot enough to be placed in the BBQ. 14 minutes! AMAZING!

Using the BBQ Chimney & Chimney Booster

By the 12th minute, the briquettes were close to being ready. And how do you know when their ready? The briquettes become ash over, turning a light grey colour. That’s when it’s ready to be popped into your BBQ!

14 minutes, Briquettes were ashed over and ready to go!

With the setting up time reduced to a mere 12-14 minutes, I’ve got more time to cook my meats now! I decided to do a comparison of cooking methods: low & slow vs quick & fast. Heat Beads® is perfect for both! The low & slow would be perfect for days when you have a little more time to spare. The quick & fast would be perfect for busy bees who are working, or have little time to get food time on the table. Trust me, cause now with bubba, all I have is under an hour to get our meals prepared and cooked! So what did I decide to cook? Smoked BBQ baby back ribs (low & slow) and Jamaican Jerk Smoked chicken wings (quick & fast)! Salivating yet? hehe I definitely was, smelling the aromas coming out of the Weber!

Ribs & Wings

All done within 1 1/2 hours, inclusive of prep time! I thought it was pretty impressive, don’t you? You must be thinking, how can it be? Well, I used the 14 minutes taken for the briquettes to be ready to season my meats! A win-win situation if you asked me!

Smoked Bbq Baby Back Ribs

Smoked BBQ Baby Back Ribs (Recipe from Weber’s Time to Grill™ by Jamie Purviance)

Dry Rub :

1 tbs sea salt

2 tsp granulated garlic

2 tsp paprika

2 tsp dried thyme

1/2 tsp freshly ground black pepper

1 racks of baby back ribs, about 1kg

1/2 cup BBQ sauce

Handful of Hickory Wood Chips

Steps : 

1) Soak your wood chips in water for at least 30 mins and drain. Set aside.

2) In a small bowl, mix the ingredients for the dry rub together. Remove the membrane of the ribs and cut them into half to create two smaller racks.
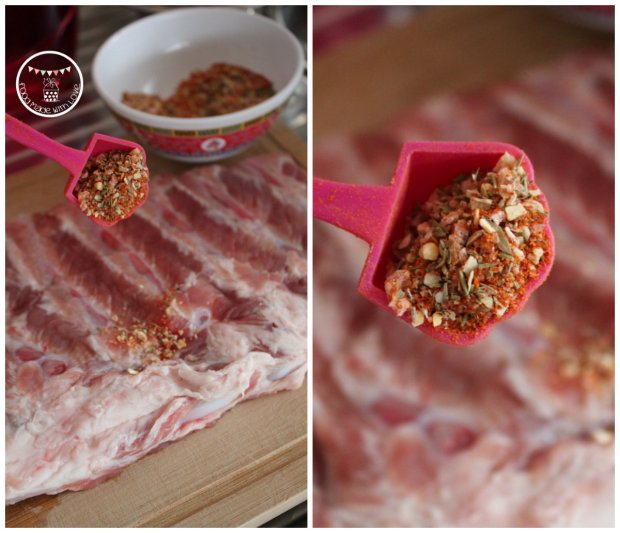
Dry rub - Ribs

3) Season each rack evenly with the dry rub and place the ribs on a piece of foil, wrapping them up well. Double wrap them, making sure there are no holes.

Seasoned and ready to go

4) Place the packet of ribs on the clean grill and cook for 1 hour, with the lid closed, and turning the packets occasionally, making sure not to pierce the foil. At this point, you could go do other things! Go hang the laundry and just put your feet up and have a cuppa (:

Ribs on the bbq

5) Remove the packets from the grill and let rest for about 10 mins. Carefully open the packets, remove the ribs and discard the rendered fat and oil.

6) Place the wood chips onto the charcoal and a a tray of water under the grill. Close the lid and when the wood chips start to smoke, return the ribs onto the grill (above the water) bone side down. Grill and smoke, the the lid closed, for about 10-12 minutes, basting with the bbq sauce, until they are sizzling and lightly charred. Remove from grill and let it rest for 5 minutes before serving with the remaining bbq sauce.

Jamaican Jerk Smoked Chicken Wings

2 tsp Jamaican Jerk Rub (For a quick marinade, I used the one from The Spice Mill)

2 tsp sea salt flakes

10-12 chicken wings

Steps : 

1) Marinade the chicken wings with the Jamaican Jerk spice rub and sea salt and allow it to marinade while the ribs are cooking on the grill.

Seasoning the chicken wings

2) When the ribs are 10 minutes from getting done, I put the chicken wings on the grill and turned it occasionally to make sure it doesn’t burn.

3) When the ribs are smoking, leave the chicken wings on the grill to be smoked as well (for the same 10-12 minutes). It brings the chicken wings to a whole new level of deliciousness! Golden brown and lightly charred. PERFECT!

Grilling the chicken wings

Jamaican Jerk Smoked chicken wings

Have them with some baked sweet potatoes (you can throw them on the grill when you start cooking your ribs) and a side of salad! Dinner is served! (:

Smoked BBQ Baby back ribs

My parents and I were really impressed by how delicious the ribs and wings were! I had so much fun trying out the Heat Beads® BBQ Chimney & Chimney booster and couldn’t be happier with how the meats turned out. I’m sure by now you’re wondering where to get the Heat Beads® BBQ Chimney & Chimney Booster from? Or you want to read more about the Heat Beads® products? Do pop over to Heat Beads® to find out more!

Have a great weekend ahead and always remember to cook and bake with love!

Disclaimer : Lianne@Food Made With Love received the Weber BBQ & Heat Beads® products as a gift from Heat Beads® & KeepLeft PR. Thank you so much for this fantastic opportunity! 

Eclair Affair

IMG_0523-1-1

High tea. Something I love but I don’t do it too often. Nothing beats sitting around a table of delicious sweets and savouries, sipping on champagne or tea, chatting with a group of your closest girlfriends! I was lucky enough to be invited by Q Strategies to the Lobby Lounge at The Westin for their Eclair Affair with Daisy & Agnes!

Domaine Chandon

There are two options available for this delicious high tea. $49 per person is served with Vittoria coffee, hot chocolate or a selection of Jing Tea. $59 per person includes 1 glass of Domaine Chandon and also with coffee, tea or hot chocolate!

Jing tea

As I couldn’t have the champagne, I decided to order a fruit tea to accompany the 3 tiered spread we were having! I love the different selection of teas there are. There’s black, green, white and fruity! (:

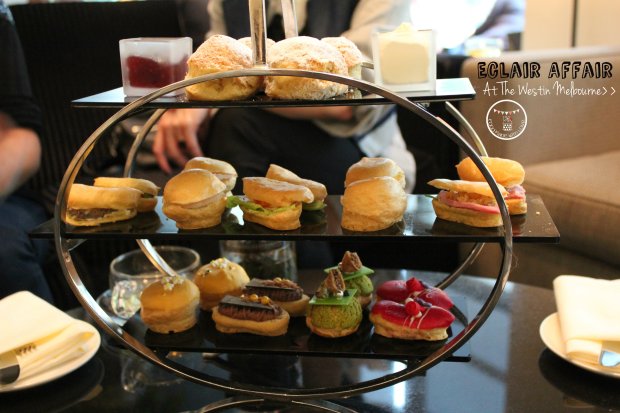
Eclair Affair

And what’s special about this high tea you ask? It’s served with a range of both savoury and sweet eclairs and also some scones! Choux pastry is something I love, especially when it’s thin and buttery. I actually prefer the savoury eclairs more than the sweet ones!

Eclair Affair

The savoury eclairs include :

Mushroom pate with pickled shemiji

Hame, comte cheese, confit tomato and grainy Dijon aioli

Smoked duck, gorgonzola, pear, caramelised walnut and rocket

Prawn, avocado and sweet chilli jam

Goat cheese with pesto

My favourite was the prawn and avocado with the slight kick of the sweet chilli jam. A really good balance of sweet, salty and creamy! YUMMO!

Sweet eclairs

The sweet eclairs include :

Strawberry & Lime

Passionfruit and White Chocolate

Pistachio and Fig

Chocolate & Caramel

I was really excited when I heard about the pistachio and fig, but sadly the one I had wasn’t filled! But I did enjoy the chocolate and caramel one the most! hehe It’s one of my favourite combinations, so definitely can’t go wrong! hehe

Scones

Last but definitely not the least, scones! It wouldn’t be high tea without scones, in my opinion! There’s a serve of vanilla scones and fruit scones! I actually love vanilla scones more with a dollop of cream and jam! Till now, I’m not sure what the right way of having scones. Cream first or jam first? hehe I mix them around and is different every time I have it! hehe

Eclair Affair

So if you’re looking for something different from the usual high tea, so head to the Westin to give this a go! With really comfy sofa seats and a beautiful ambience, it’s definitely somewhere you can consider going with your girlfriends or loved ones! But be quick cause this is only till the 30th of June!

Eclairs are definitely the new cupcakes and macarons! So get in quick! hehe

Disclaimer : I was invited to the Eclair Affair by the Westin and Q Strategies. All thoughts and opinions are based on my experience at the time of the visit. Thank you so much for this wonderful experience and opportunity!


New Autumn Menu : No. 8 By John Lawson

photo 1-1-1

I was so lucky and excited to be invited to taste the new autumn menu at No. 8 by John Lawson a few weeks back. Don’t know if you can remember my first tasting done there and I absolutely loved it! So when another opportunity came to dine back at No. 8, I couldn’t say no hehe If you don’t remember John Lawson, his dishes are driven & inspired by the fresh produce he has around him. In fact, his cooking revolves around sustainably produced ingredients that he can find around locally from Victorian farmers. 

Before I share with you the new menu, I just want to thank John Lawson, the chefs and the staff for accommodating to this expectant woman. hehe Cannot be more thankful that I am still able to dine comfortably and have delicious food! (:

Whole wheat and beer sourdough

So like always, the night starts with beautiful slices of bread made by Eds Breads! If you follow me on instagram, you would know that I often buy my breads from him and have them for my breakfast! Unfortunately, I was late due to work, so I didn’t get to try the newly created – whole wheat and beer sourdough. But lucky for me, we were all given a loaf to bring home! YAY! hehe Love the crunchy outer crust and a soft centre. There isn’t one loaf of his I could fault!

Wheat berry and baby carrot salad

The first course was the salad course : wheat berry and baby carrot salad ! I absolutely love the wheat berries. They have a nutty flavour to them and really good bite too! This was also served with jerusalem artichokes turnips and sunflower shoots! A really colourful and refreshing start to the night! This was paired with a gin & tonic, which I didn’t have, of course. But I can imagine what a good match it would be! hehe

Mildura yabbies, hervey bay scallops and pine mushrooms

The next dish was a show-stopper in my opinion! When it arrived in front of me, I could feel my jaw drop! How pretty is that? Perfectly cooked Mildura yabbies, that were so fresh and sweet with Hervey Bay scallops and pine mushrooms! What a great entree! Every seafood I love on a plate! Actually on a gorgeous scallop shell! Absolutely loved this dish.

Slippery Jack mushroom risotto

And the dishes just gets better and better! When I looked through the menu before dinner started, this was the dish I was really looking forward to! Risotto, when cooked perfectly, is my weakness. I could have a huge plate of it and still want more. hehe This, my dear readers, was absolutely delish! Every mouthful I had was bursting with mushroomy flavours, and the rice was creamy and cheesy! SO GOOD! Ticked all the right boxes! Hands down my favourite dish of the night! NOMS!

Milawa duck breast

The main for the new autumn menu was Milawa duck breast! As it was cooked medium rare to medium, I couldn’t have it. But from the sounds made by everyone sitting around me, I knew it was as good as the first time I had it! This time it was served with pear, brussel sprouts and foie gras sauce. How good does that sound? hehe Have to head back another time to try it! hehe

Flat iron steak

Lucky me though, a special dish was cooked for me – flat iron steak! I’ve not had this cut of steak before, but it was so tender and though it looked like it hasn’t been cooked through, it was! Every piece just melts in my mouth and goes so well with the slices of beet root! AMAZEBALLS! I was trying to savour it slowly, but I found myself finishing it before I knew it! haha

baked potato with cheddar and crispy pig

We were also served a side of baked potato with cheddar and crispy pig! Holy moly! This was everything I was craving for in my pregnancy! Lucky thing we shared among the 4 of us, or else I would have smothered my face in it! Don’t worry there was also a side of cosberg, kale and mustard leaf, but I was so engrossed in eating the potato and steak, I forgot to snap it! hehe

72% Cocoa and coffee fondant

Now, time for the sweets! Though I was already quite stuffed, but there is always room for dessert right? hehe There were two on offer again tonight, and this was the one I didn’t have cause they were worried the chocolate wasn’t pasteurised. 72% Cocoa & coffee fondant! Let me tell you though, the smell of the chocolate filled the table as they were being served! So delicately plated too!

Gooey middle

Of course, when you are served a fondant, the money shot would be when you cut it open! Sorry the photo is a tad dark, but can you see the shiny bit of chocolate oozing out? Definitely a perfectly cooked fondant!

IMG_0452-1

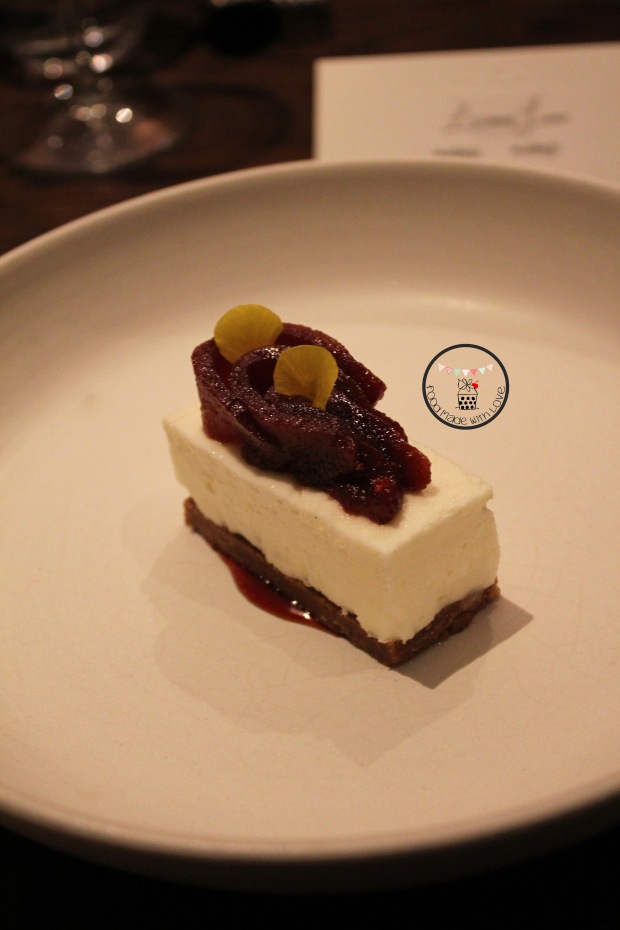
I had the slow poached quince, spiced crumb and yoghurt! The last time I was at No. 8 I had a yoghurt dessert too! Such a good way to end the night though. Light, refreshing with the sweetness of the poached quince! I definitely wanted more! Mmmm (:

Occelli testun in foglie di castagno

Something new was a fromage course : Occeelli Testun in Foglie di Castagno! haha The name was a tongue twister and I have to admit I googled just to see what it was! hehe It’s a cow and sheep milk cheese that is wrapped in chestnut leaves for 18 months! My constant craving has always been cheese this whole pregnancy, but sadly I couldn’t have this cause it was soft cheese! The smell was divine though! It was matched with a Grey Box honey from Castlemaine. Sweet and salty – match made in heaven I’m sure!

Chocolate and passionfruit truffle

Last but definitely not the least, we were given beautiful chocolate and passionfruit truffles to end the night (: Dark chocolate that is subtly bitter contrasting with a sweet passionfruit filling!

Once again, the food was outstanding and I highly recommend you to head down to No. 8 at Crown Melbourne to give the new menu a go! You definitely won’t regret it! (:

Disclaimer : I was invited to the launch  by Hatch Communications and No. 8 By John Lawson. All thoughts and opinions are based on my experience at the time of the visit. Thank you so much for this wonderful experience and opportunity yet again!

No. 8 by John Lawson (number 8) on Urbanspoon

Turning 28 At Nieuw Amsterdam

IMG_9898-1

Turning a year older is no doubt a special occasion. But this year, it was really special to me. Next year, I will be celebrating as a mum! (: Can’t be any more excited about that! As we get older, birthdays just become a time where we head out to have good food. No longer did we have the huge celebrations, just quiet ones now, which I actually enjoy more! Just a small intimate affair with my loved ones. hehe

Nieuw Amsterdam

Address : 106-112 Hardware Street

Melbourne Vic 3000

Website

Nieuw Amsterdam has been on my to-go list for a while now, so I knew exactly where I wanted to go to celebrate turning a year older! Absolutely loved the atmosphere when we stepped into this American Bistro, and the wait staff were really friendly as well!

Our drinks

Being pregnant, I couldn’t have any alcohol, so I ordered lemon lime bitters instead. The sister-in-law couldn’t resist the cider and the Mr had a dark beer (sorry I didn’t get the exact name! haha). The food at Nieuw Amsterdam are mainly sharing plates and that’s exactly what we did! Although we did order quite a bit. haha We were definitely hungry (:

New York Sour Dough

The night of food started with a loaf of New York sourdough with some beautiful creamy butter! It had a really crispy outer crust and the bread was still soft in the middle. We definitely wanted more of it, but was reserving our stomach space for the food we ordered! hehe

Pig trotter and ham hock nuggets

These little gold nuggets were absolutely delicious! With a great crunch with every bite, the mixture of pig trotters and ham hock just melts in your mouth and you wouldn’t be able to resist going for more! Sitting on the nugget is a thin slice of a pickled radish, which cuts through the richness of the dish. AMAZING!

BBQ Scallops with mango gazpacho, avocado and chilli

Our second appetiser is perfectly cooked BBQ scallops sitting in mango gazpacho, with avocado and chilli! Scallops are one of my favourite ingredients of all time. I could have it in any way – sashimi, pan fried, grilled. Give it to me! haha Though it seems like there is a lot of flavours going on, but everything worked together!

Chicken waffles

I was craving for waffles for the longest time, so when I saw this on the menu, I couldn’t resist! A thin waffle topped with chicken terrine, pate and a super crispy chicken skin! YUM! Don’t worry, I didn’t have my pate hehe but it was still delish! The small but mighty chilli jam just brings the whole dish together and the flavour of sweet and spicy just bursts in your mouth! I was one happy girl! hehe

Southern style pork belly chops

This, my dear readers, was the best dish of the night. Tender and melt-in-your-mouth pork belly which was just full of flavour, topped with pork crackling and sauerkraut! Couldn’t get enough of it and just wanted to devour the whole bowl!

Southern style pork belly chops

Absolutely divine! A definitely most order dish when you do head there! (:

Jerk chicken

The Mr chose the jerk chicken dish with crispy rice and black bean puree! The jerk chicken was tender and had a good chilli kick to it and went really well with the crispy rice! The only down part of this was the pineapple salad, which really was just pieces of pineapple, and was a tad bit sweet for my liking.

Smoked beef brisket

I chose the last main : Smoked beef brisket with carrot remoulade! I requested for the beef to be cooked through, and it wasn’t tough! Wheee! (: So thankful that the chefs were happy to accommodate to my dietary requirements!

Dutch potato fries with spiced garlic mayo

As a side, we got the dutch potato fries with a side of spiced garlic mayo! Can’t turn down crispy thick cut fries. Simple but delish!

The Nieuw chocolate bar

As we were all quite full by the time we finished our appetisers and mains, we decided to share just one dessert. The one that caught my attention is the Nieuw Chocolate Bar! When it came, I couldn’t be happier with my choice! A rich and decadent chocolate bar topped with banana cake, brûlée bananas and tonka bean ice cream! It was so yum I wanted to have another, though there wasn’t much space left in my tummy. haha

 It was definitely a great night and I can’t thank the Mr and sister-in-law enough to celebrate this special day with me! Nothing beats celebrating with loved ones and having great food is just the icing on the cake! Will definitely be back to try the other dishes on the menu! hehe

Nieuw Amsterdam on Urbanspoon


Have a great weekend everyone!

Remember to always cook and bake with love! 

New Found Gem : Mr. Brightside

Mr. Brightside

Brunch. Something I truly truly adore and look forward to on weekends! It was the long weekend last week, and the Mr and I were looking for a place nearby to have brunch. We usually head to our usuals favourites in Bentleigh (Merchants Guild & Little Tommy Tucker), but we really wanted to find something different, and still close by!

Thank goodness for Eat Fresh Eat Local (twitter: @FreshBestLocal) l who introduced me to The Homemaker Report, I found a place that was just 10 minutes away from our place – Mr Brightside !

Mr Brightside

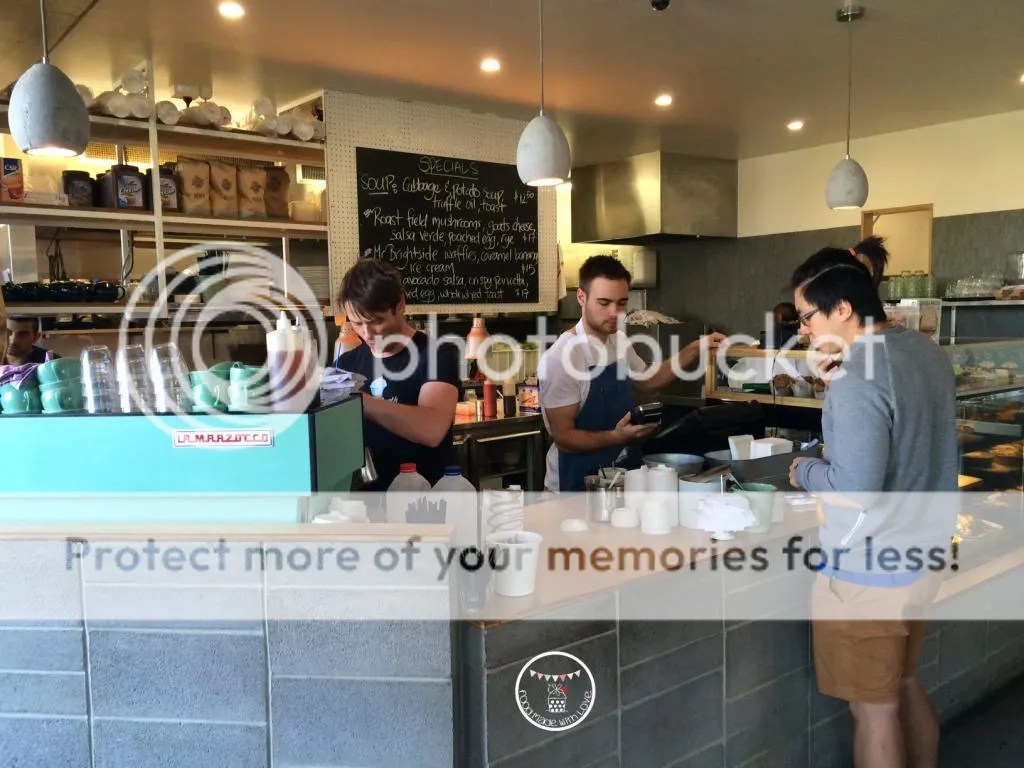
A cosy cafe tucked in the corner, it was just filled with locals who knew one another. We were greeted with warm smiles by the staff and as it was pretty packed, we sat outside. But no fear, there were heaters right above us to keep us warm and toasty!

Our usual drinks

We also ordered our usual drinks to keep our tummies warm! The mr had a latte, I had Calmer Sutra soy chai latte and Melissa had her favourite hot chocolate! I pretty much knew what I wanted to have when I saw the menu online before heading there, but I knew they had specials for the day too, and asked the Mr to help me check the board. One of the staff (wish I got his name!) joked with the Mr and said now we aren’t able to hear him say it in his special voice! haha Too funny! He came out shortly after to explain what the specials were. SO FRIENDLY! Seriously love the service at Mr. Brightside! Made brunch a lot more enjoyable!

Challah French Toast

I still decided on the challah french toes with maple syrup and mascarpone! There’s an option of adding bacon, and how could I not?? Maple syrup and bacon is the best combination! This was my kind of heaven. The challah toast was crispy on the outside and still soft in the middle. Together with the mascarpone, absolutely delish!!! If you want a good french toast, this is it!

Potato hash brown

Whenever there is a potato hash on the menu, the mr would definitely order it, and this was no different! He loves his hash, and this hash he absolutely loved! In fact, he said he might have found the best hash he’s had! Super golden and crispy, with a moist and tender centre! Can’t get better can it? It is served with beef brisket and he added a side of mushrooms!

Perfectly poached eggs

When the Mr cut into the poached egg, liquid gold was spilling out! I have to admit, poached egg is one thing I do miss to have for breakfast!

Big Breakfast

Melissa ordered the Big Breakfast and boy, they weren’t joking about it being big! 2 sausages, bacon, roasted tomatoes, scrambled eggs, potato hash and toasts! She could hardly finish it and was filled all the way till dinner!

Mr. Brightside

We were all so happy to find Mr. Brightside, with delicious food and super friendly staff, there’s no doubt that we will be back again and very very soon! I bet you want to head down for that plate of french toast now! hehe

Happy weekend everyone! x

Mr Brightside on Urbanspoon

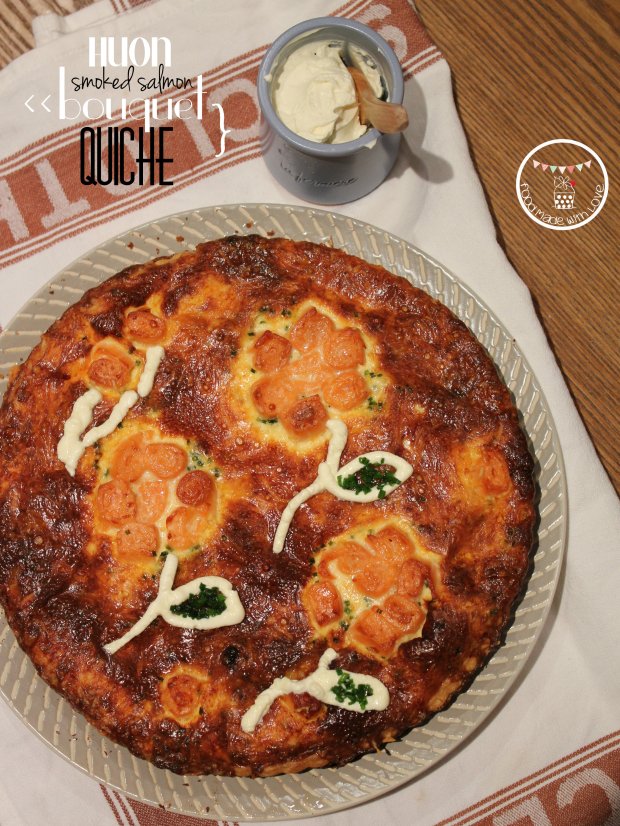
HUON Smoked Salmon Bouquet Quiche

IMG_9891-2-2

I’m late, I’m late, I’m late! That was the only thing on my mind when I was trying to come up with something to make for the HUON Blogging Challenge as the post is due tomorrow! I have to admit, I was a bit hesitant to take up the challenge as we had to use smoke salmon and the only way I could have it is cooking it!

HUON smoked salmon banquet rolls

While looking at the HUON Reserve Selection range and deciding on what I should get, I was drawn to the banquet rolls immediately! If only I could have them as is, cos I would love to have man a roulette out of it! Oh wells! haha Have to concentrate on what I can have!

ingredients used

So I did what I usually do to get inspirations for the dish I want to make – walk down the aisles of the supermarket! It’s seriously the best place to come up with ideas for what to cook! Absolutely love doing it. hehe So I decided to make a quiche, for the first time! I know, what’s so exciting about a quiche? Well, I decided to make it look very different from a usual quiche, turning the salmon rolls into bouquet of flowers!

Smoked salmon bouquet quiche

I was super nervous making it because I’ve never made a quiche before, and I didn’t know if the shapes were going to last through the baking process! Thank goodness, the flowers were still “blooming” when I took it out of the oven. HOORAY! It worked! hehe The mr and sister-in-law really enjoyed it too! That’s always a plus! (: So here’s the recipe! Hope you will enjoy it as much as we did!

Smoked Salmon Bouquet Quiche (Serves 4-6 people)

For the sour cream short crust pastry : (Recipe from Maggie Beer)

125ml sour cream

250g plain flour, extra for dusting

200g butter

For the filling : 

200g HUON Reserve Selection banquet rolls

1 leek (white part, halved lengthwise and thinly sliced)

8 mushroom cups, sliced

10g chives, finely chopped

6-8 sundried tomatoes, finely chopped

1 tbs olive oil

10g unsalted butter

salt and black pepper, to season

200ml thickened cream

150g shredded cheddar

4 eggs

Steps :

Kneading the dough into a ball

1) For the short crust pastry : Preheat the oven to 200 degrees celcius. Dice the butter then pulse it in a food processor with the plain flour till it resembles bread crumbs. Add the sour cream and pulse it further till it resembles a dough.

Rolling out and dough and blind baking

2) On a clean surface, dust a bit of plain flour and knead the dough into a ball. Wrap the dough in cling wrap and allow it to rest in the fridge for 20 minutes. Roll the pastry out to 3-5mm thickness and roll it over 24cm quiche baking tin that has been oiled. Blind bake the pastry for 10-15 minutes, or until it’s lightly golden. Allow it to cool while preparing the other ingredients.

Lining the tin with the pastry

2)  For the filling : Heat a large heavy-based pan on high and add the olive oil. Fry the leek till soft and fragrant, then add the mushrooms. Season with salt and pepper and allow the mushrooms to fry till slightly caramelised. Add the butter and fold in the mushroom mixture. Set it aside and allow it to cool before placing it in the pastry case. Sprinkle the chives and sundries tomatoes evenly around the pastry case.

Frying the leek and mushroom mixture

3) Cut each banquet rolled salmon into half and place them in a shape of a flower. ( I did 3 large flowers, and 3 small flowers. But you can do as many as you like! Bring out your artistic side! )

4) Combine the thickened cream and eggs in a bowl and mix them till well combined. Pour it slowly into the case and around the smoked salmon, careful not to get any on.

eggs and cream mixture

5) Top the quiche with shredded cheddar, once again avoiding the smoked salmon.

6) Reduce the oven to 190 degrees celcius and bake the quiche for 35-40 minutes, or until the egg mixture is set and the top is golden brown.

Smoked salmon bouquet quiche

7) Serve with a side of salad with your favourite dressing and with extra sour cream to go with the quiche! Indulgence! ENJOY!

Quiche with a side of salad

I have to say I really enjoyed making those flowers out of the smoke salmon rolls! To make it look more like flowers, I piped stalks and leaves using the sour cream and fill the leaves with chopped chives! hehe I’m no artist, but I think this is the best I could do!

Hope you enjoyed the recipe, and do give it a try! I didn’t get to eat the smoked salmon on it’s own (before cooking), but the mr and sister-in-law said it was delicious and not as salty as the others they’ve had! Which is always a plus! Have a great weekend everyone!

Remember to always cook and bake with love! Till the next post, xx